Have you considered leveraging the power of Google Ad Manager (Previously known as DFP) and Advanced Ads to show floating creatives, popups, and other out-of-page creatives on your site?
Look no further. This tutorial will explain how to run out-of-page creatives through Google Ad Manager and the Advanced Ads Plugin. Check out the explanation about out-of-page creatives for insight on what we’re talking about, and try them on your site. Your site’s ad performance will thank you for it!
Table of Contents
What do we mean by out-of-page creatives?
Love them or hate them! Out-of-page creatives might be to ads what wide-legged pants are to fashion: the trend that keeps dying a brutal death, only to make a come-back a few years later — supposedly “having changed.”
Remember those popups that you so hated back in the early 2000s? It seems that, with the pandemic, they’ve come back, and now they are seemingly as indispensable to ad monetization solutions as sanitizers have become to all of us.
Out-of-page creatives are conceived not to fit in with the content of your site. Unlike a regular banner, say, a 728×90 that you’d stick at the bottom of your page, out-of-page creatives “float” on top of your site’s content, popping up and temporarily hiding your content to fully grab your reader’s attention, such as in the example below.

As you can guess, these can be sticky or not, and they might even be made to stick “to the bottom of the page.”
But no matter how you’ve configured them, the benefit of this type of creatives is that they truly stand out. On the flip side, if abused, this kind of attention-seeking ad might disrupt your user’s experience. One floating ad occasionally popping out of your page is added value. A floating ad, a floating video, and a sticky banner alongside both on the same page is overkill.
Both ad networks and ad servers offer various types of out-of-page creatives. Today we will focus on Google Ad Manager ones and how to integrate them into your WordPress site.
Differences in how Google Ad Manager and Advanced Ads handle popup banners
Before we jump into an explanation of how to run out-of-page Google Ad Manager creatives in Advanced Ads, let’s start with a word of caution. There are some differences in how Google Ad Manager and Advanced Ads handle popups.
The most relevant difference between the two types for publishers is that while you can retrieve the code for an out-of-page ad in Google Ad Manager, this code does not automatically result in a popup or sticky ad on your WordPress website.
Instead, this code actually contains only the content of the ad. To embed this ad code as an actual out-of-page ad, you need a plugin like Advanced Ads.
We’ve summed up the differences in the table below:
| Out-of-page in GAM | Out-of-page in Advanced Ads | |
| Definition and behavior | You’ll find two types of “out-of-page” ad units in Google Ad Manager: The first is a fixed size ad unit, given the size of an interstitial/out-of-page, coded as size 1×1. This ad unit size is meant to be used as an interstitial on mobile apps (Appearing between layers of content) or as a popup on websites. The second type refers to a creative-behavior setting, implemented at the tag level of the ad unit by selecting “Enable out-of-page creative”. It is crucial to understand that what makes the ad “popup” is the enablement of the out-of-page creative in the ad unit tag, regardless of the ad unit size. | What makes an ad unit in Advanced Ads behave as an out-of-page or popup unit is the placement it gets assigned to, called popup or sticky placement. |
| Reporting | Out-of-page ad units in GAM come with some reporting restrictions. For example, there may be limits on how well Active View data is measured for out-of-page creatives. You might need Macros to ensure other metrics are tracked as intended, such as clicks and impressions. | Advanced Ads offers reliable impressions and clicks reports through Ad Manager, but Active View reporting won’t be available for out-of-page ads. |
| Restrictions and other targeting settings | Out-of-page ads in Google Ad Manager support the use of key-values. | There are some restrictions in Advanced Ads on using Google Ad manager key-values in tandem with a popup placement. |
Now, we’ll look at these differences one by one, starting with the definition and behavior of floating banners in Advanced Ads.
The behavior of floating banners in Advanced Ads and implications for your ad unit structure in Google Ad Manager
As we’ve highlighted, what makes a Google Ad Manager or other ad units in Advanced Ads behave as a popup banner is the popup placement that the ad is assigned to.
This fact implies that, technically, you could select any of your GAM ad units to serve a floating banner.
However, this is not what we would recommend.
Why?
Reporting, reporting, reporting!
Create your Google Ad Manager ads wisely
To go with a specific example, let’s say that you have an ad called “Mysite_home_banner” supporting sizes 300×250 and 336×280. You configured this banner to appear in several places on your home page. And you’ve, in fact, encoded it in two different Advanced Ads ad units: “Mysite_home” AND “Mysite_home_out-of-page.”
Only the second Advanced Ads unit is assigned to a popup placement. But both ad units run the same GAM ad.
When, further down the line, you try to run a report to figure out how your out-of-page banner is performing, what you’re bound to find with such a setup is the performance of your GAM Mysite_home_banner ad broken down by size, but not broken down by behavior.
If instead, you were to use a specific GAM ad unit for your popup placement, you would simply report on the performance of that ad unit, aside and separately from all of your other GAM ad units.
This is critical in case you’re using the popup to offer a special placement to your advertising clients and leveraging popups or sticky bars to communicate special offers or time-limited features to your clients. In either case, in fact, you would want to know the specific performance of the popup only to be able to compare it with the rest of your advertising efforts.
For example, let’s say you were to observe that the offer you’re promoting via a popup is performing twice as well as that same offer at the bottom of your page. That could be an indicator that your bottom-of-the-page offer is invisible to your clients. Or it is not configured in a way to generate enough interest.
Bottom line: create a separate Google Ad Manager ad unit to run into your Advanced Ads popup placement via a dedicated AA ad unit.
Restrictions in terms of targeting and reporting
One great benefit of using Advanced Ads to traffic your floating banners is that handling your GAM ads via placements to make them float makes the entire process easier and more seamless for you.
However, it’s only fair that it does come with limitations, chiefly in terms of targeting.
Key-values targeting
Key-values targeting allows Google Ad Manager to show ads based on your site structure, allowing you, for example, to target a specific post category instead of, say, all of the entries on your blog. Because of how targeting is configured in Ad Manager, Google Ad Manager might not find an ad matching your targeting criteria. In that case, the ad unit on your site might stay empty.
This doesn’t happen because the code of the ad unit is missing on your site. Therefore, if you’re targeting a popup, then the popup would still show, though without an ad to display. This is problematic because popup and sticky placement types often come with an overlay displayed when you enable this option, even if the ad remains empty.
The solution is to use Display and Visitor Conditions in Advanced Ads to remove the ad unit code from pages where you don’t intend to show these ads. Find more information on setting up conditions below.
Reporting
There may be metrics that Google Ad Manager cannot track optimally when ads are trafficked as out-of-page when it comes to reporting. For example, Active View, because of the restrictions of measuring size when the creative-rendering behavior isn’t properly captured by the corresponding <div>. Usually, the way to go around this limitation is to ensure that all trafficked creatives leverage macros.
Bottom line:
- Avoid having to rely on Google Ad Manager key-values to target and report on different out-of-page ad units.
- Refer instead to Visitor and display conditions in Advanced Ads.
- Make sure you use macros, including click macros, to track creatives you’re trafficking as popups properly.
How to implement Google Ad Manager out-of-page creatives in your WordPress site with Advanced Ads
Now that the definitions are out of the way let’s walk you through how to create a specific banner ad in Google Ad Manager to be run as a popup in Advanced Ads.
This tutorial will also explain how to make your banner “popup” or stick somewhere on your page and control frequency and positioning.
Let’s get started.
Create an ad unit in Google Ad Manager for your out-of-page (Floating) campaigns
As for other Google Ad Manager tutorials, the first step is to head over to Google Ad Manager and create a new ad unit. As a reminder, here’s how you do it:
- Go to Google Ad Manager and select the ad unit tab.
- Create a new one, and give it a name. We’d recommend giving it a defined name, such as mysite.com/floatingbanner.
- In the ad unit settings page, under “Sizes,” choose “Fixed size”. Then select the creative size you’d like to display.
As highlighted above, this is crucial: there’s no need to choose “Out-of-page (Interstitial)” (Which is a size 1×1) in this step because you’ll make the ad unit float through the Advanced Ads placement. What is key is that you know the size of the popup or floating ad you want to display. For example, you might choose a size 320×50 for a sticky ad to show it on mobiles only, or a size 550х480 or 1000×250 for a floating ad intended to perform a take-over of your welcome page.
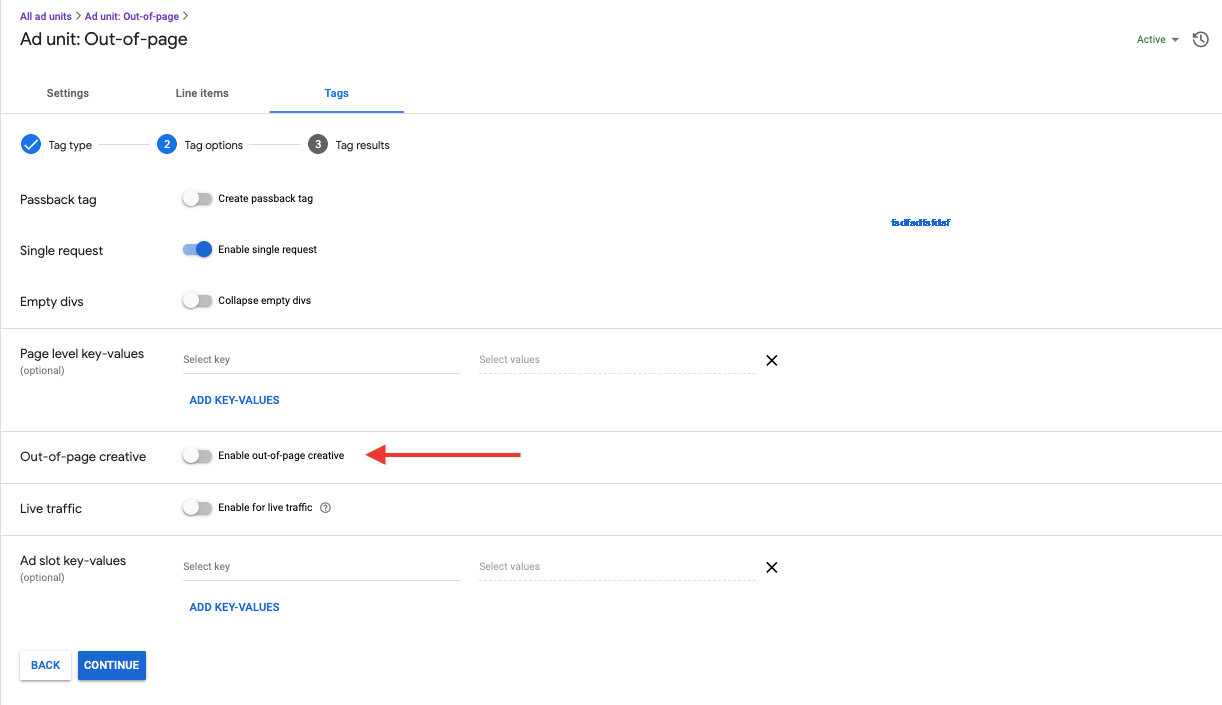
- When you’ve assigned the right size, hit “Save.”
- Go to the Delivery tab. Create an order and line item targeting this ad. Add as many creatives as you need to show, and ensure that your line item settings match the settings you’ll select in the Advanced Ads condition settings. For example, avoid targeting different key-values pairs in both places.
Import an out-of-page ad into Advanced Ads
Next, it is time to head over to Advanced Ads for the second phase of the implementation. Follow the steps below to continue:
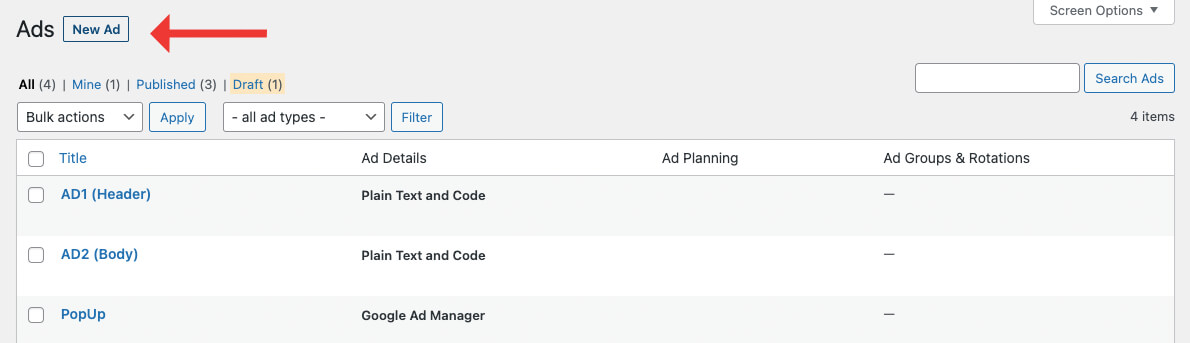
- In WordPress, find “Advanced Ads” and select the “Ads” tab.
- Click the “New Ad” button.
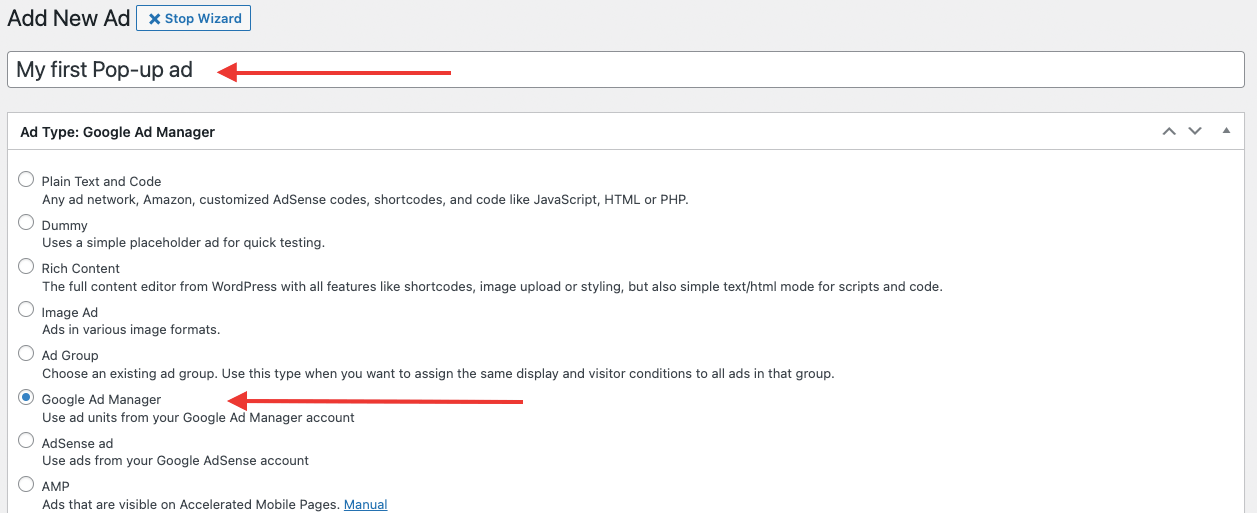
- Give it a name, such as “My first Pop-up ad.”
- Choose ad type = Google Ad Manager, as shown below
- Next, Advanced Ads will prompt you to select the ad unit from your Google Ad Manager account. In my example, this ad unit has the name “Out-of-page.”

- Select the ad size you’d like to target: the available ad sizes will depend on the ones you’ve added to your GAM ad unit. In this case, we’ll choose 300×250.
At this point, you have a few crucial decisions to make.
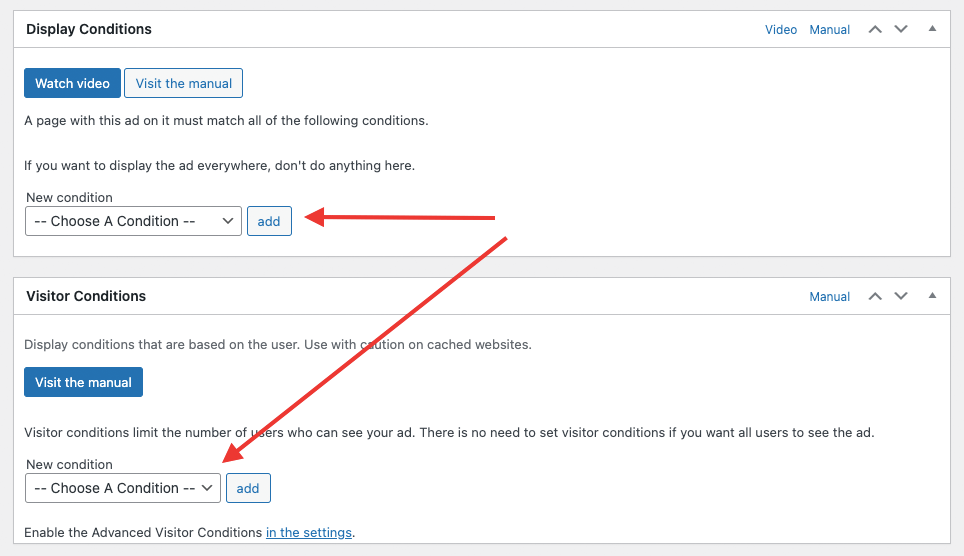
As a matter of fact, the popup placement you’ll choose next works by default on all of the pages of your site. Because of that, it might be wise to select at this stage if you’d like to limit your popup ad to a specific subset of pages or to limit its number of impressions by adding a frequency cap.
The best way to do this is by applying some specific Display or Visitors conditions, as shown in the image below. For example, among Display conditions, the Category condition would allow you to limit delivery to content belonging to a specific post category. In contrast, the Paid Membership Pro condition would give you the option of excluding your popup ad from pages that are only accessible behind a paywall.
On the other hand, the visitor conditions allow you to limit impressions based on the profile of your users. For example, you might establish that the popup should never show up more than three times to the same visitor or that it should never appear to visitors in a specific location.
This is crucial: there’s no need to choose “Out-of-page (Interstitial)” in this step because you’ll make the ad unit float through the Advanced Ads placement. Instead, you’d want to know whether the floating ad you want to display looks like a sticky ad on mobile (Usually, that would prompt you to assign it a size such as 320×50) or whether you’d want it to be more like a takeover (Of size 550х480, or even 1000×250).
Another option you have in the ad wizard is to select positioning. In this case, we’ll choose “default”.
Once you’ve selected all of the correct settings, you’re ready for step 7.
Embed an out-of-page ad into your website
- Hit “Publish!”
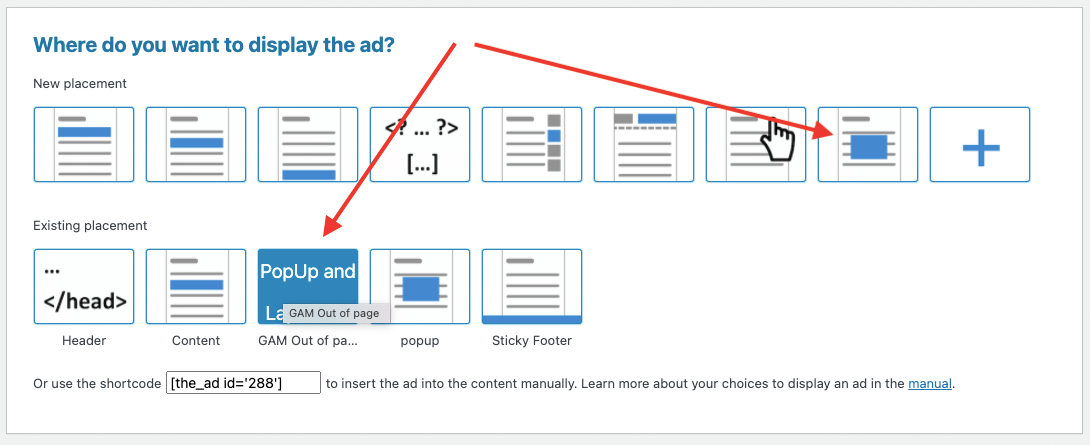
Afterward, you can choose the placement for your ad. Select “PopUp and layer” to create a new placement or choose one “Pop-up and layer” placement you’ve previously created.
Again, this is the crucial step. Unless you assign your ad to a “Pop-up and Layer” or sticky placement, it won’t float or stick to the bottom of the page and will not appear at all.
At this point, you’ll see a message saying: “Congratulations! Your ad is now visible in the frontend.”
This is your clue that the popup ad is now live on your site.
Suppose you haven’t added visitor conditions before and find the popup overwhelming. In that case, this is an excellent time to review your ad’s visitor conditions and add a maximum number of impressions per user.
Want to get even more creative?
Remember that you have the option of placing your floating banner exactly where you want it to appear on the page. For example, you could choose a sticky placement (Which doesn’t float away as users scroll down your site) and select whether it should stick to the left/right, to the bottom, or the top of your site.
Alternatively, you could edit your placement to control when you want to show the ad. For example, limit the popup to show it after the user has started scrolling down your page or other effects (For instance, allowing the popup to fade in or slide).