Imagine that you’re running a blog with three categories of content: sports, nutrition, and wellness. You want to allow one of your clients — a sports gear company — to only appear on your sports pages and another — a snack bar advertiser — to only show its ads next to articles about nutrition.
Now, if you’d implemented Google Ad Manager some years ago, you’d have to create different ad units to achieve this and manually place them on the pages accordingly. Hence, you’d have to put your “sports” ad unit only on sports pages and inject the “nutrition” ad unit into the nutrition pages. But since Google introduced key-value pairs, using tons of ad units has become obsolete.
With key-values, you can use the same ad unit on all pages. You would then use key-values to target nutrition content vs. sports content. It’s easier, faster, and allows you to sell your inventory more granularly and at a premium, while offering each of your advertising clients the reach and ROI, they are looking for.
In this tutorial, we’ll take a look at how to configure key-values in Google Ad Manager and on your WordPress site so that you’ll be able to target your line items against such classifiers (aka, keys) as the post category, tag, or placements.
Table of Contents
The function of key-values in real life: example of a blog
To start, we’ll be working with a blog in-the-making, including three posts:
- Lorem Ipsum A
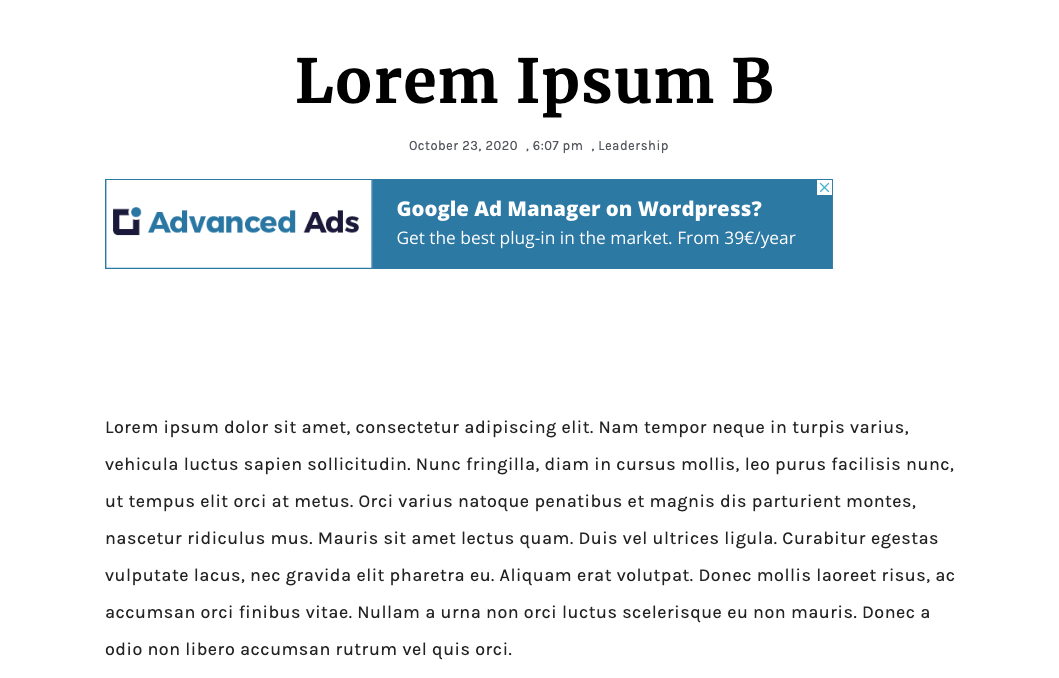
- Lorem Ipsum B
- Lorem Ipsum C
As you will see, each article belongs to a different category. Lorem Ipsum A discusses Business, Lorem Ipsum B Leadership, and Lorem Ipsum C belongs to Finance.

I need the key-value targeting because I am currently working with a “picky” advertiser. The advertiser, which I’ll call “Advanced Ads” (not to confuse with our WordPress plugin), wants their ads to appear on my blog, but ONLY next to articles dealing with Leadership topics.
We can promise and ensure such a deal, leveraging custom targeting with key-values.
How to set up key-values (aka. Custom targeting) in Advanced Ads
To set up custom targeting, I would first head to my WordPress dashboard and ensure that the Google Ad Manager Integration add-on is activated.
Now, navigate to Advanced Ads > Ads and click on “New Ad”.

In this example, I name this ad unit “Advanced Ads” and select the AdvancedAds ad unit, which I have previously created in my Google Ad Manager account.

Next, I’ll scroll down to configure my ad sizes and the Key-value options to target specific categories.
Note: The ad sizes available will depend on the ones I have configured in my Google Ad Manager account. In my case, I want this ad unit to target 970×90 for large screens and 300×250 for smaller screens. Therefore, I’m simultaneously leveraging the responsive feature to configure my ad unit properly. You’re welcome to skip this step if you already configured the ad in a way you’d like it to be!

You’ll see the Key-value targeting box below the size settings. In my case, I have already created one key, which I have named “postcategory”.
And what if I want to target that same ad unit with multiple key-values pairs?
Then, I would add all of the targeting keys that I need to use in the Key-Value targeting section. For example, imagine that I want to target my Advanced Ads ad unit together with the targeting key “postcategory” and “placementID”. I would add both to my ad configuration in Advanced ads, as shown below:

Note: You can set up different key-values for each ad in Advanced Ads. Of course, they can be the same for other Ad Manager units. You can also deliver the same ad unit with different key-value pairs. In that case, create multiple ads in Advanced Ads with the same ad unit assigned to it.
Custom targeting options through the Advanced Ads plugin
As you can see in the screenshot below, Advanced Ads has already configured a significant number of Targeting keys for various uses. Except for “Custom key”, their values are automatically filled with the correct information.
The name of the key is up to you but needs to match precisely to the key you set up in your Google Ad Manager account. I will make suggestions for namings that proved to be helpful in the past.

We’ll look at them in-depth below:
| Post types | This type allows me to target specific post types. The value is filled automatically with the post type slug, e.g., “post” or “page”. |
| Page slug | The slug of the current post, page, or archive. This option would allow me to target specific blog posts or pages within my site. For example, let’s imagine my site uses the same ad unit for all product pages, but I intend to target my ads against one specific product page. I could use the Page slug type to set up the targeting key “pageslug” and target it against “promotion-of-the-month” if the URL of the specific product page I wanted to target was: mysite.com/promotion-of-the-month. Keep in mind that the value only contains the part of the URL for this particular page. If you are using subpages like mysite.com/products/promotion-of-the-month, then “products” will not be part of the value. |
| Page type | The Page type delivers four different values: – single – on single post or pages – archive – on archive pages like a category overview – home (if the front page lists your posts), or blog (on the blog page). |
| Page ID | The ID of the current post or page. This option works similarly to the page slug (Allowing me to target specific pages) but based on their ID rather than the URL slug. It can be handy because, while you might forget about your targeting and change the slug, you probably wouldn’t change a page’s ID accidentally. |
| Placement ID | This option allows you to target a specific Advanced ads placement based on the ID. If you have a placement called “Before Content”, the value of this key for an ad unit delivered through this placement would be “before-content”. This configuration allows you to target the same ad unit in different placements. |
| Post meta | Advanced WordPress users can target “Post meta” values if they know how to retrieve them. Only string post meta values are supported; arrays are not. |
| User meta | The same as “Post meta”, but for User meta values. |
| Taxonomy | Taxonomy of archive pages, e.g., the value would be “category” on category archive pages. |
| Categories/Tags/Terms | The category, tag, or any other taxonomy term. When adding this option, you can choose whether it should send the key/values pair also on archive pages, like category lists. |
Last but not at all least, we have the Custom key. It enables you to track any specific value, which is not “automatically” filled with a value from your site. Ideally, it would be best if you didn’t have to use it, as the existing targeting keys in Advanced Ads allow you to target the most common values in WordPress. Keep in mind that the “Custom” targeting key works with the same static value everywhere it is used. If you intend to target different custom key/values for the same ad unit, you would have to create multiple ads in the Advanced Ads plugin for that ad unit and attach a different custom key/values setting to each.
NB! Do remember that it is not enough to set up the Custom key in Advanced Ads. You have to set it up in Google Ad Manager as well. That’s what we’ll look at next.
Using post meta data for key-values targeting
When using the value of WordPress post meta data for key-value targeting, you need to be aware of similar names. Post meta have “meta_key” and “meta_value”, often also simplified as “key” and “value”. Google Ad Manager targeting also uses the terms “key” and “value”.
The “key” for Google Ad Manager targeting is a static string that you choose. It needs to be identical to the “key” in your GAM account.
The “value” in the Advanced Ads Google Ad Manager integration is the “key” of the post type. In the frontend, this key will not be visible. Instead, the value of the post meta will show up dynamically.
The following example comes from a user. She wants to target ads in Google Ad Manager based on the “Primary Category”, a feature that comes with the Yoast SEO plugin. The ID of the primary category of a post is stored with the key _yoast_wpseo_primary_category as post meta. By adding that key to the “Value” field as displayed below, we tell Advanced Ads to get the value from the database and send it with the “primary_category” key to Google Ad Manager.

NB: only plain post meta values are supported, not arrays.
Configuring Key-values within Google Ad Manager.
In Google Ad Manager, go to the Inventory tab, and then select the Key-values tab.
Because I’ve already created the “Postcategory” key, you can see it listed on the right, along with its basic settings.

Let us take a closer look at the available settings and options:

The first thing that should grab your attention — and this is truly your most important takeaway of the whole tutorial — is that you can never modify it once you create a targeting key in Google Ad Manager.
This is because the targeting key is the one you must use in your code. And hopefully, you’ve noticed that my targeting key in the Advanced Ads plugin and the one in Google Ad Manager look the same. We’re not aiming for “something like”: the only way it’s going to work is if the key is always the same: in your code, in the plugin, and in Google Ad Manager.
Be warned, or suffer the doom of empty ad slots!
Note: Key-values are not case sensitive. There is no distinction between words entered in lowercase and uppercase. Our examples mix lower- and uppercase for readability, but we would recommend using lowercase for simplicity.
Ad Manager always saves the value (s) in lowercase even if I write it in uppercase, and in the code, it would still have to be written in lowercase as well. However, in practice, this doesn’t matter because when I am setting up a line item and selecting its targeting settings within Ad Manager, I will only be able to choose a value that already exists. One that I can find it in the dropdown when I am targeting. So, in that sense, a higher or lower case doesn’t matter here.
Extra options for your key-values in Google Ad Manager
Code or name apart, you’re provided with the following extra options when setting up your key-values.
| Value type | In my blog example, I want my Postcategory key value to use a set of “predefined” values ONLY. This setting means that only the values I create in Ad Manager will be considered as valid. Therefore, you’d want to use the Predefined Value type for targeting keys whose number of values is or should be limited and that you can regularly update in Ad Manager. Another way to look at this is, “Which values do I want to control?”. Let’s imagine that you’re dealing with a blog with thousands of articles tagged by bloggers from all over the world, where everybody uses their tagging criteria. Then, you wouldn’t use a Predefined Value type unless that type of tag or category allowed you to sort out only selected articles from the bunch (For example, the ones categorized as “featured”). For the rest of your article, you’d prefer a dynamic value type, which picks up signals from Ad Manager to update your list of values automatically. For more in-depth info on this, feel free to check out this Ad Manager article. |
| Include Values in reporting | Suppose you’re working with a limited number of values for your key like I am. In that case, I recommend including the values in reporting, as that’s going to allow you to understand how your ads are performing for your targeting key by value (For example, in this case, I’d be able to check Revenue earned on the Business vs. Finance category). Most often, this feature won’t make sense for targeting keys that have too wide an array of values. Having said that, you want to make sure that you are reporting what’s important to you. Just avoid overkill. That one report on impressions shown against a tag that you’ve only used once? Most likely, it’s not going to break — or make — your business. |
| Targeting Values | Here’s where you’ll get a list of the values you’ve already created and where you have the option of creating new ones. Anytime. |
Adding your ad to your page or post in WordPress
Whether you’re working with a page builder or with the WordPress editor, there’s nothing you should do differently about adding an ad to your page or post.
For example, in a WordPress post created with Gutenberg, I would go ahead as follows (7 steps only!!):
- From the Dashboard, Hit “Posts”, then “Add New”.
- Give it a title, such as “Lorem Ipsum A”.
- Hit on the plus sign to add a block.
- Click on the “Advanced Ads” block.A
- Within the block, select the ad you’d like to use with your custom key-values.

- Add some text, images, and more to make your post ready to go public.

- Before you’re ready to hit “Publish”, make sure to configure your post as you intend to, using the Document column on the right-hand side. Select the appropriate category, which you’ll target with your “Postcategory” key, tag, configure your URL slug, and more.
If no ads are appearing, don’t panic. You haven’t created a line item yet, and that’s the reason why. But if ads do appear, don’t panic either! If you have existing line items in Google Ad Manager targeting your content, they will also run against this post.
In the next step, we will see how to create a line item targeting specific key and value(s). Keep in mind that Google Ad Manager, by default, targets everything (All ad units, all custom keys and values, all browsers, all geographies, and so forth). The ultimate function of custom keys and values is to segment and thereby limit your targeting.
Line item targeting: how to verify if your key-values settings are working
Once you’ve set-up your key-values, it’s time to use them as custom targeting options in your Google Ad Manager account. To do that, we’ll head over to Google Ad Manager, find the Delivery tab, and proceed as usual to Line item creation (Either by creating a new order or adding a line item to an existing one).
In this case, I will create a Display line item from within my existing order, which I have called “Advanced Ads”, for advertiser “Advanced Ads”.

As shown in the screenshot, I have selected the Ad Type “Display”, and Line item type “Standard”. This is my preferred testing priority because it allows me to prioritize this line item without incurring any glitches. Unless, of course, if there’s a sponsorship line item with a goal 100% booked against that same inventory. Beware!
As for the name of my line item, I am fond of leveraging nomenclature. In this case, I have used the following structure:
Advertiser year_Mysitename_Type of page targeted_Device type_Creative Size_Custom Targeting used
This makes it way easier to detect what’s wrong when you’re troubleshooting because the line item name contains all of the key info you’re going to be after.
As for the size, I am choosing 970×90, just as I had indicated in Advanced Ads when I toggled my ad’s settings.
For additional settings and delivery settings, go ahead as usual. Since I’m testing delivery, I’m setting my line item to start immediately.
Target key-value in your line item
Next up, we’ll look at targeting, which is the part of the line item, which will make our key-values targeting work like a charm.
First off, select the ad unit you have configured in Advanced Ads and added to your blog post or page. In my case, that ad unit is called AdvancedAds, and that’s the one I have selected for my line item.
Next, to apply your targeting key and preferred value, head over to Custom Targeting by toggling the arrow on the right-hand side.

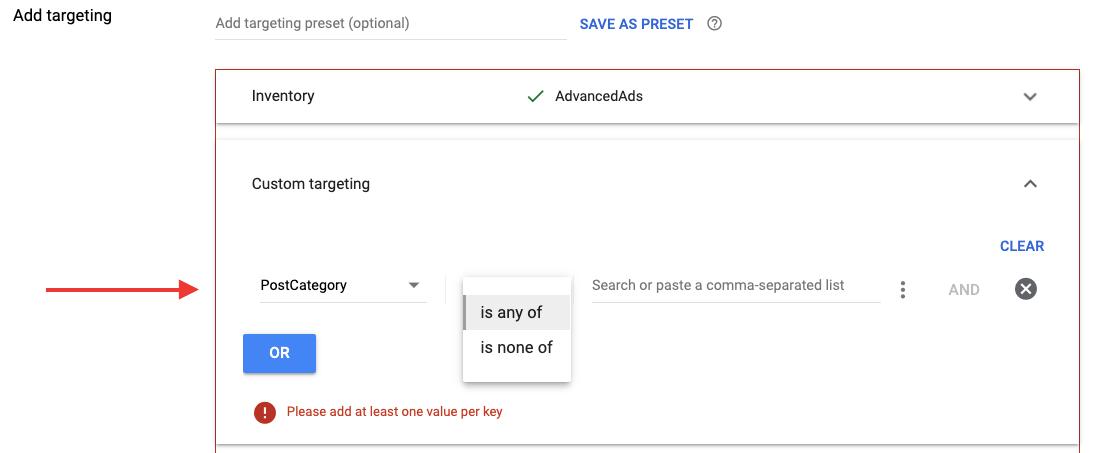
Hitting “select” will allow you to choose which targeting keys you want to target this line item to. In my case, it’s the “Postcategory” targeting key.
As you can see in the screenshot below, once I select my key, I am invited to choose first how I want to select my values, if I wish to target or exclude them. In my case, I want to target the “Leadership” post category. Therefore I will choose the value “is any of”.
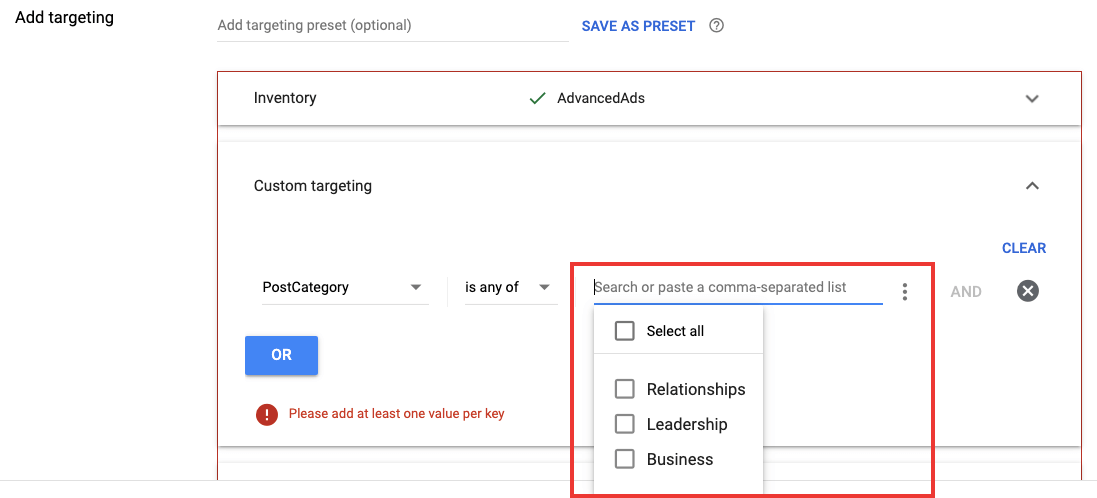
Selecting predefined key-values
Next, I can type or find the value I intend to select amongst the ones I have predefined (Predefined values) or that Google Ad Manager has identified as being used (Dynamic values). In my case, I have predefined a few categories for my posts, amidst which I will choose “Leadership”.
You’ll probably notice that your various targeting keys and values can be combined through booleans.
For example, if I intend to make sure I am targeting all of the content on my site which deals with Leadership, but only for the position “topbanner”, I could combine the following key-value settings:
Postcategory is any of “Leadership” AND Position is any of “topbanner” (Assuming I’ve created a targeting key = position with value = topbanner).
Note: Keep in mind that the more key-values pairs you’ll be targeting for any given line items,
using the AND boolean, the more restrictive your targeting will become, particularly if you were to add more criteria, such as geo-restrictions or browser targeting.
Once I’ve added my targeting settings, I’m ready to hit “save” and add a creative just as usual.
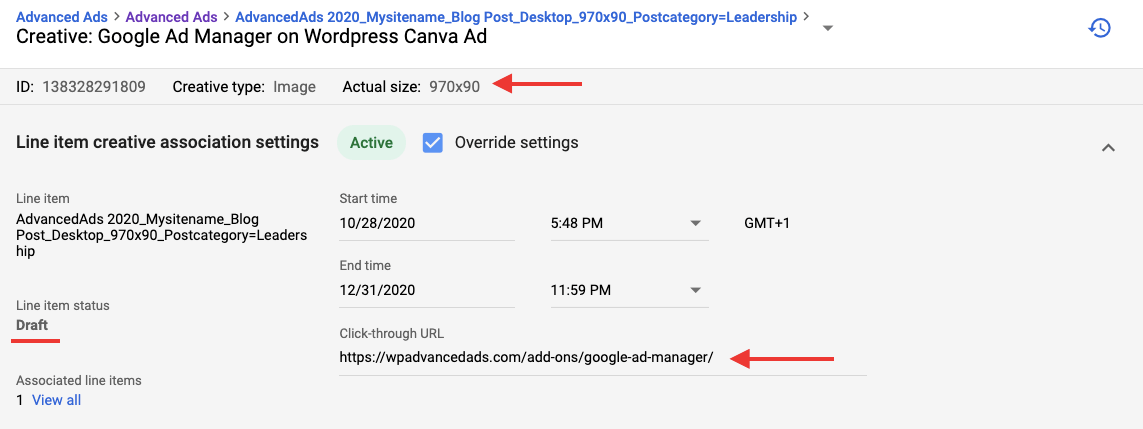
Once done, I’ll check my settings to ensure the Creative size and Destination URL are currently set. You’ll also see my line item is still in draft, so I will head back up to the Order tab and hit “Approve”.
Checking if my Custom Targeting settings are working properly
When I’ve just approved my Line item, it can take a while (15 minutes or so) before it starts delivering. But it doesn’t hurt to start troubleshooting to verify if everything is running as intended.
For troubleshooting, it’s best to use the Google Publisher Console.
First, head over to the page or post where you’re expecting to see your ad, and refresh the page a few times. Then, enable the Google Publisher Console to double-check the settings of the creative being shown (Or of your empty ad slot).
In my case, the ad slot first came up empty. I, therefore, enabled the console and focused on Slot nr. 1 to troubleshoot. I first quickly checked the settings:
- Slot Size correct? (Yes, 970×90)
- Ad Unit name correct? (Yes, Advanced Ads)
- Is the ad slot correctly set-up? (Yes, as status is “Displayed”)

And because everything appeared to be in order, I clicked on “Delivery Diagnostics”. This opens the Ad Request Simulator, which attempts to understand which line item should have won.
The Simulation provides the following info:
- Request Size
- Location
- Key and value targeted

Let’s say I did not see the Key-Value combination appearing here. Then I would know that the request that WordPress is sending is not including the Key-value. For example, if I had not configured the category for the post or set the appropriate key-value option in the Advanced Ads plugin, it probably wouldn’t have appeared.
Search for the expected line item
Next, I can scroll down to search for the line item I expected to win and select it.
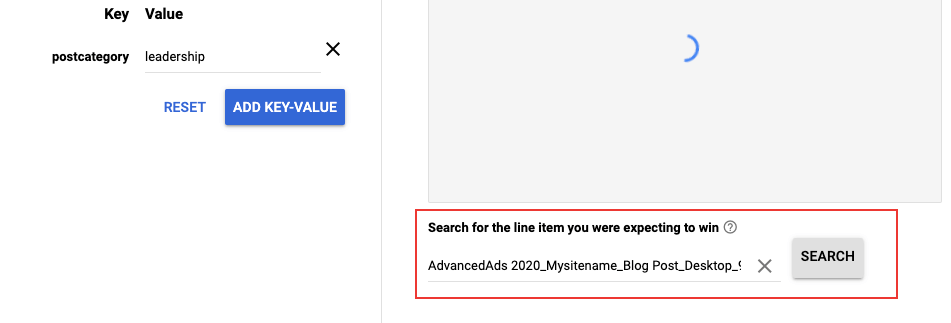
This opens up the Line Item Diagnostics on the right-hand side. As you can see in the screenshot, the explanation I am getting this time around is that the line item is “not found”. This is common of new line items, but it can also mean that:
- The Line item is still in draft → Head over to the line item and check that the inventory is reserved
- The order hasn’t been approved → Head over to the Order tab and hit “Approve”.
Your line item status, for it to be ready to serve, should be “Ready”.

In my case, I double-checked both.
And when I refreshed the page, I got my ad!
I am now able to target my ads more granularly, combining the power of Google Ad Manager and Advanced Ads!! And now, I’d better go find some advertising clients for my new post categories!!