A few weeks ago, we covered how to split test in WordPress using placement and layout options in Advanced Ads to drive higher CTRs and, therefore, higher revenues from your advertising sales.
Today’s tutorial will cover how to split test your ads’ sizes and styles in Google Ad Manager using the Google Ad Manager integration of Advanced Ads to ensure your performance is as great as it can get.
Testing creatives of different sizes from the same ad network
The first section of this tutorial will focus on testing different creative sizes from the same ad network and delivered via Google Ad Manager and Advanced Ads.
In our example, we will refer to ads run through Adsense, Google’s ads network. Yet, bear in mind that the workflow would be the same if we were to refer to any other network or Supply Side Platform (SSP).
So, whether what you’re curious about is the performance of Adsense ads of different sizes within the same ad slot or the performance of different kinds of creatives by, let’s say, Amazon Publisher Services or AdPushup, you can rest assured that the steps highlighted below will work for you.
Creating AdSense ad units for split testing
Let’s get to it:
To begin, head over to Adsense (Or the network of your choice) and choose the Ads tab.
Here, hit “Create new ad unit” and then create two ad units. In our example, we want to test the performance on a vertical slot of a 160×600 vs. a 300×600 creative.
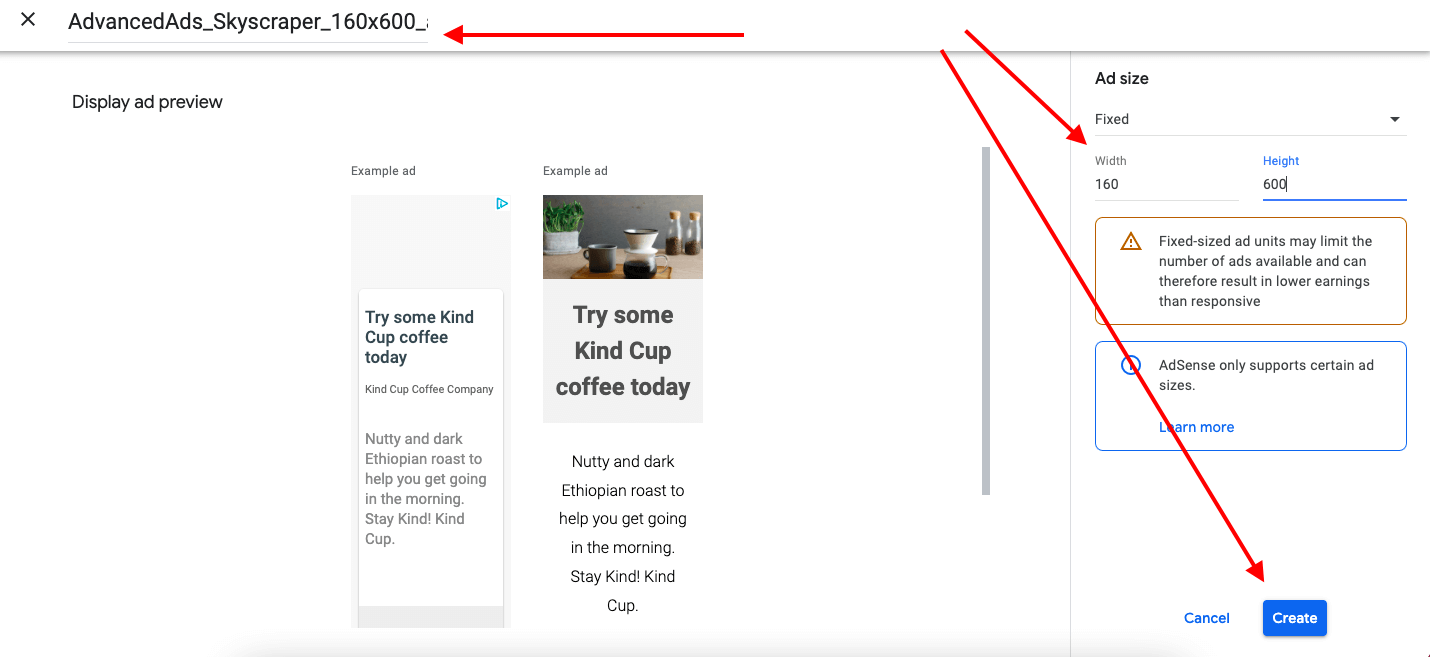
Thereby, we’ve created one of each size. We’ve also removed the responsive option because that would invalidate the test, given that, if responsive, the 160×600 ad might take on a larger size.

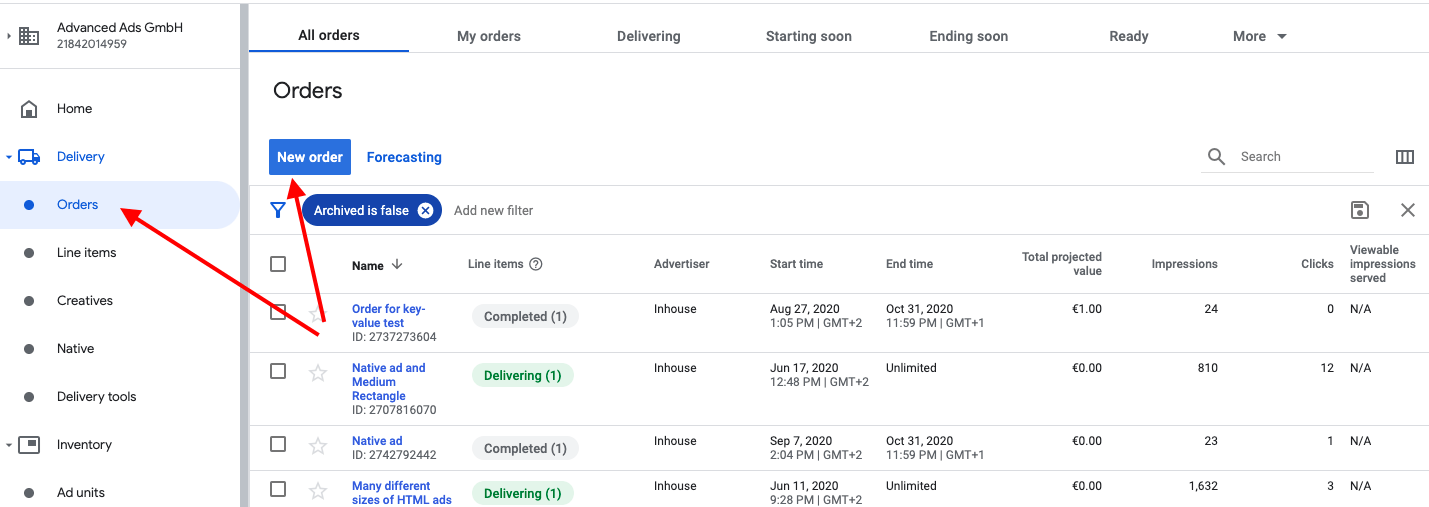
Create a new order in Google Ad Manager
At this point, we’ll have to copy and paste the code of both creatives into a dedicated line item that we’ve created in Google Ad Manager to test the performance of both creatives against each other.
In Google Ad Manager, let’s select the Delivery tab and then Orders > New orders.
Add a line item
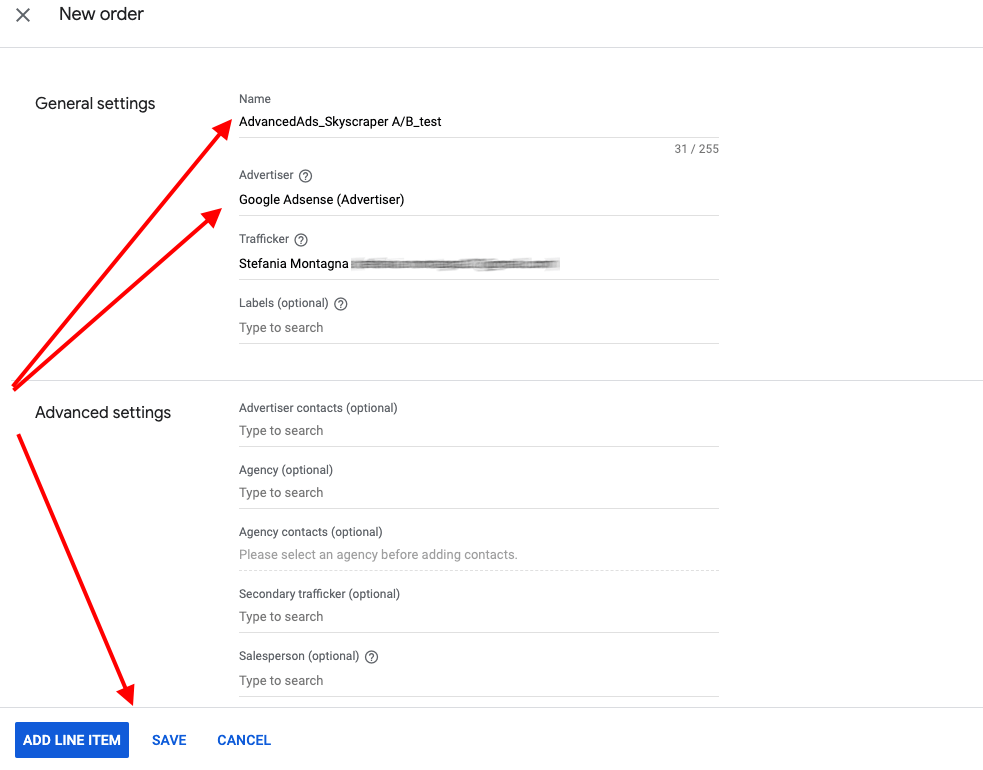
Select the right advertiser (In our case, Google Adsense) and give it a recognizable name, such as AdvancedAds_Skyscraper A/B_test. Hit “Add Line item.”
Select “Display Ad” and fill out the remaining settings of the line item. We’ve given ours the name: “AdvancedAds_Skyscraper A/B_test — Price Priority — 160×600 vs. 300×600” and chosen the Expected Creative sizes 160×600 and 300×600.
This step is crucial. You must target both sizes to compare their performance. Select the priority level you’d like to test at, and head down for further settings.

Next, choose your delivery settings and make sure that you head down to the “Rotate creatives” option. Here, select “Evenly.” This will ensure that you’ll compare apples with apples, as the system will show the two creatives an even amount of times.

Copy the ad codes
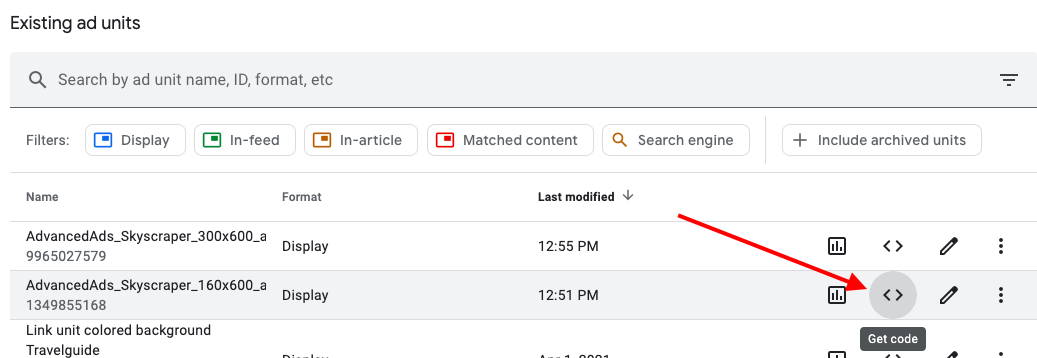
At this point, you should add your creatives as a third-party tag that you will copy and paste from your Adsense account. First, head over to Adsense and copy the code for your 160×600 ad by clicking on the code icon or “Get Code.”
Next, in Google Ad Manager, choose “Manage creatives” and add a creative for creative size 160×600. Choose creative type “third party” and copy your creative code in the box, as displayed below. Hit “save.”
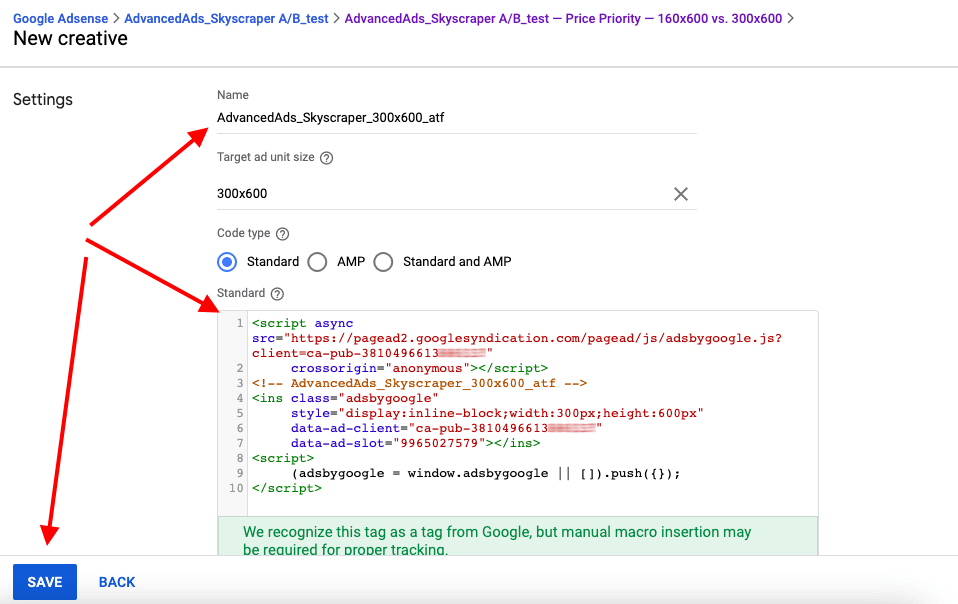
Repeat the procedure for your second ad size.
Import the creatives into Advanced Ads
At this stage, you must target an ad unit with a dedicated placement on your site, such as the banner that appears alongside your blog posts. Ideally, the ad unit always appears in the same spot.
Remember, you don’t want your creatives to be landing on different page types. That would make your split test invalid, as you would never know if it’s a different kind of content on your page that’s driving those results, instead of the creatives themselves.
In our example, we’re targeting our Google Ad Manager ad unit “Advanced Ads_Skyscraper A/B test” by creating a new Advanced Ads ad unit. We’ll call it: “Skyscraper Test.”
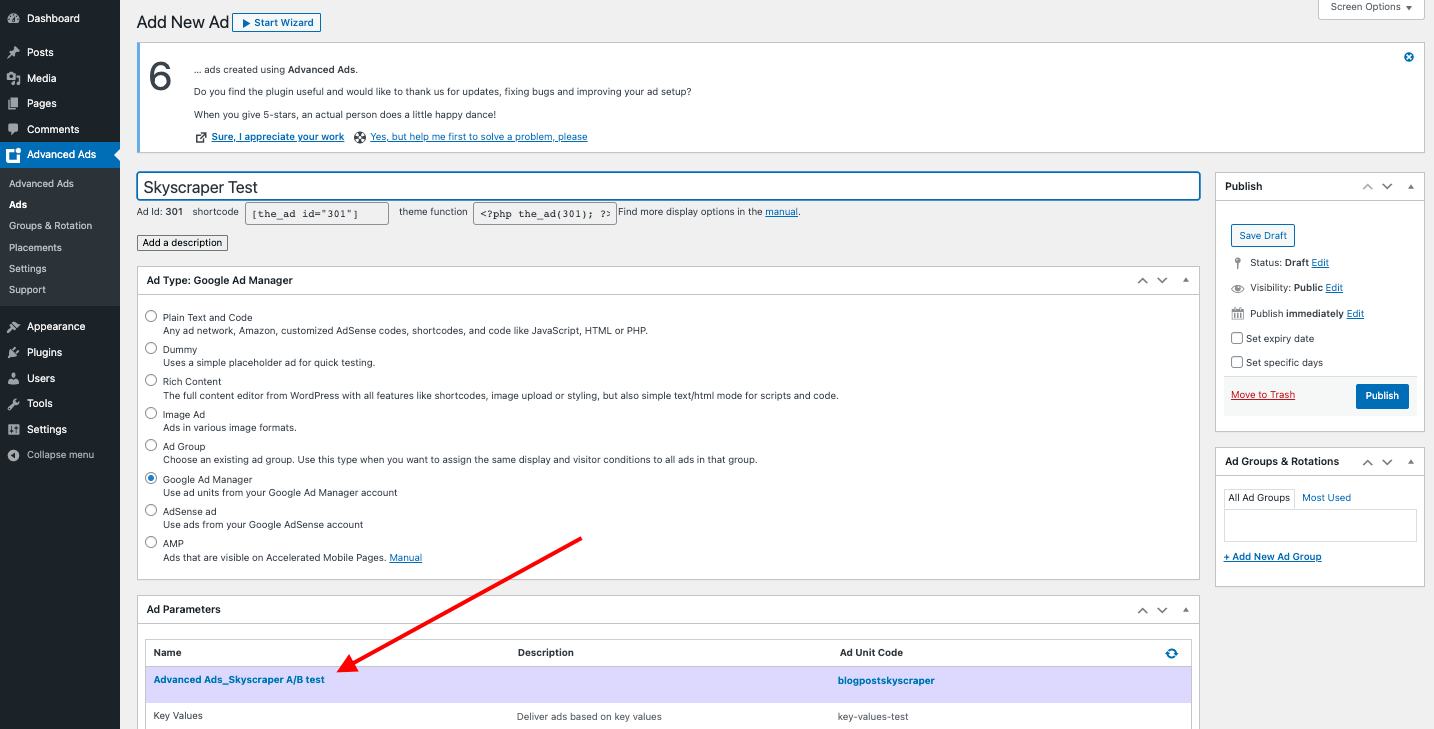
Again, what is crucial is to make sure that the ad unit in Advanced Ads is targeting both sizes: 160×600 and 300×600. That’s because you want to run both sizes in the same slot to ensure that the test will work.

When you’re done selecting all of the settings, it’s time to hit “Publish.”
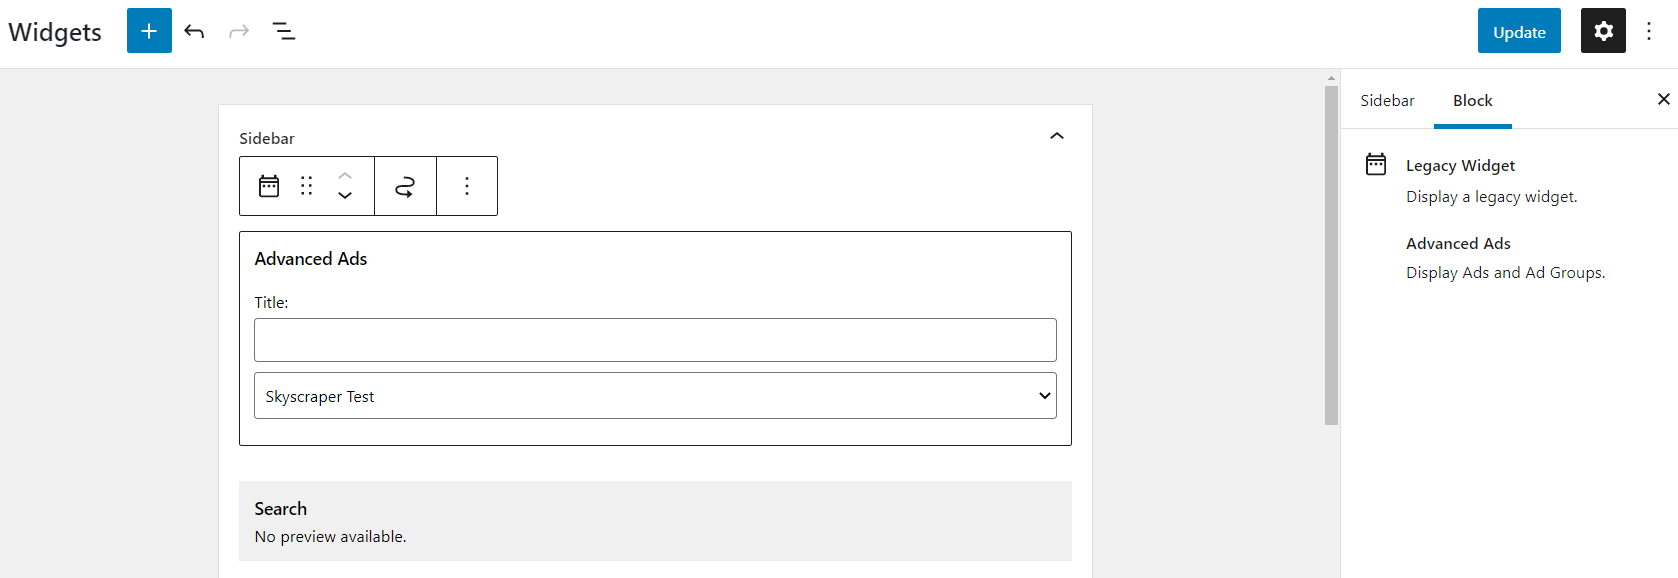
When you do so, you’ll be prompted to select where to show the ad. Select the sidebar, as shown below.

Place the ads and run your a/b test
Finally, add the new ad unit to your site by assigning the chosen placement to your sidebar and selecting your ad, i.e., “Skyscraper test.”
We recommend making sure that, unless you’re serving a vast number of impressions, you let the test run for two weeks. Two weeks of data will ensure that the conclusion you land on — on which ad size is most successful — will allow you to improve your site’s overall performance (And not just make a change that might or might not be fruitful).
In our split test tutorial, you can find detailed instructions on how large your sample must be to achieve a significant result in such an A/B test.
What can you test with this method?
Even though we’ve been running our example with creatives of different sizes, you can apply the same method to several other features and options. The goal is to test for efficiency and performance. For instance, you could use the same system to compare the formats display ad and in-article ad.
With the Google Ad Manager integration of Advanced Ads, you can insert your Google Ad Manager split test comfortably into your existing ad setup. For this purpose, the add-on supports features like key-values targeting or native ads.
Testing different styles with Native ads in Google Ad Manager
Besides testing different ad sizes or creatives from various networks, you might want to experiment with your ads’ layouts and feel. For example, playing with colors, fonts, or font sizes.
Test for this by leveraging Google Native ads via Ad Manager.
In this tutorial, we highlighted how to set up native ads.
Instead, we will focus today on setting up a style experiment leveraging Google Ad Manager’s capabilities to understand which style performs best.
Create a new native ad
To get started, go to Google Ad Manager and choose “Delivery” and then “Native.”
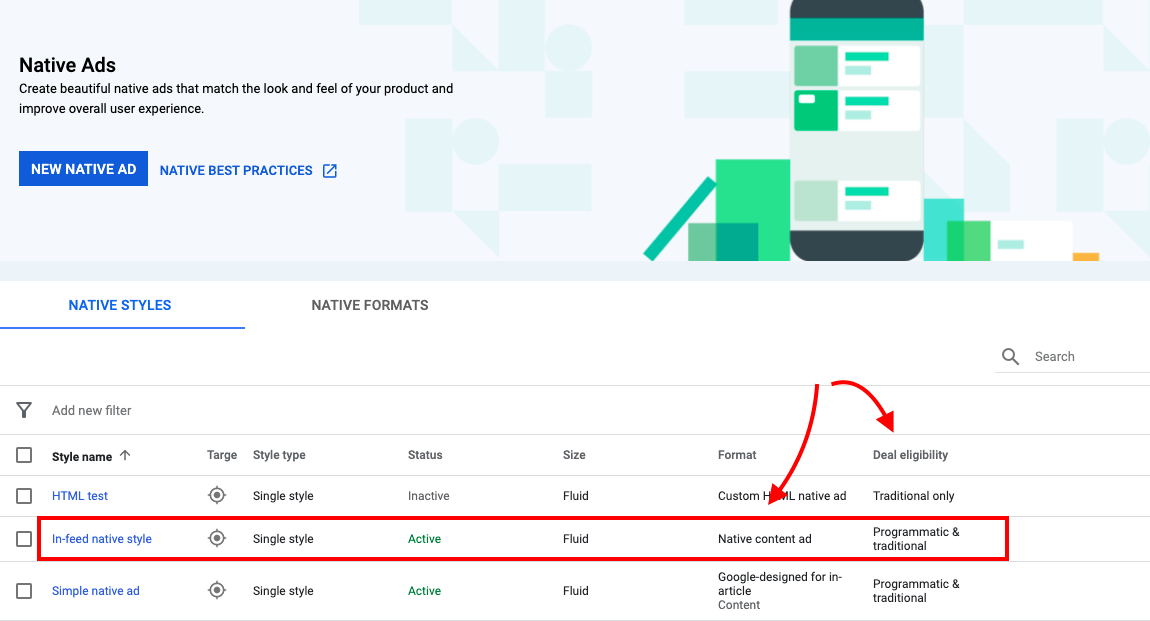
Here, you can choose an existing or new Native style to set up your A/B test against. This style will work as your A style, or “control group,” and it must fulfill the following requirements:
- It is either a “Native content ad,” a “Native app install ad,” a “Native video content ad,” or a “Native video app install ad.”
- It must be eligible for both Programmatic and traditional advertising.
As you can see from the image below, in our case, we have only one ad which, in terms of format and delivery, fulfills these criteria: our In-feed native style.
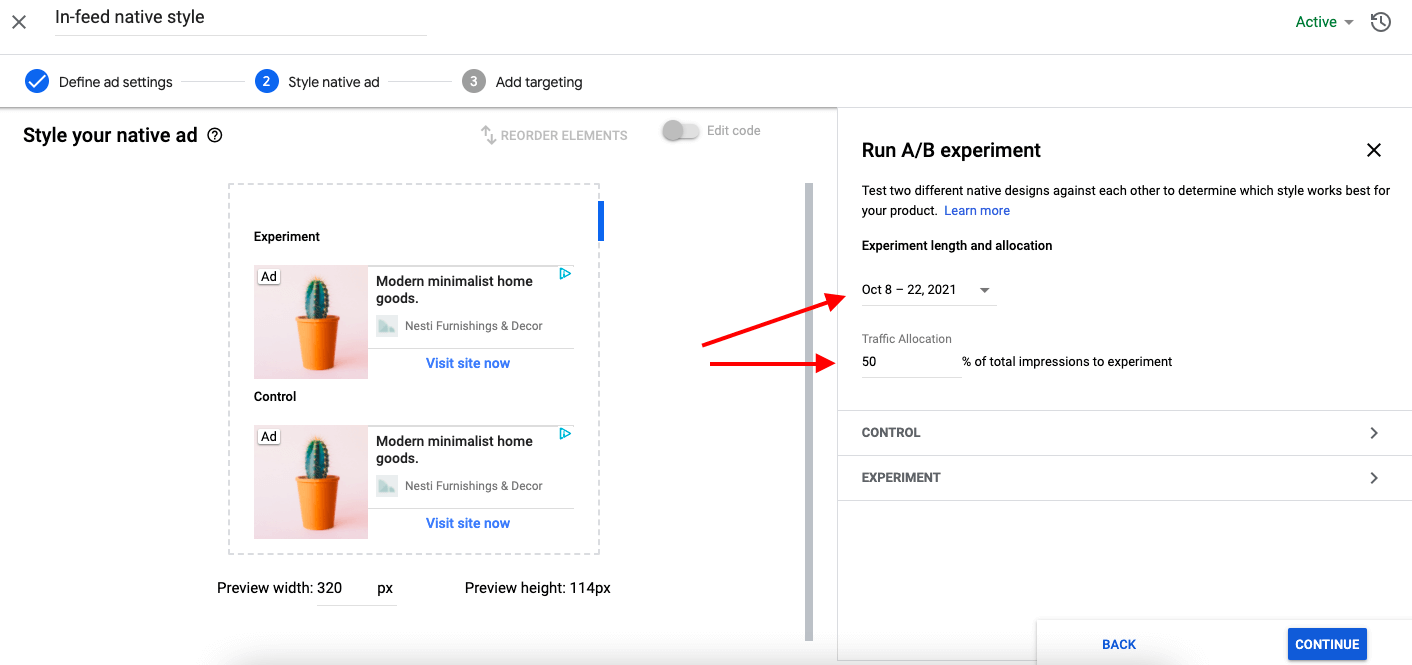
Click on the selected Native style, and the Style your Native ad page will appear. It is here that you’ll find the option to create an A/B experiment, right in the ad preview.

This will open up the A/B experiment wizard.
Start by establishing the test’s duration (Minimum two weeks) and the percentage of your inventory the test should be applied to. By default, it is 30%.
Opt for 50% if you’re feeling adventurous or if you’d like to better appreciate the impact of the test.
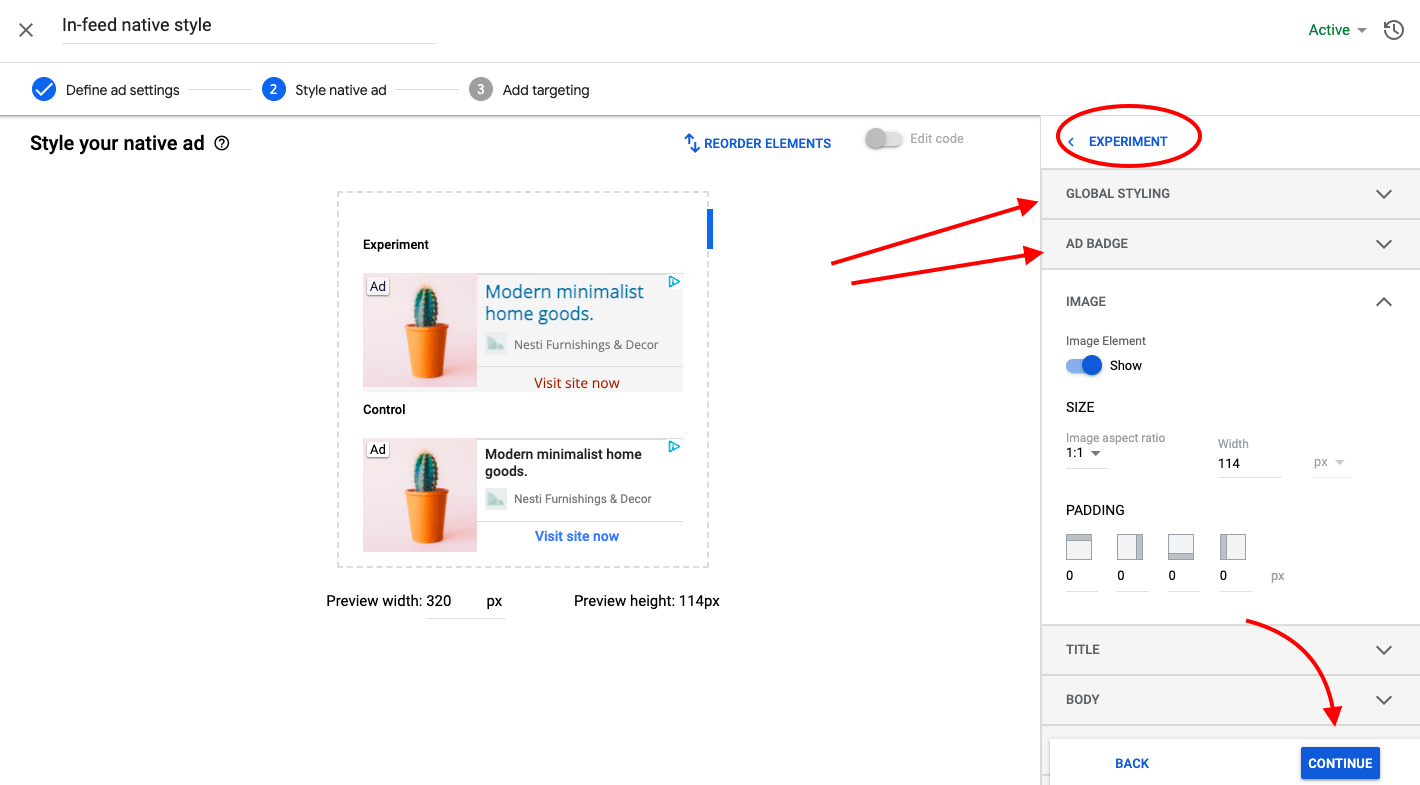
Customize native ad styles
Next, you’ll be able to customize the style of your experiment’s ad set.
To keep the test clean, keep the control as is so that you’ll be able to compare the new variation with your historical data.
In our case, we’ve added a bit of “Advanced Ads flavor” to the experiment style. You can see it above the control style. We did so by changing fonts in Global styling and applying the same background color as on our site. We’ve also changed the title and call to action color. That way, the style will now match our site, making the ads appear more as part of the content.
Another option is to go for a starkly contrasting style or a mix-and-match look and feel, taking inspiration from your existing design but with a twist.
Here’s what our style looks like before hitting “continue.”
Before you’re ready to save the experiment, you’ll be asked to confirm your targeting settings. Keep them as they are or set new targeting settings for your native style. Beware! Changing the targeting means that you won’t be able to compare your results with historical data, as that will refer to a different set of targeted ad units.
At this stage, don’t forget to set up a new line item targeting this Native style as outlined here. See the tutorial section “Lining up your native goods (On native and line items)” if you’re looking to save time.
NB! Make sure, as usual, that you’ve set up an Advanced Ads ad unit targeting the same Google Ad Manager ad unit as the line item to which you’ve applied the native style to. Refer back to the start of this article for more details on how to set up an Advanced Ads ad unit targeting a Google Ad Manager ad.
Checking out your experiment results
In due time, when the system has collected enough data, your experiment results will appear in Google Ad Manager in the Native tab under the delivery segment of your account. They’ll be available in the Native style’s “styling page” by clicking on the “View experiment” link.
Click on it to get insights on the Experiment’s revenue, Revenue per Thousand impressions (eCPM), Experiment’s Click-Through-Rate (CTR), and Coverage.
This will allow you to establish whether it is the experiment or the control that’s performing better. If the former is giving you better results, you have the option to apply it to your Native style going forward.
A few parting words about split testing in Google Ad Manager
Experimenting and A/B testing can give you plenty of insights into the performance of your account. It can help you increase ad revenue, user satisfaction, and customer retention. However, it’s easy to go overboard.
Make sure to run meaningful experiments based on large enough portions of your traffic and to give each experiment the time to gather enough data before you rely on the results to make decisions about your business.