In this tutorial, you will learn how to display ads from Google Ad Manager (formerly DFP) on your WordPress website without changing any code in your WordPress theme.
We are using Advanced Ads’ plain text ad types to implement the ad manager codes on your website. With our Google Ad Manager plugin for WordPress you can use the dedicated GAM ad type and import the ad codes from your Ad Manager account automatically. In this case, you can skip this entire tutorial.
Table of Contents
Reasons for using Google Ad Manager on a WordPress site
Google Ad Manager (GAM) is a hosted ad serving platform. Its original name was DoubleClick for Publishers (DFP) until mid-2018. Being free for small businesses and yet powerful, it has gained worldwide popularity.
Our Advanced Ads plugin and GAM have many overlapping features. So why use both?
Using GAM to manage your ads could make sense if you run a large website with a high number of ad impressions. Within the Google Ad Manager, you can let Google AdSense and other networks compete against each other or use them as a fallback for unsold ad impressions.
After you create ad units in GAM, it will generate snippets of code, the so-called “ad tags.” You need to insert them into WordPress, but GAM doesn’t help you do that. As a result, many publishers who manage ads in GAM use Advanced Ads to embed the GAM tags on their website. Their main advantage is that they can place the ad tags without changing any code in their theme. Using a plugin for ad implementation and changes does not need coding skills.
In this tutorial, we assume that you already use Google Ad Manager, know how to create ad units within the platform, and how to get ad tags.
Specifics of Google Ad Manager tags
A Google Ad Manager tag is not a single piece of code like you know it from Google AdSense. It contains two parts: a header tag and a body tag. The header tag preloads the ad content shown below in the body section of your page.

You need to insert the code in the “Document header” box into the header section of your WordPress page. In contrast, the “Document body” content must be placed precisely at the position on the page where the ad is to be displayed later.
Inserting header and body tags into WordPress
To convert tags from Google Ad Manager to WordPress ads, you create two ads in Advanced Ads. The first ad will accommodate the header tag, and the second will carry the body tag. Each of them will be embedded in a different position in your theme using placements in Advanced Ads.
Let us explain how to do this in a few simple steps.
Inserting a header tag
- Go to Advanced Ads > Ads > Create New Ad.
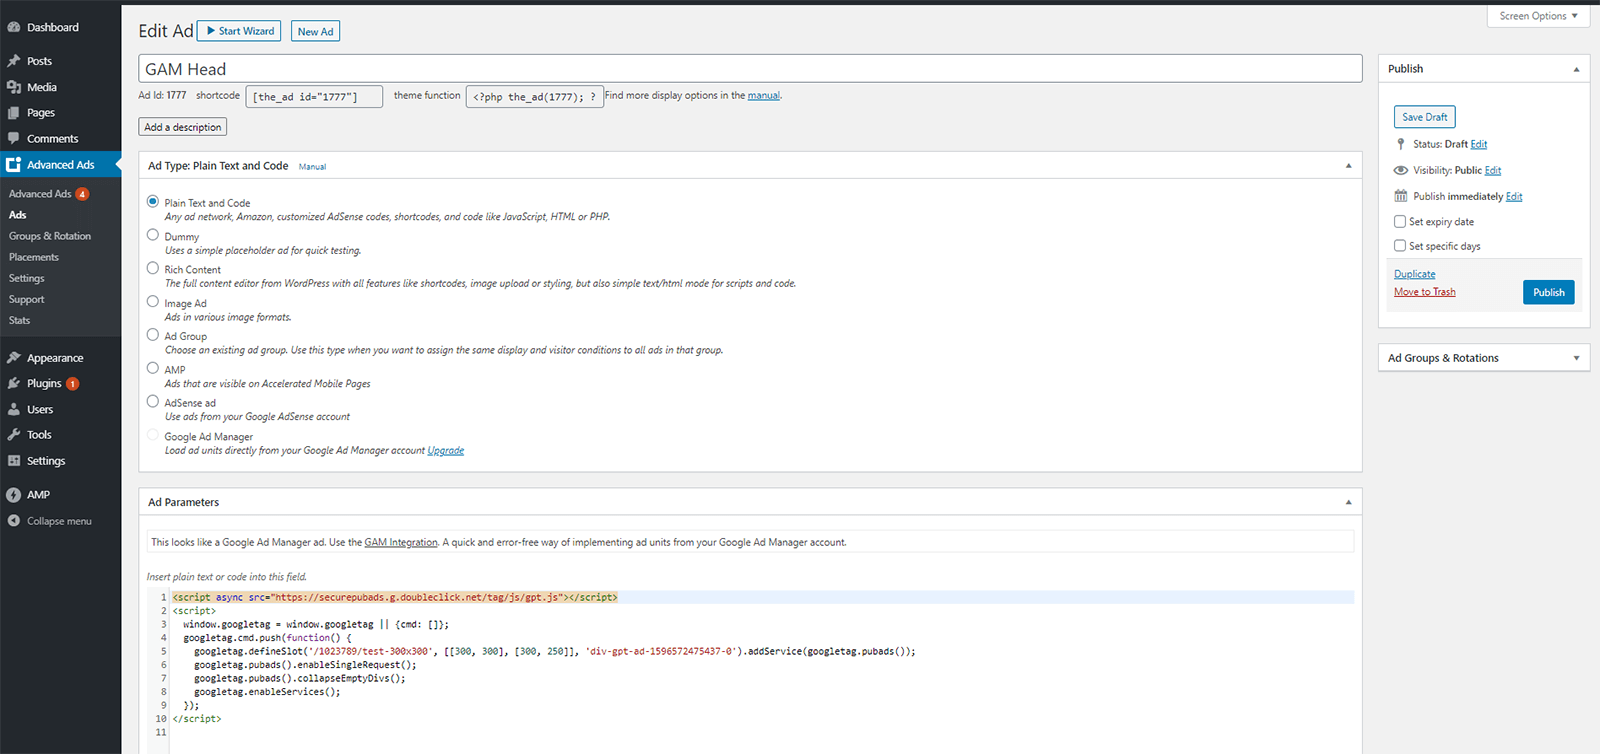
- Name your ad. We called ours “GAM Head”.
- Select the ad type “Plain text and code” if it is not already pre-selected.
After that, copy the header code generated by Google Ad Manager and paste it into the field under “Ad Parameters”. Typically you will not need to change anything else, so you can click “Publish”.
Advanced Ads now asks you where you want to display the ad. As mentioned before, the header section of your page will be the right place. So from the option offered, choose a new placement marked “<head>”.
Tip: If you already have a header placement in your Advanced Ads setup, we recommend using it instead of creating a new one. Insert each header snippet into a separate ad unit. Next, add all those ads to the same group and adjust the number of visible ads to “all”. Read more about adding snippets to the header or footer in WordPress.
Combining multiple header tags
You might usually want to embed multiple Google Ad Manager ad units on the same page. Normally, each one of them has its own header tag.
In case that you use the same ad units on the same pages, you can just combine them into a single header code.
So if you have two different header codes like the one below,
<script async src="https://securepubads.g.doubleclick.net/tag/js/gpt.js"></script>
<script>
  window.googletag = window.googletag || {cmd: []};
  googletag.cmd.push(function() {
    googletag.defineSlot('/1023789/test-300x300', [[300, 300], [300, 250]], 'div-gpt-ad-1596572430437-0').addService(googletag.pubads());
    googletag.pubads().enableSingleRequest();
    googletag.pubads().collapseEmptyDivs();
    googletag.enableServices();
  });
</script>

<script async src="https://securepubads.g.doubleclick.net/tag/js/gpt.js"></script>
<script>
  window.googletag = window.googletag || {cmd: []};
  googletag.cmd.push(function() {
    googletag.defineSlot('/1023789/test-300x600', [[160, 600], [300, 600]], 'div-gpt-ad-1596572487302-0').addService(googletag.pubads());
    googletag.pubads().enableSingleRequest();
    googletag.pubads().collapseEmptyDivs();
    googletag.enableServices();
  });
</script>Code language: HTML, XML (xml)
Just combine them by moving the line starting with googletag.defineSlot of any additional ad unit into one header code. See the result code below.
<script async src="https://securepubads.g.doubleclick.net/tag/js/gpt.js"></script>
<script>
  window.googletag = window.googletag || {cmd: []};
  googletag.cmd.push(function() {
    googletag.defineSlot('/1023789/test-300x300', [[300, 300], [300, 250]], 'div-gpt-ad-1596572430437-0').addService(googletag.pubads());
    googletag.defineSlot('/1023789/test-300x600', [[160, 600], [300, 600]], 'div-gpt-ad-1596572487302-0').addService(googletag.pubads());
    googletag.pubads().enableSingleRequest();
    googletag.pubads().collapseEmptyDivs();
    googletag.enableServices();
  });
</script>Code language: HTML, XML (xml)
Inserting a body tag
- Create an ad unit for the body tag the same way you did it for the header tag
- Go to Advanced Ads > Ads > Create New Ad
- Name it, e.g., “Test 300×300”
- Paste the body part of the GAM tag into it
- Click “Publish” to save it

Again, Advanced Ads asks where you want to display the ad. Choose an appropriate placement (read more about placements). After that, a congratulation message for an ad visible in frontend will appear once again. Check your frontend page to see how the ad looks in real life.
Tip: Give Google Ad Manager some time to process the new ad. Sometimes you will be able to see it in frontend immediately. Sometimes it will take up to 30 minutes. If patience doesn’t help, something went wrong.
Repeat this step for every ad unit created in Google Ad Manager.
Matching header and body tags
Be careful about matching header and body tags. If there is a header tag without a corresponding body tag, you will see nothing in the frontend. Similarly, a body tag without a proper header tag will not show up.
So ensure that the header and body tags inserted into the same page match each other. There is one more reason for it. Google Ad Manager believes the ad is displayed when the header tag gets loaded. It counts the impression, regardless of the presence of a matching body tag.
So if you insert header tags where they are not needed, impression counts and click rates in GAM will be misleading. Sounds complicated? Our Google Ad Manager integration extension takes care of this for you automatically.
A practical example of the integration of Google Ad Manager ads
Let’s say you have created three ad units in Google Ad Manager to display them on two types of pages: your homepage and all posts:
- Leaderboard 728×90
- Medium Rectangle 300×250
- Large Skyscraper 300×600

So there are three ads, four positions, and two different page types in this example. You got six pieces of code from Google Ad Manager: three header tags and three body tags.
In the following, I will show you step by step on how to configure this setup. If you decide to follow this tutorial and manage the ad codes manually, you will need to create two header ad units, three body ad units, one group, and five placements in Advanced Ads.
This process is more comfortable and faster if you use the Google Ad Manager integration add-on. You only have to create three ads and three placements. But the most significant simplification is that you don’t have to match header and body tags anymore.
Configuring the header tags
Let’s start with the header tags.
1. Header tag ad units
- Create an ad for the homepage’s header tags (e.g., “Homepage header tags“):
- Copy two header tags into it: the header tag of the Medium Rectangle 300×250, and the header tag of the Leaderboard 728×90
- Use the General Conditions display condition and select “Home Page”
- Publish the ad without choosing a placement

- Create another ad for the post’s header tags (e.g., “Post header tags“):
- Copy two header tags into it: the header tag of the Leaderboard 728×90 – yes, the same as above –, and the header tag of the Large Skyscraper 300×600
- Set up the display conditions and select “Posts”
- Publish the ad without choosing a placement

2. Header tag group
- Create an ad group (e.g., “Header tag group“)
- Choose the random mode and adjust the number of visible ads to “all”
- Add the ad units with the header tags (“Homepage header tags“, “Post header tags“) to this ad group

3. Header tag placement
- Create a header code placement (e.g., “Header”)
- assign the group with the header tags (“Header tag group“)

Configuring the body tags
1. Body tag Leaderboard
- Create an ad for the Leaderboard 728×90 body tag:
- Copy the body tag of the Leaderboard 728×90 into it
- Configure the display conditions, select “Home Page” and “Posts”, and connect them with “or”.
- Publish the ad

2. Body tag Rectangle
- Create an ad unit for the Medium Rectangle 300×250 body tag:
- Copy the body tag of the Medium Rectangle 300×250 into it
- Adjust the display conditions and select “Homepage”
- Publish the ad
3. Body tag Skyscraper
- Create an ad for the Large Skyscraper 300×600 body tag:
- Copy the body tag of the Large Skyscraper 300×600 into it
- Set up the display conditions and choose “Posts”
- Publish
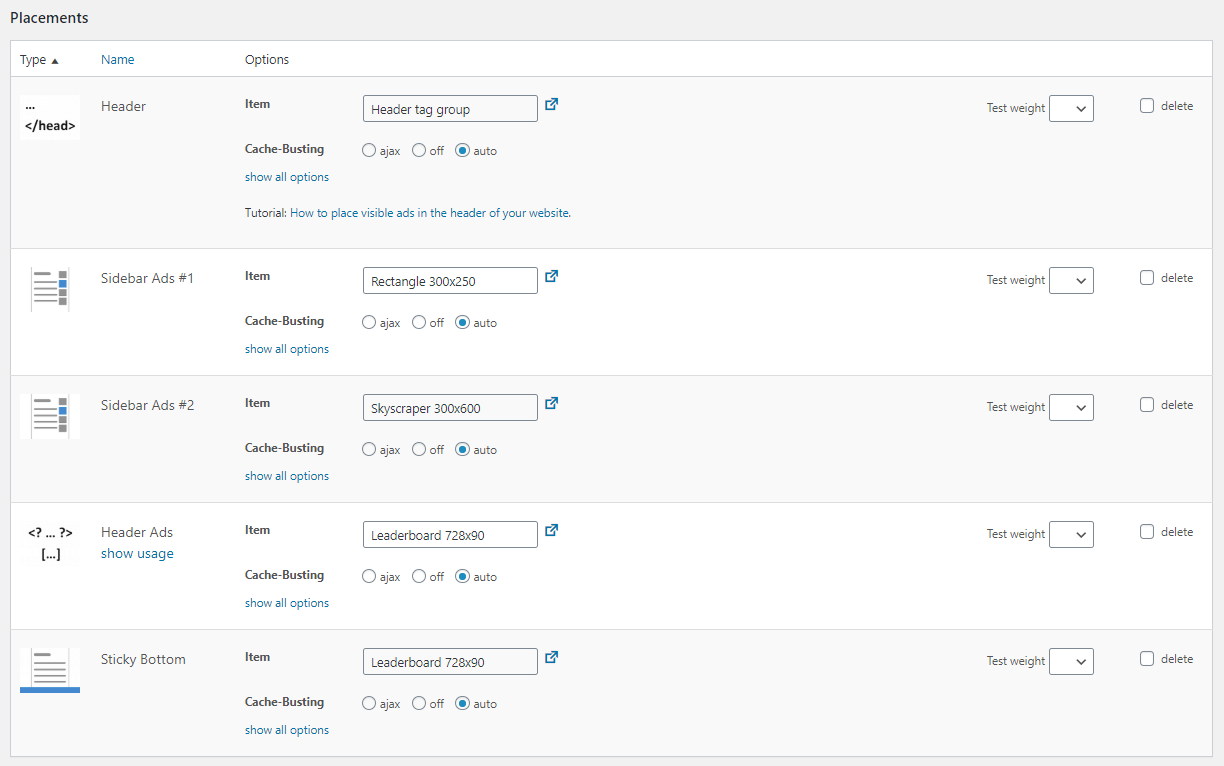
Assigning the ads to your placements
Create a sticky bottom placement (e.g., “Sticky Bottom”) and a placement for your website’s header. Then, assign the Leaderboard ad unit to both. In this example, we use a manual placement that we inject via PHP directly into the theme.
We inject the Rectangle and the Skyscraper ads with a widget. In the long term, it is practical to create separate placements for this purpose. So, create two Sidebar Widget placements and assign each ad to one of them.
Afterward, navigate to Appearance > Widgets. Move the Advanced Ads widgets to the desired positions in the sidebar and set them to display the two sidebar widget placements.
Debugging Google Ad Manager Ads
Especially when getting started with Google Ad Manager, the ads sometimes stay blank for no apparent reason. You might not know whether it is related to the setup in GAM or Advanced Ads.
Therefore, we introduced the “Debug Google Ad Manager” item in the “Ad Health” menu. You can find it in the admin bar in the frontend. When you click on the “Debug Google Ad Manager” link, Advanced Ads adds the ?google_force_console=1 parameter to your URL, and the page reloads. If you implemented the GAM code, you would see temporary overlays and additional windows on the screen:
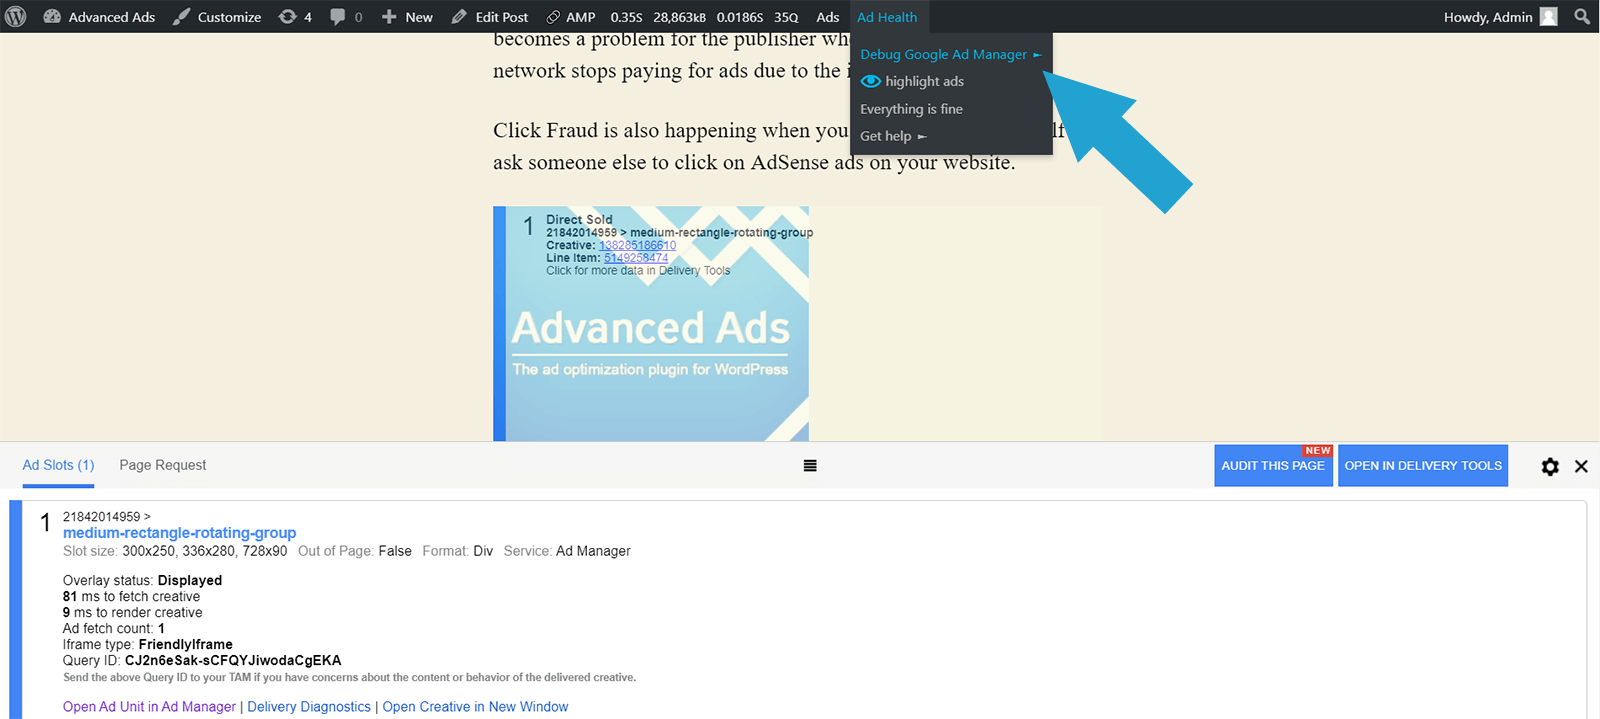
The GAM debug output will stay visible to you until you close it.
Google Ad Manager Integration add-on
As you could read above, a specific form of Google Ad Manager tags makes matters a little complicated. Features of the free version of the Advanced Ads plugin are 100% capable of inserting GAM tags into WordPress. Still, we decided to make the life of our users a little easier.
An extension of Advanced Ads named Google Ad Manager integration allows you to place the ad units on your website without you touching any codes or taking care of the complicated mix of header and body tags. Watch the video to learn more.

9. Further reading
- Build Google Publisher Tags
- Common issues with Google Ad Manager
- Google Ad Manager vs. an ad plugin – what to use?
- Key-values targeting in Google Ad Manager
- Responsive Google Ad Manager ads
- How to integrate Google Ad Manager out-of-page ads and floating creatives
- Fallback ad for empty AdSense and Google Ad Manager ads