Like all other publishers, I received many emails before the introduction of the “General Data Protection Regulation “(GDPR) in May 2018. Among them was Google’s information telling me that, since I am using Google AdSense and Google DoubleClick for Publishers, I have to make my websites comply with updated privacy regulations. The requirement to inform visitors about cookies was already needed for AdSense since 2015, but explicit consent seems more critical now.
There are many solutions to gather consent out there, but the truth is, that with Advanced Ads, I already have everything I need to display a compliant consent cookie message. This tutorial will show you how I set it up on wpadvancedads.com.
Table of Contents
What is the GDPR?
The GDPR (General Data Protection Regulation) is a European Union law that took effect on May 25, 2018. The purpose of the GDPR is to give EU citizens control over their personal data and change how organizations around the world handle data protection. If you collect personal information from any EU citizen (within or outside the EU), you must first obtain explicit and unambiguous consent.
If your website runs retargeting pixels or retargeting ads, you will need to get the user’s consent. For this approval to be considered, you must request an explicit opt-in (e.g., without an already ticked checkbox) that is clearly formulated and separated from other terms (e.g., access to the website).
Penalties for businesses who are not in compliance with the GDPR
As Google announces in the AdSense dashboard:
Under the Google EU User Consent Policy, you must make certain disclosures to your users in the European Economic Area (EEA) and obtain their consent for the use of cookies or other local storage and for the use of personalised ads. This policy reflects the requirements of the EU
The EU has put in hefty penalties for those who are not in compliance. They can fine up to 4% of a company’s annual global revenue OR €20 million per case. This threat is enough reason to cause wide-spread panic among businesses around the world.
How does the user consent look like?
After reading a lot about the topic and browsing through various solutions, it looks like a standard approach is to show a cookie message to the visitor that she agrees to your privacy policy by using your site. You should have a page with the privacy policy, including opt-outs, and also link to it. On your privacy policy, you explain which user information you handle and when.
This page can be as detailed as listing every single cookie or just explaining how you handle user data and which external services are used that might also store the information you have implemented. The consent message can then be closed with a button or X and will never appear again.
Time will show if this is enough or how it should work correctly, but you are better off with any consent method than none, especially if you don’t want to risk your AdSense account or any legal problems.

How to display a GDPR compliant cookie message?
I checked different approaches to display the cookie notice. Some jQuery libraries or even companies offer the check for a couple of dollars per month.
The good news is that the Advanced Ads toolbox comes with all the options you might need to implement a sticky cookie message in the header at the page bottom. The following tutorial shows you how I built the GDPR compliant cookie consent message here on this site using Advanced Ads and two add-ons.
Disclaimer: I am not sure how “safe” my cookie message or privacy policy is. If you copy them or any other text from wpadvancedads.com or other websites, then you do that at your own risk.
Setup
- Advanced Ads
- Advanced Ads Pro
- Sticky Ads
Ad Setup
First, let’s create the content of the message. Technically, it is an ad, so please go to Advanced Ads > Ads > New Ad in your WordPress dashboard.
I called my ad “Cookie Consent Message.”
I am using the Plain Text and Code ad type, but if you want to do some styling on the text, use the Rich Media type first and switch to the Plain Text type later to add the code from the next step.
1. Ad Content
As mentioned, this is my example. It would be best to adjust it to your site.
<p>example.com uses cookies. By using our site you agree to our <a href="/privacy-policy" rel="nofollow">privacy policy</a>
<button id="advads-cookie-consent" onclick="advads.set_cookie('accept_cookies', 'true', 3650); jQuery('#advads-cookie-consent').parents('div').fadeOut();">I agree</button>
</p>
What am I doing here?
I created a paragraph starting with the message and the link to the privacy policy, followed by the button that closes the whole bar (including the container built later). I also used a function that comes with Advanced Ads to set the cookie that will then be used to hide the message. The cookie is set for 3650 days, so roughly ten years.
The last function that fires if the button gets clicked is the one that hides the message.
If the above code empties your site
If clicking the I agree button hides more elements from your site than just the cookie message; please try the code below. Replace PREFIX with the value of the ID Prefix option set in Advanced Ads > Settings > General.
<p>example.com uses cookies. By using our site you agree to our <a href="/privacy-policy" rel="nofollow">privacy policy</a>
<button id="advads-cookie-consent" onclick="advads.set_cookie('accept_cookies', 'true', 3650); jQuery('#advads-cookie-consent').parents('div[class^=PREFIX]').fadeOut();">I agree</button>
</p>
2. Layout
You can add some custom layout to the HTML code or later use CSS to style it. I changed my text color to white.
To center the text, go to the Layout / Output meta box and check the Position option like on the image.
3. Visitor Condition
Be sure to have Advanced Ads Pro installed, activated, and the “advanced visitor conditions” module enabled for the next step.
Now, go down to the Visitor Conditions meta box and add the “Cookie” visitor condition using the field below. Set up the visitor condition field that should now have shown up like in the image below:
First, we select “does not contain” because we want to show the message only when the confirmation cookie is still missing. Then we set the name of the cookie. It is accept_cookies, as we defined above.
You can leave the field for the value empty because it only matters to us whether the cookie exists or not.
Btw. the “cookie” visitor condition has its name not only because we are using it here. You can use it to check for any cookie. E.g., some opt-in extensions track the visitor as a subscriber to your newsletter with a cookie. You could use this to your advantage, too.
4. Adjust the privacy settings
If you used our Privacy module to hide ads without consent, you should not forget to make an exception for the consent ad so that it can be displayed without permission. In every ad menu, you can find a checkbox to ignore the global privacy settings of Advanced Ads and show those ads anyway.
This option is hidden for the “image ad” ad type, as this ad type is not relevant for the GDPR
5. Publish the “ad”
Click on the “Publish” button. Don’t worry; the ad won’t be visible yet.
6. Setting up the Header Bar
To set up a sticky Header (or Footer) Bar, you must have Sticky Ads enabled.
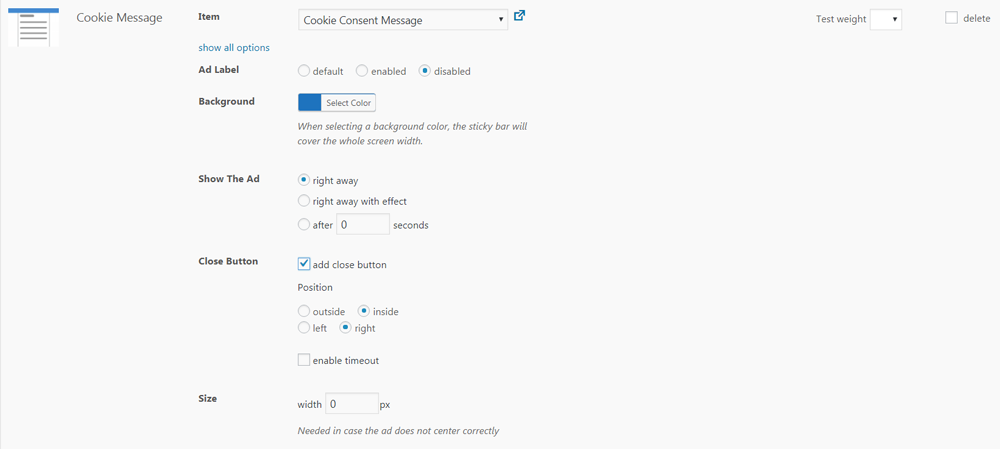
Go to Advanced Ads > Placements and create a new “Header Bar” placement.
In the form, select the image below and name the placement “Cookie Message.” As an item, select the “Cookie Consent Message” ad that we have just published. You can also choose a background color for your cookie notice.
Congratulations! The message should be visible now.
You can still play around a little with the styling. I added some CSS rules for my cookie notice.
That’s it. I also checked it on mobile devices, and it works fine. If you still find an issue with this tutorial, please contact me.
Tip: I used the geolocation visitor function with cache busting to display the cookie notice to EU visitors only.


