Interstitial ads are an advanced form of pop-up and layer ads. They have been experiencing a revival in the digital advertising world for several years. Since these ads tend to have a high click-through rate, they can generate substantial revenues.
In this tutorial, you’ll find more background information about this ad type and learn how to integrate interstitial ads into your WordPress website.
Table of Contents
What are Interstitial Ads?
You’ve probably seen an interstitial ad from Google AdSense while navigating a website or using an app on your desktop or smartphone.
Commonly, interstitial ads are displayed during navigation between two subpages, for example, when you open a new subpage from a home page or archive page. This behavior distinguishes this ad format, also called a page-to-page ad, from pop-up ads, native ads, or banner ads.
Interstitial ads are often full-screen ads that fill the entire screen of a device. Typical ad types used in interstitials include static image ads, rich media ads, or video ads.
Visitors seeing an interstitial ad can either click on this ad or close it using the close button and continue navigating. Therefore, they cannot ignore such an ad, as it would be possible, for example, with sticky ads at the page bottom.

How Google rates websites that use interstitial ads
Google does not like it when ads cover the content of a website. That’s why Google rates websites that show such an ad on initial opening as not mobile-friendly.
This is not surprising because it is often not easy to find a close button on mobile devices due to the smaller screen. And even if you do see it, its size and placement often make it difficult to tap and cause a frustrating user experience.
The excessive use of interstitial adverts, e.g., when you show them after every user action, leads to Google classifying the website as non-mobile-friendly as well.
However, this does not at all mean that Google devalues all websites that use interstitial ads.
On the contrary, Google AdSense Auto Ads also integrates this format. AdSense calls this ad type Vignette Ads. So the Google rating depends on how you integrate this format into your website.
Integrate interstitial ads Google-compliant
To embed interstitial ads in a way that they do not hurt Google’s rating of your website, you should consider the following points when embedding them:
- Do not show the interstitial ads directly. Our example below shows you how to trigger them for click on an internal link. This restriction does not apply to cookie consent modals or pop-ups for age confirmation
- Do not display the ads repeatedly after each user interaction
- Show a maximum of one interstitial ad between two pages, never two such adverts in immediate succession
How to create interstitial ads in WordPress
You can integrate interstitial ads on your WordPress website if you use Advanced Ads together with the PopUp and Layer Ads add-on.
The technical challenge is creating a popup that is only triggered by clicks on internal links, e.g., when users navigate your website and visit multiple articles.
This ad setup includes two ads. One that holds the code that triggers the popup to show, and a second one with the actual ad content.
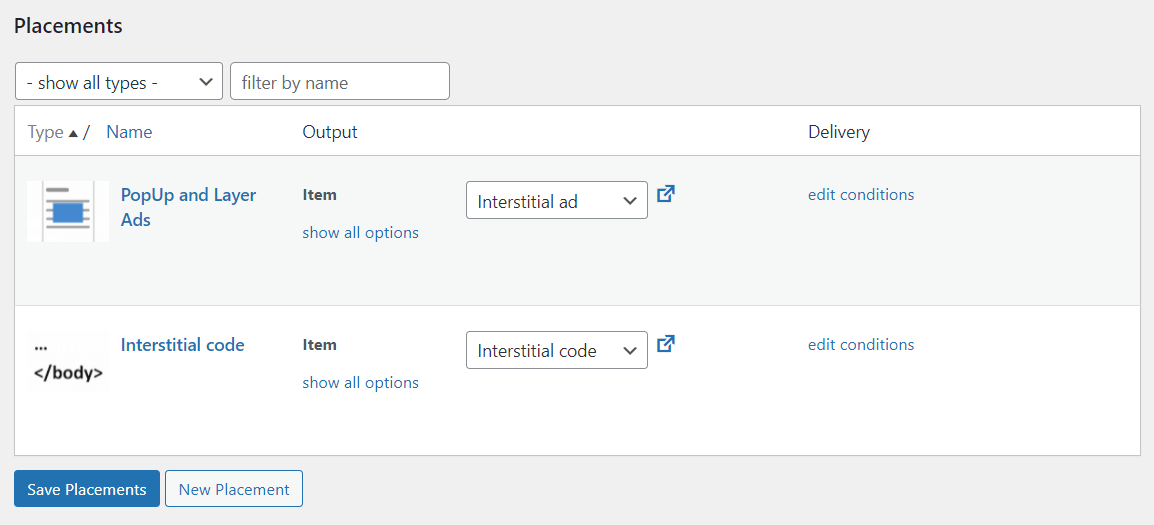
Creating the interstial ad content
The second ad unit contains the content that will be visible to the user. This can be an image or video ad, for example.
To display this ad, create a popup placement and select this ad unit for it.
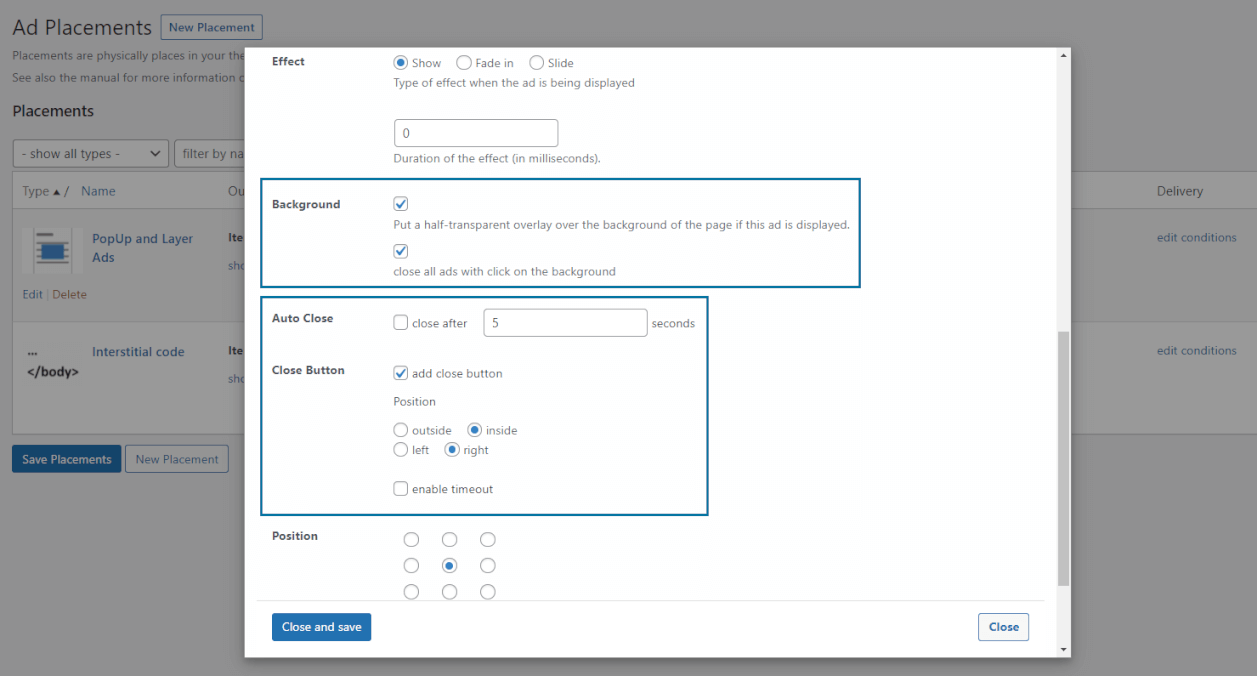
Open the placement settings to adjust the close button. You can also enable a background for the popup there that covers the visible part of the website.
By adding display conditions, you can ensure that the popup is only displayed on certain pages, e.g., on your archive pages. If you want to show the interstitial only to specific user groups, you can implement this targeting by adding visitor conditions.
A use case for this targeting would be adding the Device or Browser width visitor condition to show this ad only to users with mobile devices.
If you want to test different interstitial ads, you can also assign an ad group to the placement instead of a single ad unit. But you should not include more than one popup placement per page.
Show the ad after clicking on an internal link
The code below triggers the popup when a user clicks on an internal link. This code goes into the footer of your website. Advanced Ads will handle that for you.
Please copy the code into a new ad with the Plain text and code ad type and assign it to a Footer code placement. This ad unit ensures the function of the popup trigger.
<script>
	/**
	 * Open an interstitial ad when clicking on internal links
	 *
	 * limitations: the ad shouldn't lead to a page on the current site
	 */
	jQuery(document).ready(function(jQuery) {
		var siteURL = "https://" + top.location.host.toString();
		// iterate through internal links
		jQuery("a[href^='"+siteURL+"'], a[href^='/'], a[href^='./'], a[href^='../'], a[href^='#']").each(function() {
			jQuery( this ).on('click', function(e) {
				var target = this.href;
				var banner = jQuery('.PREFIXlayer');
				var bannerId = banner.attr( 'id' );
				if(typeof bannerId === 'undefined') {
					return;
				}
				e.preventDefault();
				// uncomment the next line if no background should show up
				advads_layer_display_background_callback( bannerId );
				advads_display_effect_show( bannerId  );
				// forward to the original link address when closing the ad
				jQuery( document ).on( 'click', '.advads-close-button, .advads-background', function() {
					window.location.href = target;
				});
			});
		});
	});
</script>
Code language: HTML, XML (xml)
Replace the string PREFIX with your site’s prefix set in Advanced Ads > Settings > General > ID prefix.
E.g., when your site’s ID prefix is set to “mysite-”, replace .PREFIXlayer in line 14 with .mysite-layer.
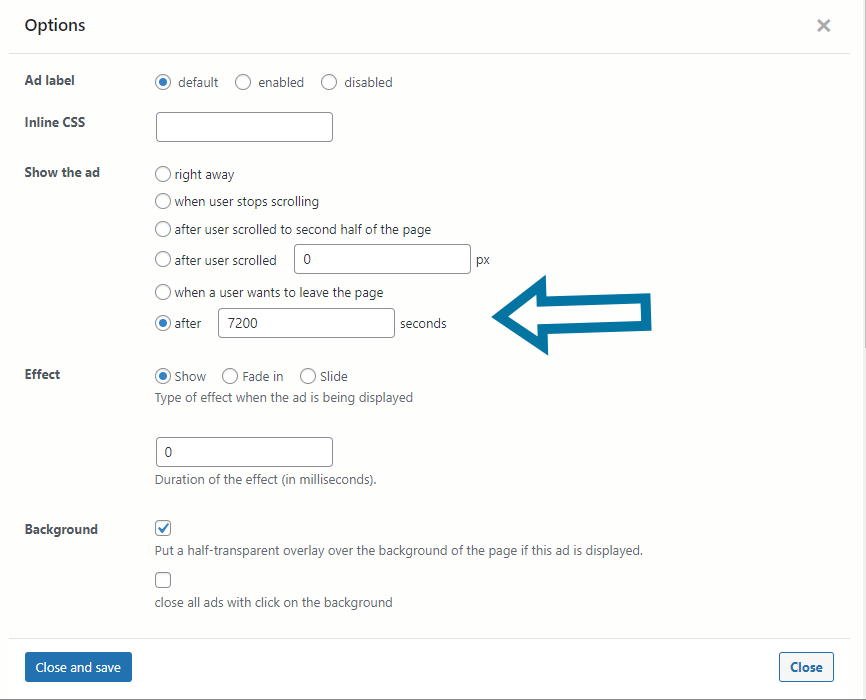
To ensure that the popup can only be triggered by the trigger click, the following setting in the placement options is essential. Please select the option “Show the ad after … seconds” and define an unnaturally high value that your visitors will not reach naturally, e.g., 7200 seconds (2 hours).
Please note that this ad setup does not work with the Fancybox option.
What you should keep in mind when embedding interstitial ads
Ensure that you don’t flood your users with ads. Interstitial banners are a suitable performing ad format. But they can be more annoying for your visitors than classic display ads due to their inevitability.
This can eventually result in users who are interrupted in their flow too often. As a consequence, they could leave your website forever or immediately activate an AdBlocker.
Do not trick with close buttons
It is really frustrating for users who are not interested in your advert if they can’t close the interstitial ad on their own because there is no clearly visible close button.
That’s why you should never hide the close button, overlay it with other elements or similarly prevent users from closing the ad.
Split-test the performance of your ads
Measuring the performance of an ad is the basis for optimizing it. That’s why you should keep an eye on the click-through rate of your interstitial ad.
Use split tests to identify the ads with the best performance, e.g., adding certain ad units to an ad group that you assign to your popup placement.
Target interstitial adverts to specific user groups
When integrating interstitial ads, you don’t have to treat all users equally. But you can use visitor conditions to target specific user segments.
This way, you could, for example, hide these ads for returning users and show them only to visitors who come to your website via a search engine.
Use Frequency Capping to avoid frustration
The excessive use of this ad format can negatively impact the user experience of your visitors, leading to higher bounce rates and poor feedback.
Use frequency capping to avoid this problem and limit the number of ad impressions per user.