Find the basic setup information for our Selling Ads add-on on this page.
Table of Contents
Getting started with Selling Ads
Setting up WooCommerce
The Selling Ads add-on is based on the free e-commerce solution WooCommerce.
After installing WooCommerce on your site, the basic setup of WooCommerce is simple if you use their Wizard.
- Install the WooCommerce plugin and activate it
- Use the Wizard to create all necessary pages automatically
- Store Locale Setup: Set store location and currency; units don’t matter
- Shipping & Tax Setup: Disable shipping products option; set up tax according to your local laws
- Payments: select your preferred payment providers (e.g., credit card, direct bank transfer, check payments, PayPal, stripe, or cash on delivery)
- Ready: decide for yourself whether you allow tracking or not; this has nothing to do with Advanced Ads
You can also run WooCommerce as a “normal” store and still sell ads through it.
Setting up the Selling Ads add-on
After you installed WooCommerce, go to Advanced Ads > Settings > Selling to set the basic options.
Store admin email
This email address is for active communication. Clients who reply to an automated email from the ad management part of the plugin (not the email generated by WooCommerce) will send it to this address.
Store sender email
This address is only used to send emails from the store. For technical reasons, it should be an address with the domain of the store in it.
Setup page
Choose the page on which the client can upload his data. The plugin will create a page with a very basic layout if you leave the default option enabled.
When you choose an existing page, the form will be prepended to that page’s content, and you can add something else after it or use all other features of your theme on that page, including its layout. You might also want to discourage search engines from indexing this page.
When using the default page for the ad setup, make sure that the permalinks option under Settings > Permalinks is set to something other than “Plain”.
Hide ad setup
Enable this option if you don’t want to include the link to upload the ads’ content anywhere in the frontend. This is useful if you set up ads for advertisers manually or use Selling Ads for internal purposes.
WooCommerce fixes
In case you are using WooCommerce only for Selling Ads, activate the WooCommerce fixes. It will optimize some parts that are not suitable for most ad stores, like removing product images.
List ads in the customer account
Enable this option to show an “Ads” link in the customer account in the frontend with a list of purchased ads and additional information.
The page contains links to the public tracking reports of ads when the Advanced Ads Tracking add-on is enabled.
Setting up a new ad product
An “ad product” is a combination of options regarding ads. Some of them influence what clients can purchase. Others define how the ad behaves after being purchased.
Product settings
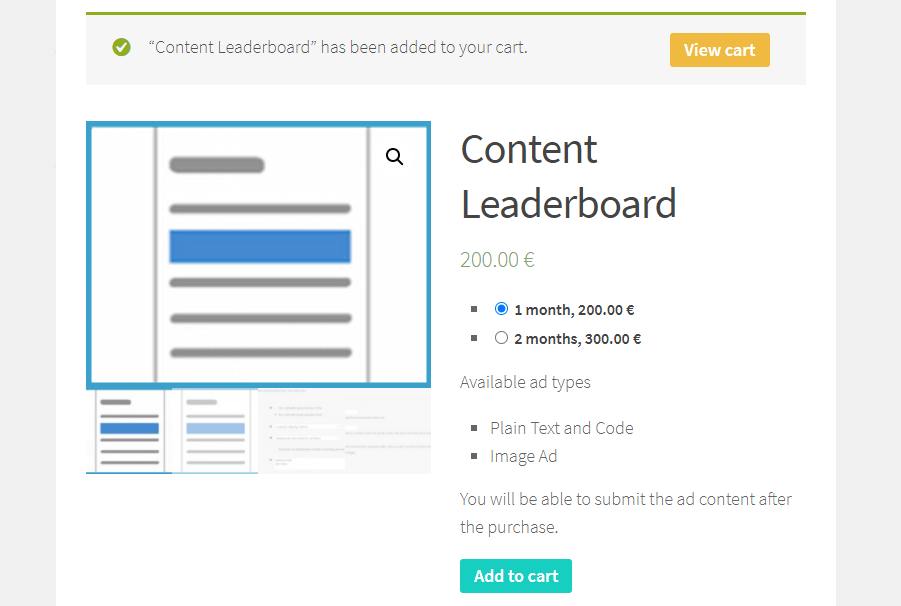
When you have the Selling Ads add-on and WooCommerce installed, you will find your ad product in the Products > Products menu in your WordPress admin panel.
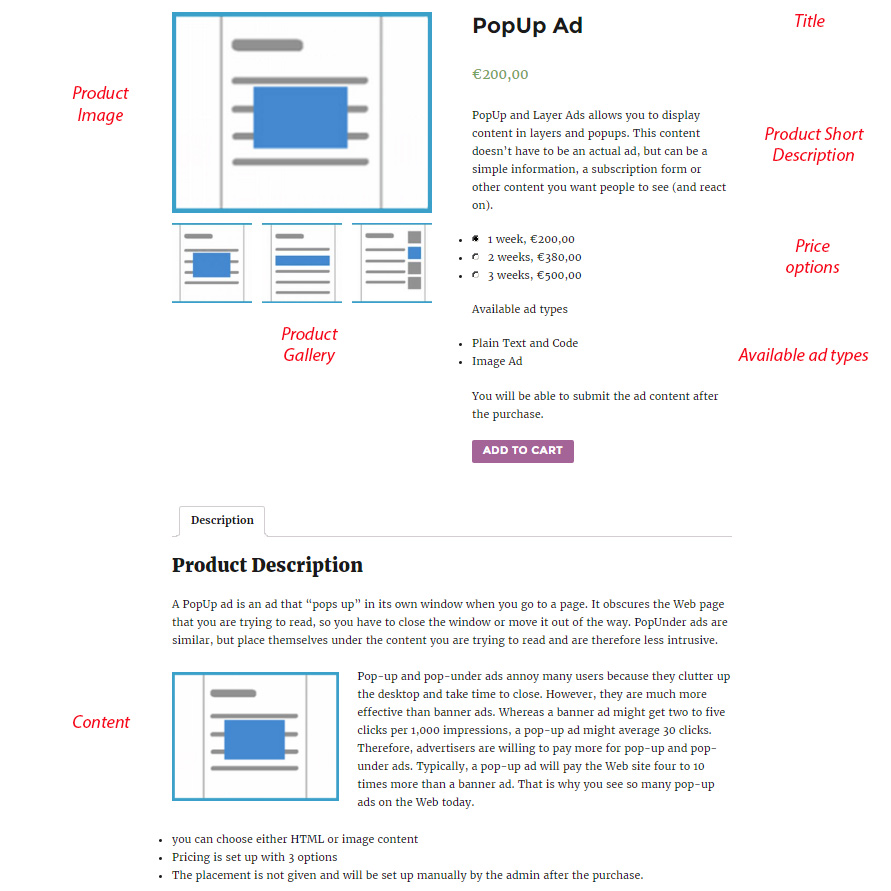
Product name
This is the publicly visible title of the ad product. It helps if this is a bit descriptive, e.g., “First Medium Rectangle in right Sidebar”.
Content
This is the detailed description of the product. You could explain the options, e.g., placements, a bit more or explain some details about the offer, especially if there are some custom conditions you need to set up specifically for each order.
You should also comment if there are limitations regarding display or visitor conditions with this ad (e.g., only specific pages, desktop only, etc.)
Product data
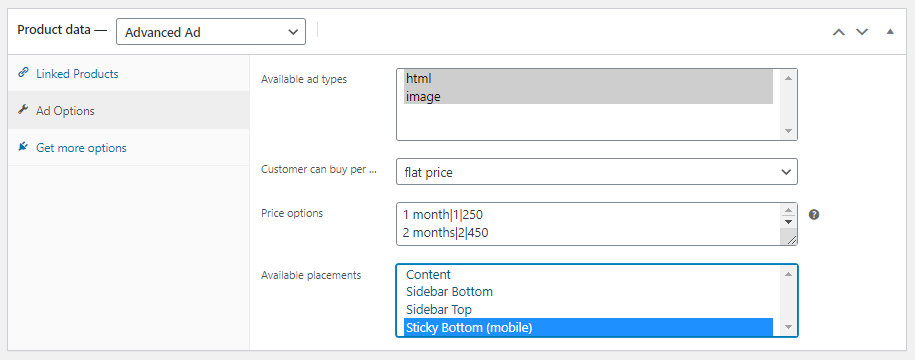
Select the Advanced Ads product type to see the ad specific options and handle ad products in the frontend correctly.
General
Please ignore this section if you still see it.
Available ad types
Which ad types clients can purchase.
- HTML – customers can upload HTML, CSS, JavaScript or plain text content
- Image – customers can upload an image
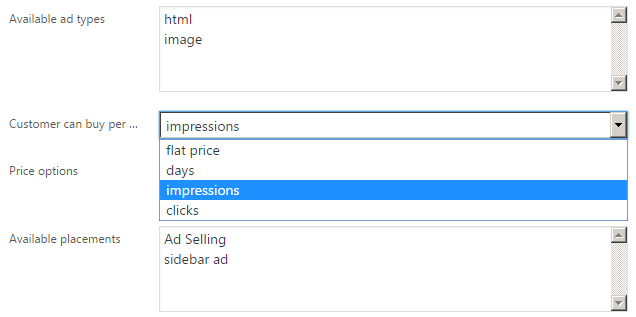
Customers can buy per …
This option determines the limits of the ad.
- Flat price – if you have a custom setup that needs more control
- Days – purchase the ad space for a specific number of days starting on the publishing date
- Impressions & Clicks – available with the Tracking add-on
Price options
Set up different prices and pricing options.
Basic meaning: public label | value | price
Example:
1 Month |1| 100
2 Months |2| 180
3 Months |3| 250
The second statement/specification value is only important for types like days, clicks, or impressions. For a flat price, it only needs to be unique for each option. Customers can select from these options.
Available Placements
Select the placement to which the ad is injected after being published. If you select multiple placements, the customer can choose. When you choose none, you have to manually place the ad after the purchase was made and the ad accepted.
If you sell an ad for a placement already linked to a group, then the new ad is automatically added to that group. It will have an ad weight of 5.
By playing with the weight of the ads already in the group, you can accomplish various setups. E.g.,
- If you already have an ad in the group and want the sold ad to rotate evenly with the existing ad, give the current ad the weight 5.
- You can use a fallback ad in an “ordered” group with a weight below 5. As soon as a new ad is sold, it will display instead of the existing one. When the sold ad expires, the existing ad will show up again.
Product Short Description
A short summary of your product description that appears as a brief description on the top of the single product pages.
Product Image
Upload a product image, which appears on the shop overview and on the single product page.
Product Gallery
Upload more images, which appear as a gallery under the product image on the single page.
Known issues
Price options might not show up if your theme has a custom single product page. Advanced Ads Selling Ads needs the woocommerce_template_single_add_to_cart() function to run there to add its fields.
Ad Sales Types
You can choose if you want to offer your ad space per day, per impressions, per clicks (both with the Tracking add-on), or custom offers. The following manual explains the differences between these modes and how to handle them.
Selling Ads per days
When you allow customers to purchase an ad per day, an expiry date will be added to the ad, starting when published and expiring the number of selected days in the future.
The prices settings in the ad product option might look like this (public label | value | price):
1 day|1|100
5 days|5|400
30 days|30|2000
This means that one day costs 100. But 5 days only cost 400 and 30 days just 2000. You can enter as many lines as choices you want to give the advertisers to choose from.
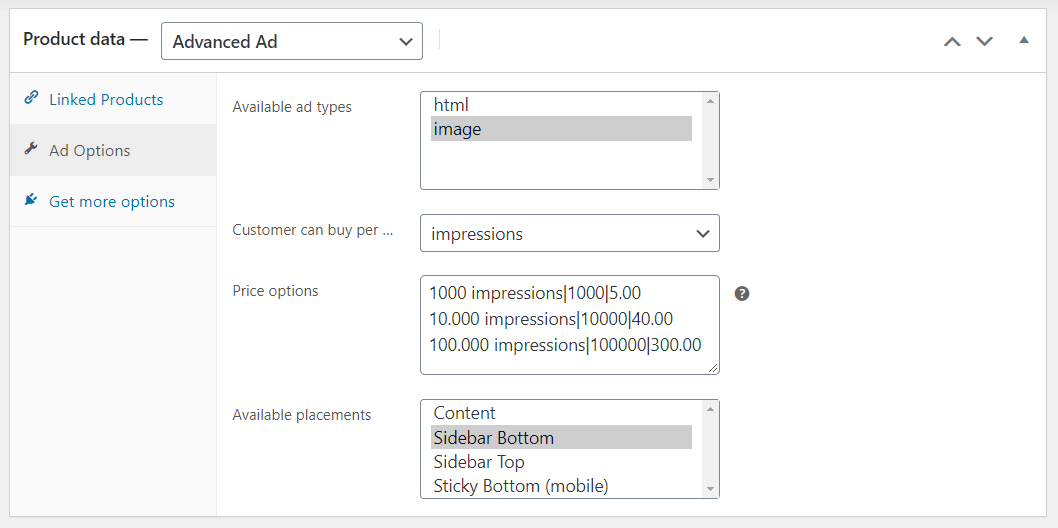
Selling ads per impressions or clicks
When you have the Tracking add-on enabled, you can also sell ads with a limit on impressions or clicks.
The prices settings in the ad product option might look like this (public label | value | price):
1000 impressions|1000|5.00
10.000 impressions|10000|40.00
100.000 impressions|100000|300.00
or
1 click|1|1.00
5 clicks|5|4.00
30 clicks|30|20.00
Note: impression or click limits are not updated for every event due to performance reasons. The default interval is 60 minutes, but you can change that in the Tracking add-on settings.
Selling ads with custom options (flat)
The flat sales option allows you to practically sell ads under any condition. The main difference to the other sales types is that no limitation is made automatically. For example:
- you can add different options for each month in the future, but when accepting the purchase, you need to set the start and expiry date manually
- you can offer different prices for ads on mobile or desktop but need to set the appropriate visitor condition manually after the purchase
For the sell-per-month example, the price options might look like this (public label | value | price):
November 2016|1116|800
December 2016|1216|1000
Holiday Season 2016|1316|600
The “value” should be different for each option but has no practical effect.
Workflow after an ad was purchased
After an advertiser ordered an ad, the following is happening:
Directly after the purchase
- order: is visible in WooCommerce > Orders
- order status: is on hold/pending (when bank transfer or cash is on delivery)
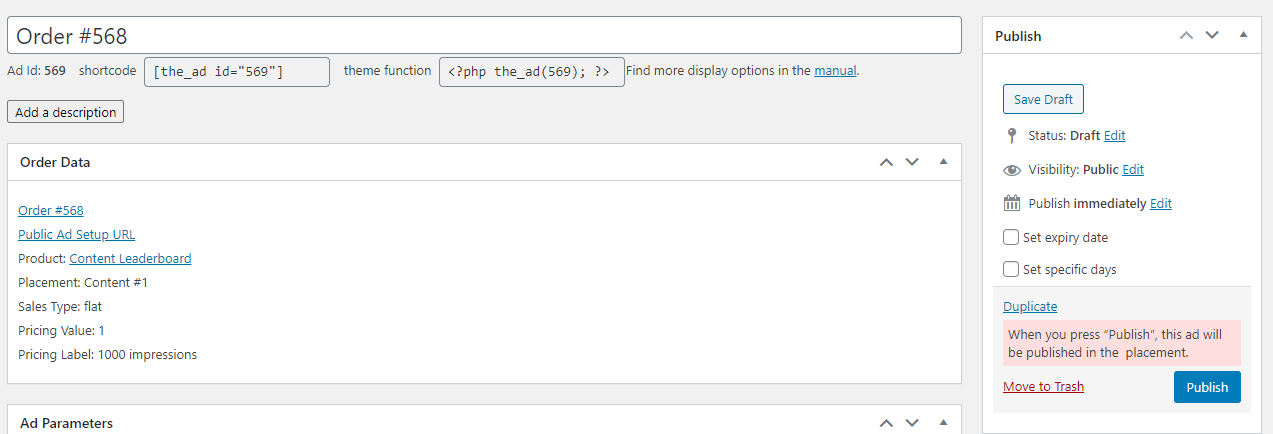
- ad: is already created with the name “Order #ORDER_ID”
- ad status: is “draft”
- client: receives an email with the link to the ad setup page where he can upload his ads
- client: receives an email from the store about his purchase (WooCommerce order confirmation)
- admin: receives an email from the store about the purchase (WooCommerce order confirmation)
Submitting ad content
The client can now submit the content of the ad. This happens on a per-ad basis. Once he has done that, the following happens:
- ad status: changed from “draft” to “pending”
- admin: receives an email about the pending ad so that he can review the content
- client: can no longer change the ad content
Rejecting the ad content
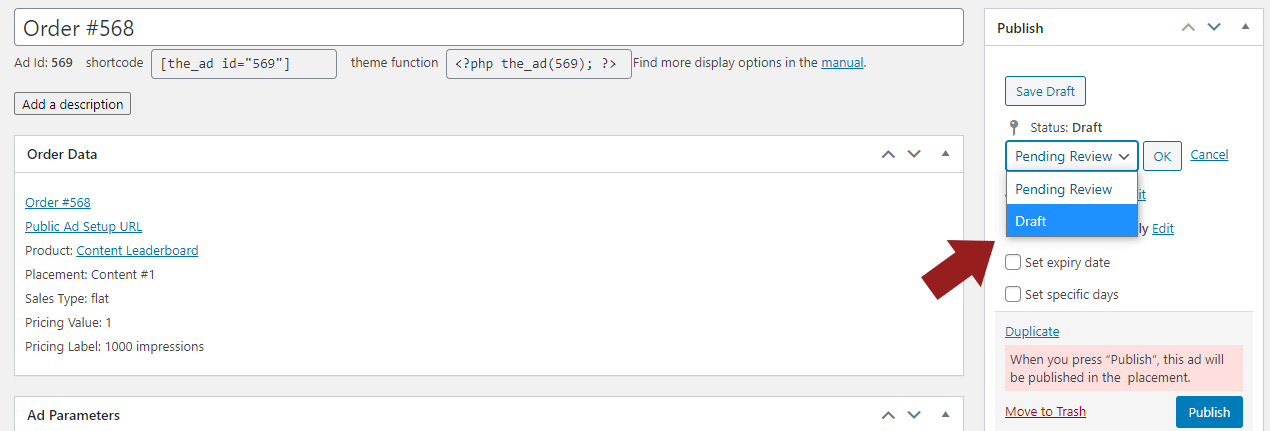
The admin can reject the ad content by changing the ad post status back from “pending” to “draft”.
- ad status: changed manually by admin from “pending “to “draft “
- client: receives an email about the rejection
- client: can upload new content again
After this step, the process is back to “submitting ad content”.
Publishing an ad
When the ad admin publishes an ad using the Publish button, which belongs to an order.
- ad status: changed from “pending “to “published “
- client: receives an email about the ad being published
- ad: is injected into the placement, if one was given
This trigger does not apply when the status is changed from “draft” to “published” directly.
If the placement contains a single ad, this ad will be swapped against the purchased ad. If the placement contains a group, the purchased ad will be injected into that group with a weight of 1.
Deleting Ads or customer data
Please, first remove ads and stored information within Advanced Ads before deleting customer data in WooCommerce. Otherwise, it might break your site.
Miscellaneous
Processing the payment and order status is independent of the ad setup. When you publish an ad for an unpaid or pending order, it will still be visible.
The triggers above only apply to ads created with orders. Ads not belonging to an order will not send our emails or trigger events when their status changes.
The notifications are sent from the sender address set in your settings, but the client or admin can reply to them directly to reach the other party.
Advanced options
In the following, you can find information about advanced features or changes.
Other Notes
Selling Ads is compatible with the AffiliateWP plugin. To enable affiliate commissions for referred ad space sales, you need to activate the integration for WooCommerce in Dashboard > Affiliates > Settings > Integrations.
Some users asked us about the possibility of combining selling ads with recurring payments and subscriptions. So far, we don’t know of any solution that can do that.
The integration with the WooCommerce Subscriptions plugin is not possible.


