Some of our users receive a video file from their advertisers and a URL to which clicks on this video should lead. But how do you implement such video ads in a WordPress site using Advanced Ads?
This tutorial will teach you how to create a video ad using HTML5 tags. You will also see how to customize this video ad with additional parameters and track their performance. Finally, you will see a workaround to implement pre-roll video ads.
Table of Contents
Create a new HTML5 video ad unit
The <video> tag was introduced in HTML5 to specify a video on a website. This format is used by websites like YouTube and supported in all major browsers.
While many people use the HTML5 format to integrate (music) videos into a WordPress site, we want to look today at how we can use this technology to embed video ads.
The method described in this tutorial for integrating video ads using the HTML5 video tag works on standard WordPress websites and AMP pages.
First, create a new ad in Advanced Ads for our video ad. Select the “Plain text and code” ad type here.
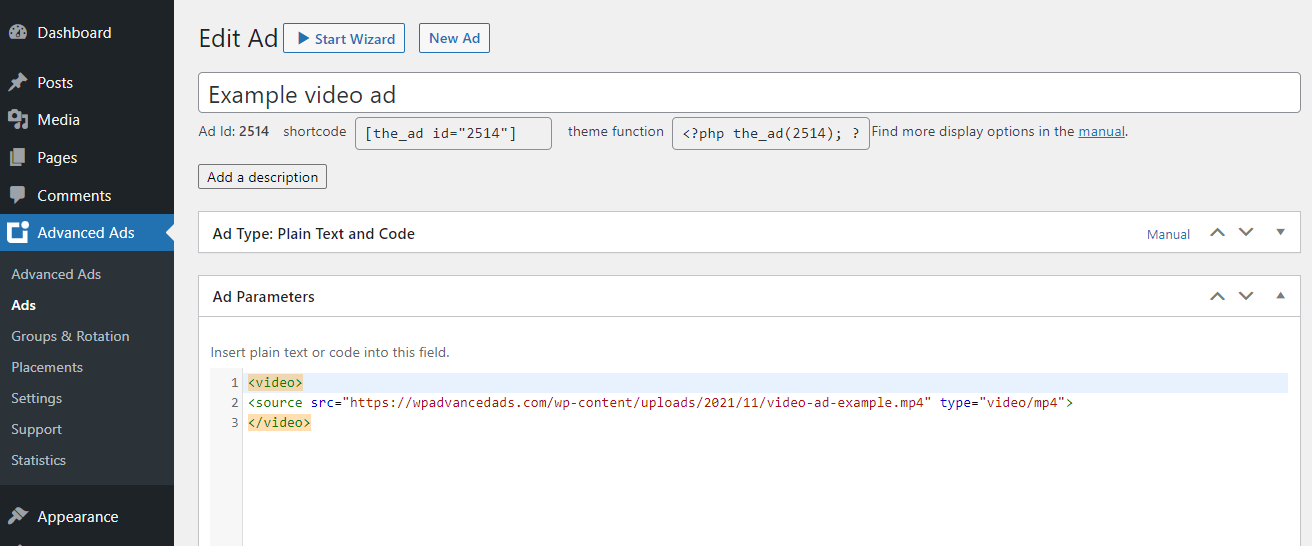
Then you can paste the following code example and replace the video file path with the path of your video ad file.
<video>
<source src="https://wpadvancedads.com/wp-content/uploads/2021/11/video-ad-example.mp4" type="video/mp4">
</video>Code language: HTML, XML (xml)
You can upload this file to the WordPress media library, or use the URL from an external source.
Depending on how much traffic your site has, how good your hosting is, and how large the video ad is, uploading the video files to your server can cause problems. For instance, large video files can cause the videos to load slower if many users access them simultaneously.
Customize your video ad
You can customize the HTML5 <video> tag with different parameters and set exactly how the website loads and plays the video ad. You can use parameters like autoplay, loop, preload, and more.

Adding attributes
| autoplay | If the video ad code contains the autoplay attribute, the video will play automatically when the website loads. |
| playsinline | The playsinline attribute ensures the functionality of autoplay in Safari on macOS and iOS |
| controls | In the video ad, you can use the control attribute to show playback controls like volume, wind backward/forwards, and pause/resume. |
| loop | If you add the loop attribute to the code of your video ad, the video will start again from the beginning after it ends. |
| muted | By default, your video ads will play with sound. Add the muted attribute to the code if you want to prevent this and mute the video ads. |
| height | The height attribute specifies the height of the rendering area in pixels. |
| width | The width attribute specifies the width of the rendering area in pixels. You can, of course, also use max-width here. |
Example video ad with enabled controls and muted autoplay
The following example shows how to customize the code with the attributes from the table above, ensuring that the video ad plays automatically. Also, these attributes will ensure that the video ad is muted and looped. Finally, this code also determines the maximum width of your video ad to match the available width.
<video max-width="100%" autoplay playsinline controls muted loop>
<source src="https://wpadvancedads.com/wp-content/uploads/2021/11/video-ad-example.mp4" type="video/mp4">
</video>Code language: HTML, XML (xml)
Example video ad with multiple file formats
If your advertiser offers the video ad in different video formats, you can integrate them into your code at the same time to increase compatibility with niche browsers.
The following example shows how to do this if the video ad is available as both an MP4 and an OGG file.
<video max-width="100%" autoplay playsinline controls muted loop>
<source src="https://wpadvancedads.com/wp-content/uploads/2021/11/video-ad-example.mp4" type="video/mp4">
<source src="https://wpadvancedads.com/wp-content/uploads/2021/11/video-ad-example.ogv" type="video/ogg">
</video>Code language: HTML, XML (xml)
Adding a link to the video ad
You should already see the video ad if you now embed this ad unit into your website, e.g., with a placement.
However, the most important thing is still missing: the link to the advertiser’s landing page.
For this, we enclose the video ad with an <a> tag that contains the destination link.
<a href="https://wpadvancedads.com">
<video max-width="100%" autoplay playsinline controls muted loop>
<source src="https://wpadvancedads.com/wp-content/uploads/2021/11/video-ad-example.mp4" type="video/mp4">
</video>
</a>Code language: HTML, XML (xml)
Your visitors can now click on the video ad and will be redirected to the landing page.
Fallback content
Any content that you insert between the opening and closing <video> tags is so-called fallback content. It is displayed when a browser does not support <video> tags. Actually, this hardly ever happens since all popular browsers now support this technology.
If you want to take precautions for this rare case, you could perhaps place a text here, that will be displayed if the browser cannot play the video file.
<a href="https://wpadvancedads.com">
   <video max-width="100%" autoplay playsinline controls muted loop>
<source src="https://wpadvancedads.com/wp-content/uploads/2021/11/video-ad-example.mp4" type="video/mp4">
	   <p>If you are reading this, your browser does not support the HTML5 video element.</p>
</video>
</a>Code language: HTML, XML (xml)
Tracking Video Ads
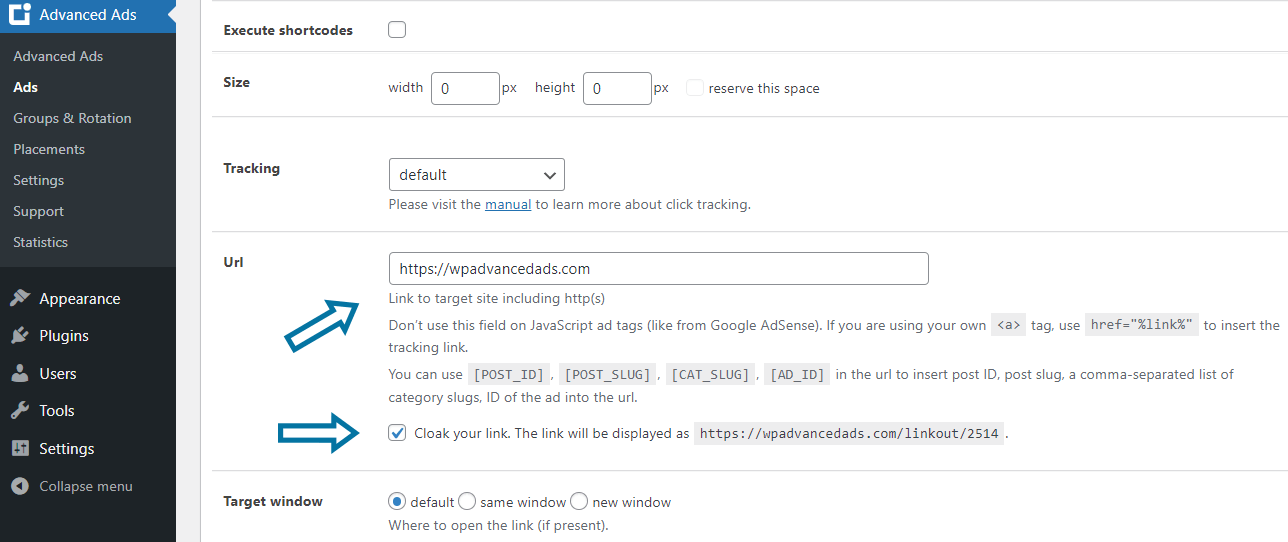
If you have the Tracking add-on enabled on your website, you can use it to measure the performance of your video ad and record the clicks and impressions.
All you have to do is enter your advertiser’s landing page in the URL field of the tracking options.
Of course, you can enable link cloaking for this type of ad as well.
Pre-roll video ads
You can also implement the method described in this tutorial to create a workaround for pre-roll video ads.
Please follow the instructions below:
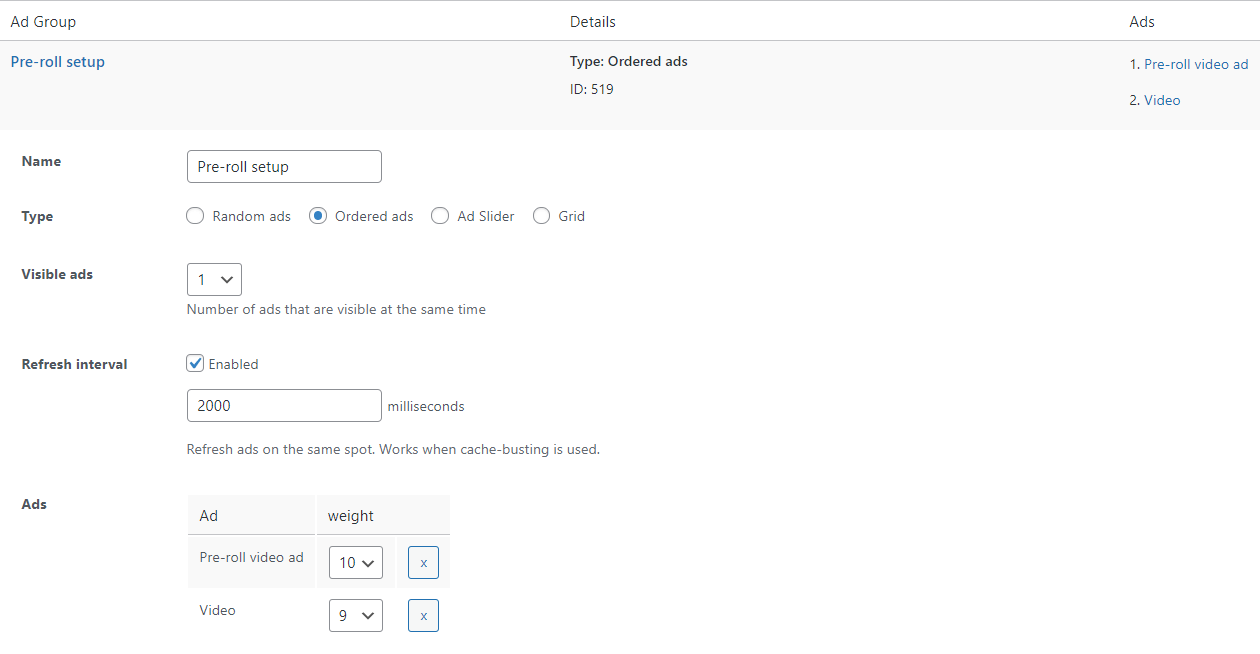
- Create your video ad for the pre-roll video ad as described above.
- Create a second ad that contains your actual video.
- Add both ads to a new group. Choose the group type: “ordered ads”.
- Define a higher ad weight for the pre-roll video ad than for the ad containing the video.
- Enable the “Refresh Interval” option in the group settings
- Add the following code to your
functions.php, specify the IDs, and refresh intervals for both ads.
add_filter( 'advanced-ads-group-refresh-intervals', 'advads_refresh_intervals' );
function advads_refresh_intervals( $intervals ){
    // pattern: $intervals[ AD_ID ] = PERIOD_IN_MILLISECONDS;
    $intervals[ 4 ] = 6000;
    $intervals[ 15 ] = 15000;
    return $intervals;
};
The code example above defines the delay of the ad with the ID 4 to 6 seconds and the ad with the ID 15 to 15 seconds.
To ensure that the video ad doesn’t start playing as soon as the page loads, but only when visible to the visitor, you should enable lazy loading for this placement.
You should still make sure to embed both videos with the same height. Otherwise, white space will appear after showing the higher ad unit.
In this configuration, the rotation would restart from the beginning after the end of the 2nd video. You can add the “Max. Ad Impressions” visitor condition to the video ad to avoid this.
Please, keep in mind that refreshing ads on the same spot is not supported on AMP pages.