In the rapidly evolving landscape of online advertising, publishers must stay ahead of the curve. Monitoring ad impressions and clicks is just the tip of the iceberg—strategically collecting and digesting data directly propels advertising success. This is where Google Analytics comes into play.
With the Advanced Ads Tracking add-on, you can smoothly integrate Google Analytics into your ad setup. You can analyze ad impressions and clicks, generate custom event reports, and seamlessly group the ad performance data with other valuable information, such as landing pages, traffic sources, geolocation, etc. This holistic approach enables you to unlock more profound insights into your audience’s behavior and fine-tune your advertising campaigns for optimal results.
Another significant advantage of utilizing Google Analytics for ad tracking is alleviating the tracking burden on your local database and server. This results in improved performance and reduced strain on your infrastructure. The Advanced Ads tracking is fully compatible with the new Google Analytics 4, ensuring you have access to the latest features and functionalities.
Table of Contents
This manual will guide you through implementing and leveraging ad tracking in Google Analytics 4. From activating the tracking method to analyzing the data and overcoming possible challenges, you’ll find all the information you need to harness the full potential of Google Analytics for ad performance optimization. Let’s dive in!
Activate the ad tracking for Google Analytics
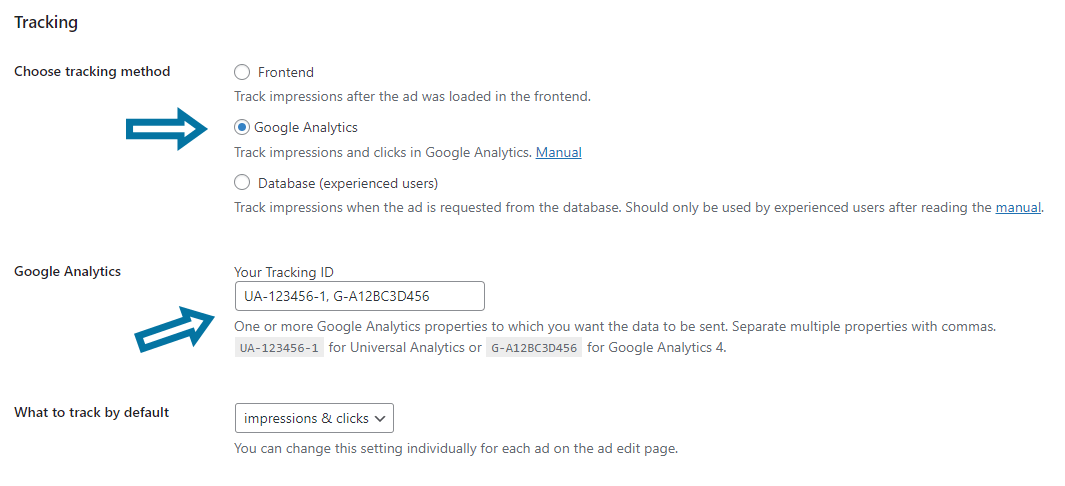
To monitor your ad performance with Google Analytics, you first need to install and activate the Tracking add-on. Afterward, go to Advanced Ads > Settings > Tracking and set the tracking method to “Google Analytics”.
Then, enter your tracking ID. It is possible to send the tracking data to multiple properties by entering the corresponding IDs. Separate them with commas in this case.
Your website must have the Google Analytics code immediately after the <head> tag in the header of each page of your website to ensure that the tracking works. You can use a dedicated plugin to embed this code or insert it with Advanced Ads into your website’s header.
Activating the Google Analytics option in Advanced Ads causes the plugin to fire off the appropriate Google Analytics events.
How to find the property ID in Google Analytics 4
To find the tracking ID for your Google Analytics 4 property, you will need to follow these steps:
- Sign in to your Google Analytics account.
- Click on the Admin button in the bottom left corner of the page.
- In the “Property” column, select the property for which you want to find the ID.
- In the “Property” column, click on “Data Streams”.
- Click on the web data stream name for which you want to find the property ID.
- The property ID will be listed on the page as “Measurement ID” and looks like
G-TDVL1JBF6K. Use this unique identifier for your property when setting up your website’s Google Analytics tracking code.
Alternatively, you can also check the Measurement ID in the Google Tag Manager container, where you have set up the GA4 tracking.
Tracking locally and with Google Analytics at the same time
You can combine the benefits of local tracking methods with those of Google Analytics by enabling Google Analytics tracking additionally. These benefits include email reports, auto calculation of CTR, and limiting ads views by their overall number of impressions or clicks.
Apply these steps:
- Switch to a local method and save the settings.
- Add the following line to your
wp-config.php.
define( 'ADVANCED_ADS_TRACKING_FORCE_ANALYTICS', true );
Code language: JavaScript (javascript)- Reload the settings page.
- Now, you will see an input field for your Google Analytics ID, even if you have selected the frontend tracking method.
- Enter your Google Analytics tracking ID in that field and save the settings.
If you have set up the tracking with Google Analytics as an additional method and want to disable it again, please do not forget to remove this entry from your wp-config.php.
Analyze ad impressions and clicks in Google Analytics 4
To retrieve the ad tracking results in Google Analytics 4, create a custom dimension first.
This dimension is required for these numbers to show up in your reports. Without it, you won’t see any data from Advanced Ads in your reports.
Create a custom dimension
Open your Google Analytics dashboard and navigate to Admin > Custom definitions > Create custom dimensions.
Fill in the following information:
- Dimension name:
Advanced Ads(customizable) - Description:
Advanced Ads event label(customizable) - Scope:
Event(mandatory) - User Property/Parameter:
event_label(mandatory)
Testing Google Analytics tracking
To test if your tracking implementation works, go to Reports > Realtime and head over to the “Event count by Event name” widget after performing some activity on your page. There, you should find the events fired off by Advanced Ads: “advanced-ads-impression” and “advanced-ads-click”.
If you just enabled the tracking with Google Analytics, it may take up to 24 hours to see impressions and clicks in Behavior > Events > Overview.
Customizing the event names
In Google reports, the clicks and impressions tracked by Advanced Ads are categorized under specific event names. By default, these event names are “advanced-ads-click” for clicks and “advanced-ads-impression” for impressions. However, you can change these labels to suit your preferences better.
You can use a filter to adjust these event labels and define your custom event names. For example, I’ve modified the event names on this page to “Clicks” and “Impressions”.
Here’s how you can do it:
- Insert your preferred event names into the following code example, replacing ‘your-custom-event-name’.
- Copy the modified code into the
functions.phpfile of your theme. - Check the Google Analytics realtime report to confirm that the events now appear with your new labels.
add_filter( 'advanced-ads-tracking-ga-click', function(){
	return 'your-custom-event-name';
} );

add_filter( 'advanced-ads-tracking-ga-impression', function(){
	return 'your-custom-event-name';
} );Code language: JavaScript (javascript)
Event reports
Afterward, you can find the clicks and impressions of your ads in your Google Analytics reports. Google stores them as events in different places.
Roughly one day after adding this custom dimension, Google Analytics automatically adds an “Advanced Ads” widget to the detailed Impressions and Clicks event reports.
You can find ad-specific results, detailed impressions, and clicks event reports under Engagement > Events. However, please note that it may take until the next day for the data to become available.
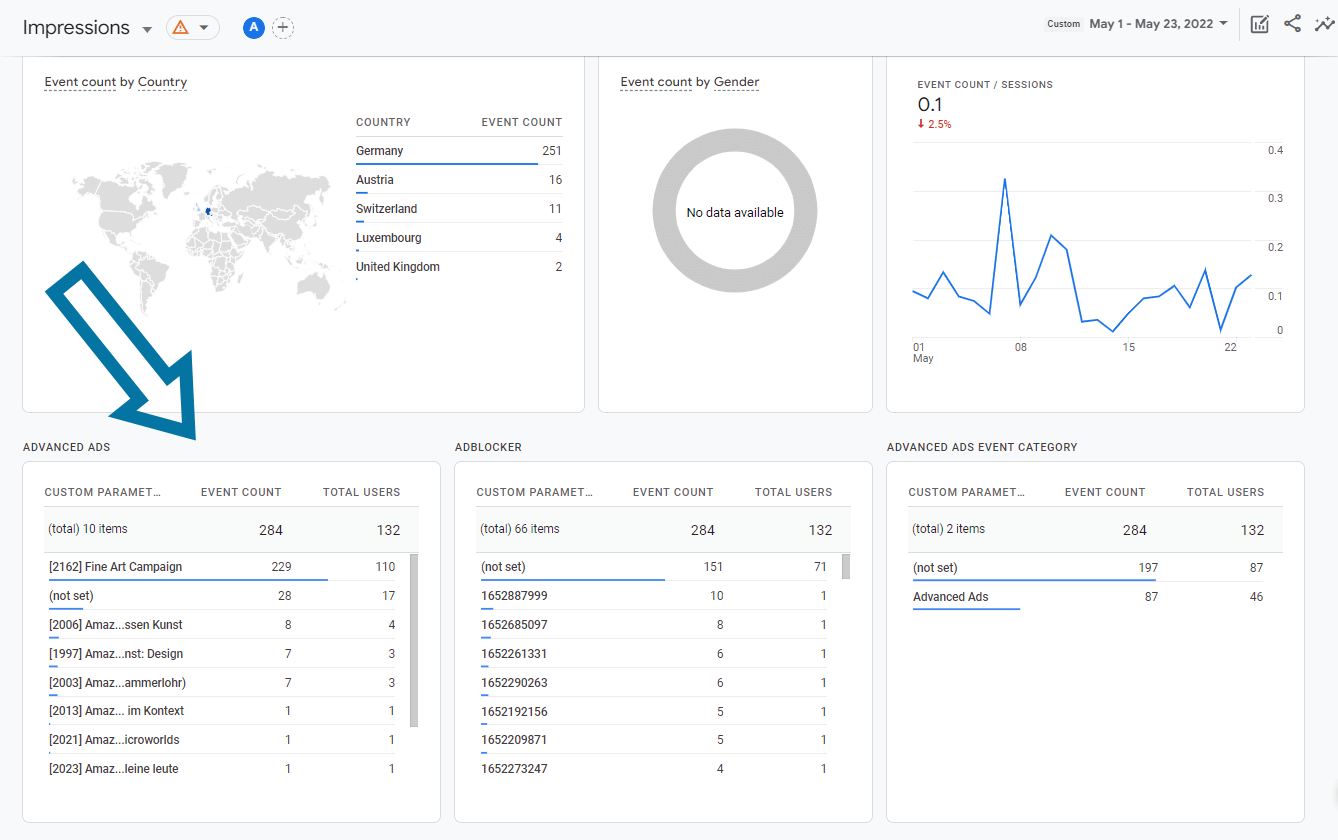
Don’t be confused if you only see the result “(not set)” in the related column after adding the dimension and selecting it in the reports. Tracking of the ad units’ names will only start after you create the custom dimension.
That’s why you cannot see this data earlier. Note that it’s also not possible to view older data that was collected before you created the custom dimension.
Combine clicks and impressions with other metrics
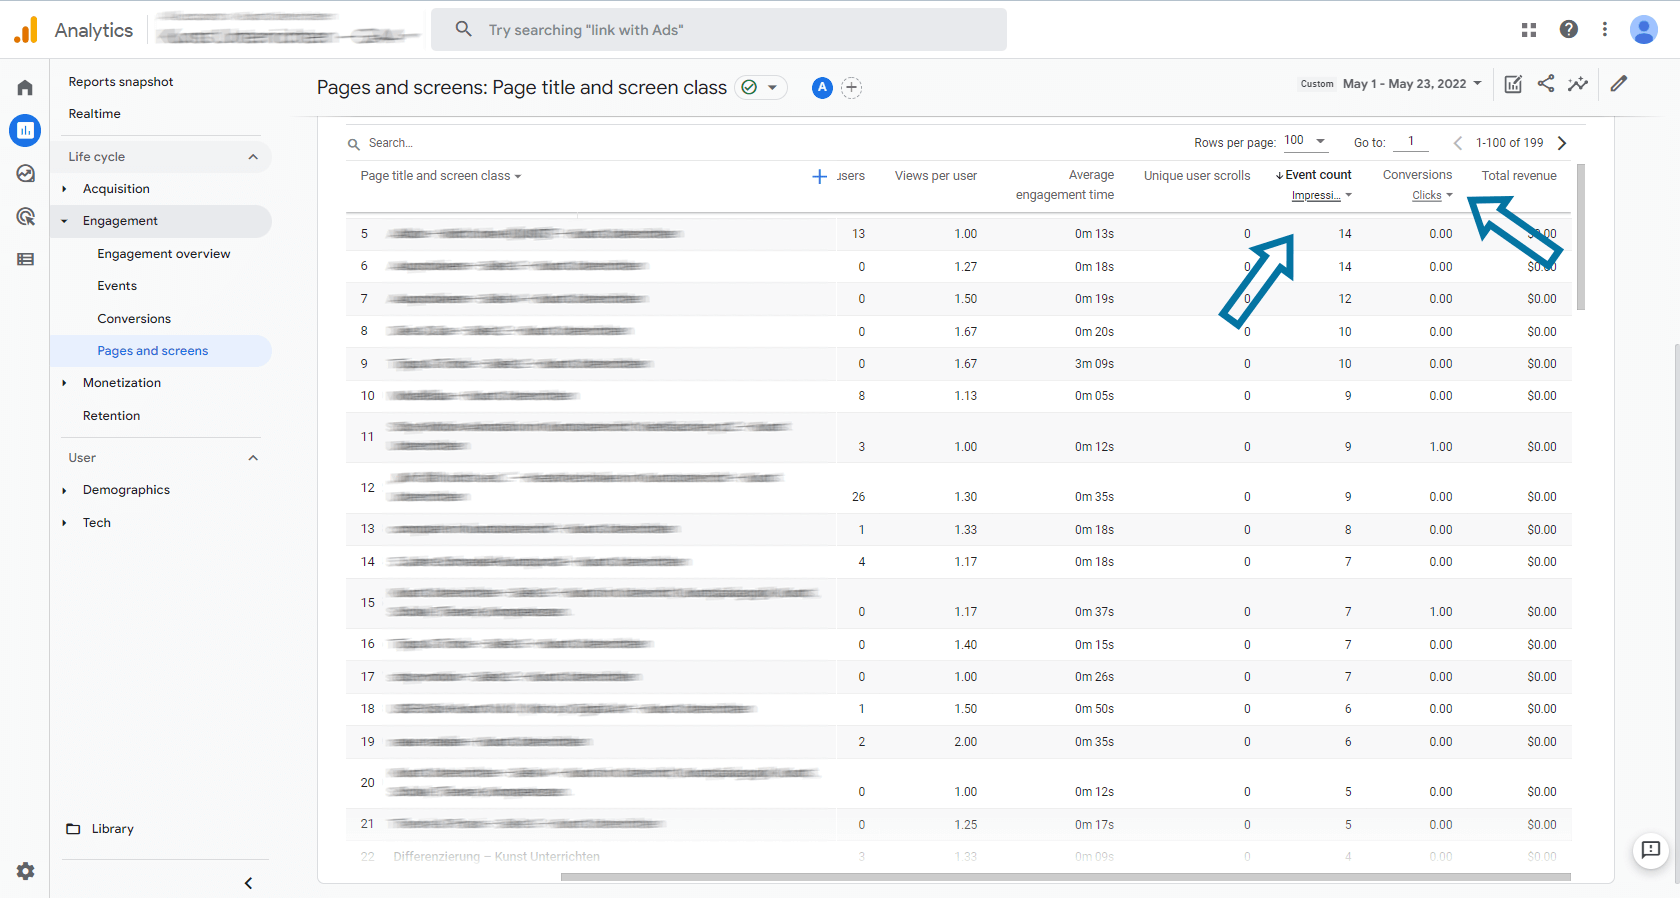
To analyze the ad performance of specific posts and pages, consult the corresponding data in the Engagement > Page and screens report.
Select Impressions from the dropdown menu under “Event count” in the table’s head row. Then, choose the clicks in the conversions column next to it. In this view, Google Analytics shows the data for all ads of each page summarized and not ad-specific.
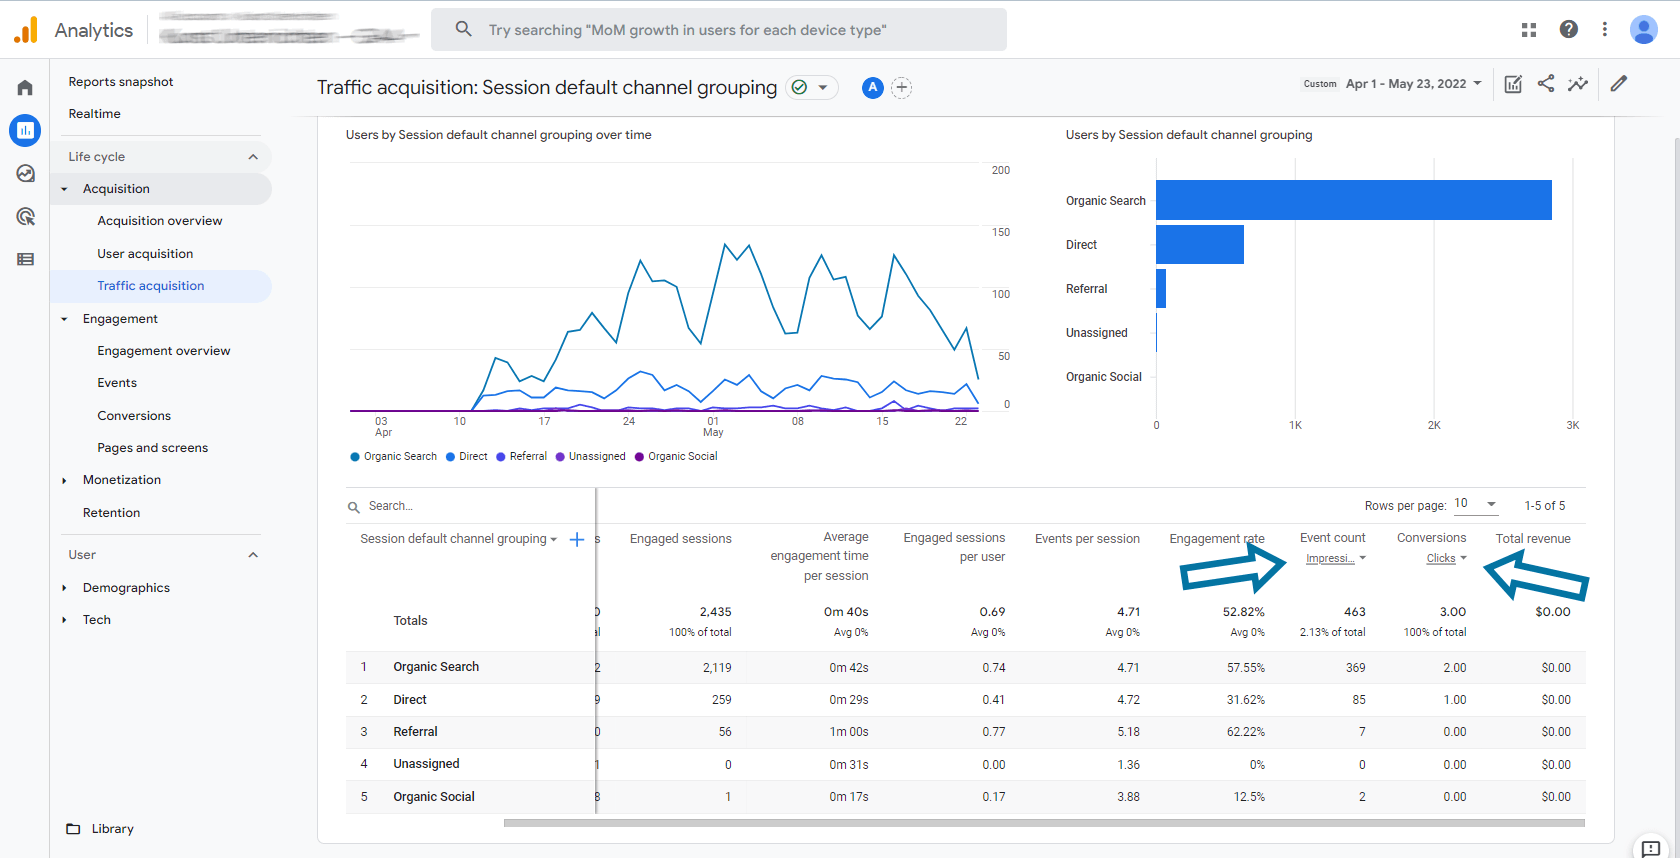
You can also display the number of impressions and clicks in other reports like User Acquisition, Traffic Acquisition, Demographic Details, and Tech Details.
See recorded clicks and impressions for specific ads
To see the impressions and clicks of a specific ad unit:
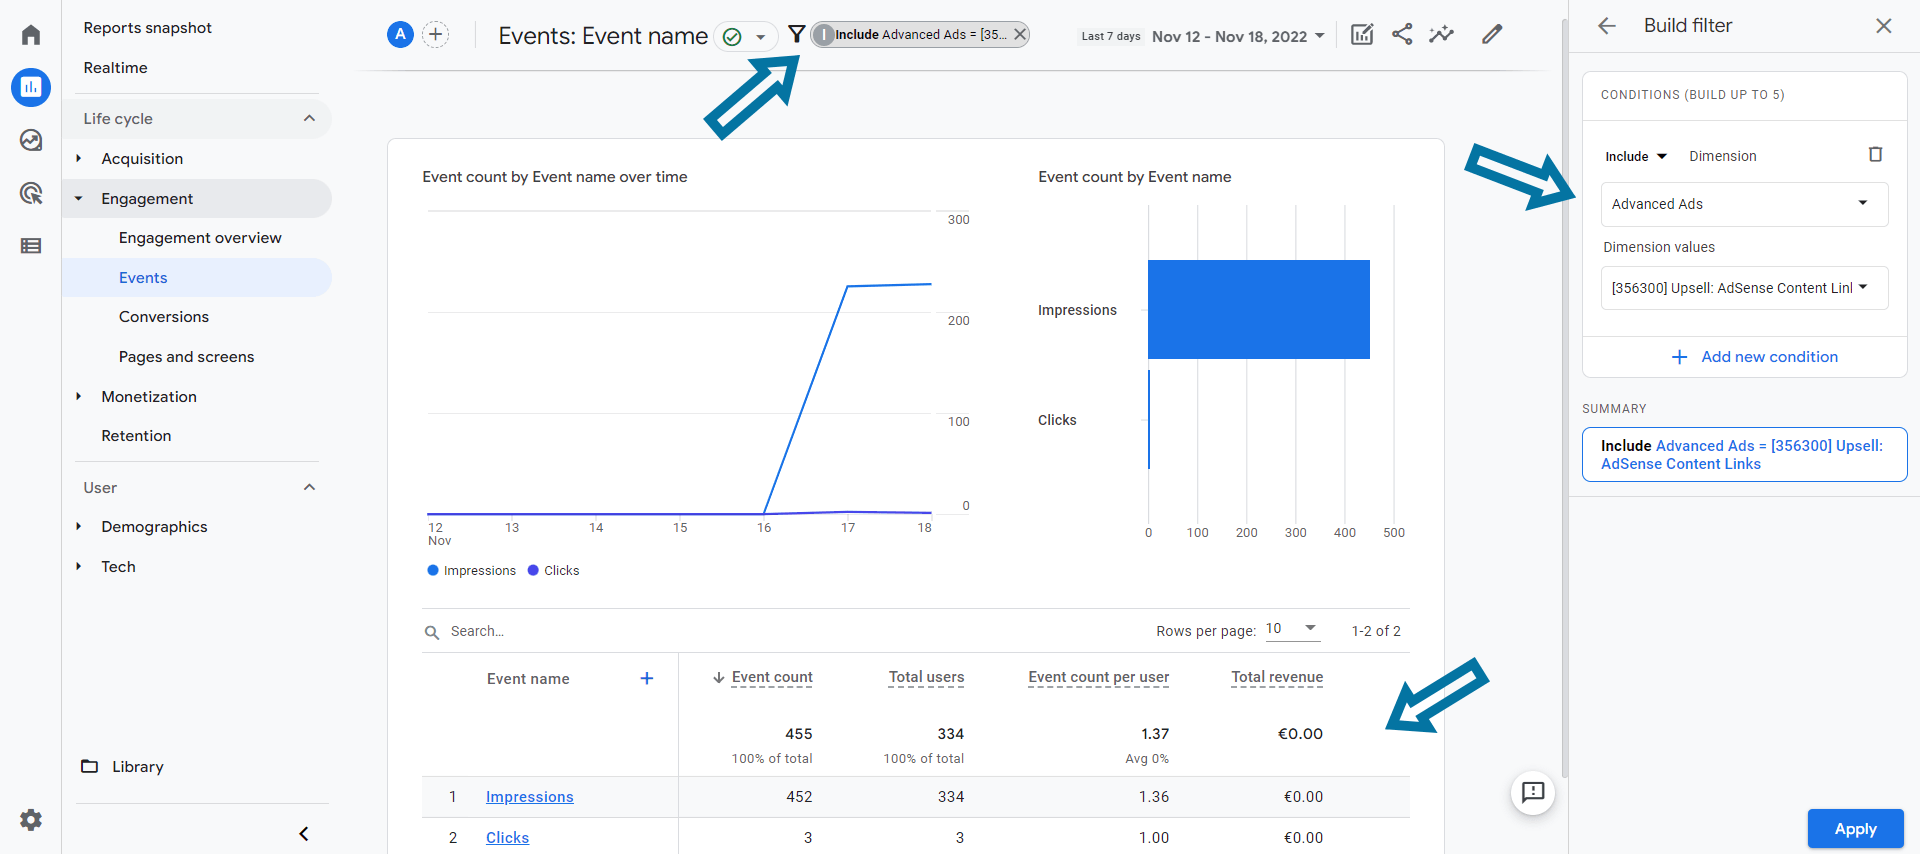
- Navigate to Reports > Engagement > Events.
- Use the filter function at the top of the screen.
- Include the custom dimension Advanced Ads and select one of your ads in the dropdown menu that appears. You can also utilize this filter function to select multiple ads in this view.
After applying your filter settings, Google Analytics will update the data table. Use the sharing option to download this report as a PDF file or to copy a shareable direct link to this report to your clipboard.
If you add the Advanced Ads column to this report, you will have the impressions and clicks of all ads on one screen. If there are too many ads for a clear view, use the filters mentioned above to narrow the selection to specific ads.
Detailed click tracking
Find the tracked clicks in the report under Engagement > Conversions. Now, you can group this data with other metrics. For example, you may choose user-related data such as geolocation, device, browser, or language to figure out which visitor segment your ads appeal to most.
But you can also merge website-related information, e.g., by grouping clicks with the landing page or the page from which a user made the click.
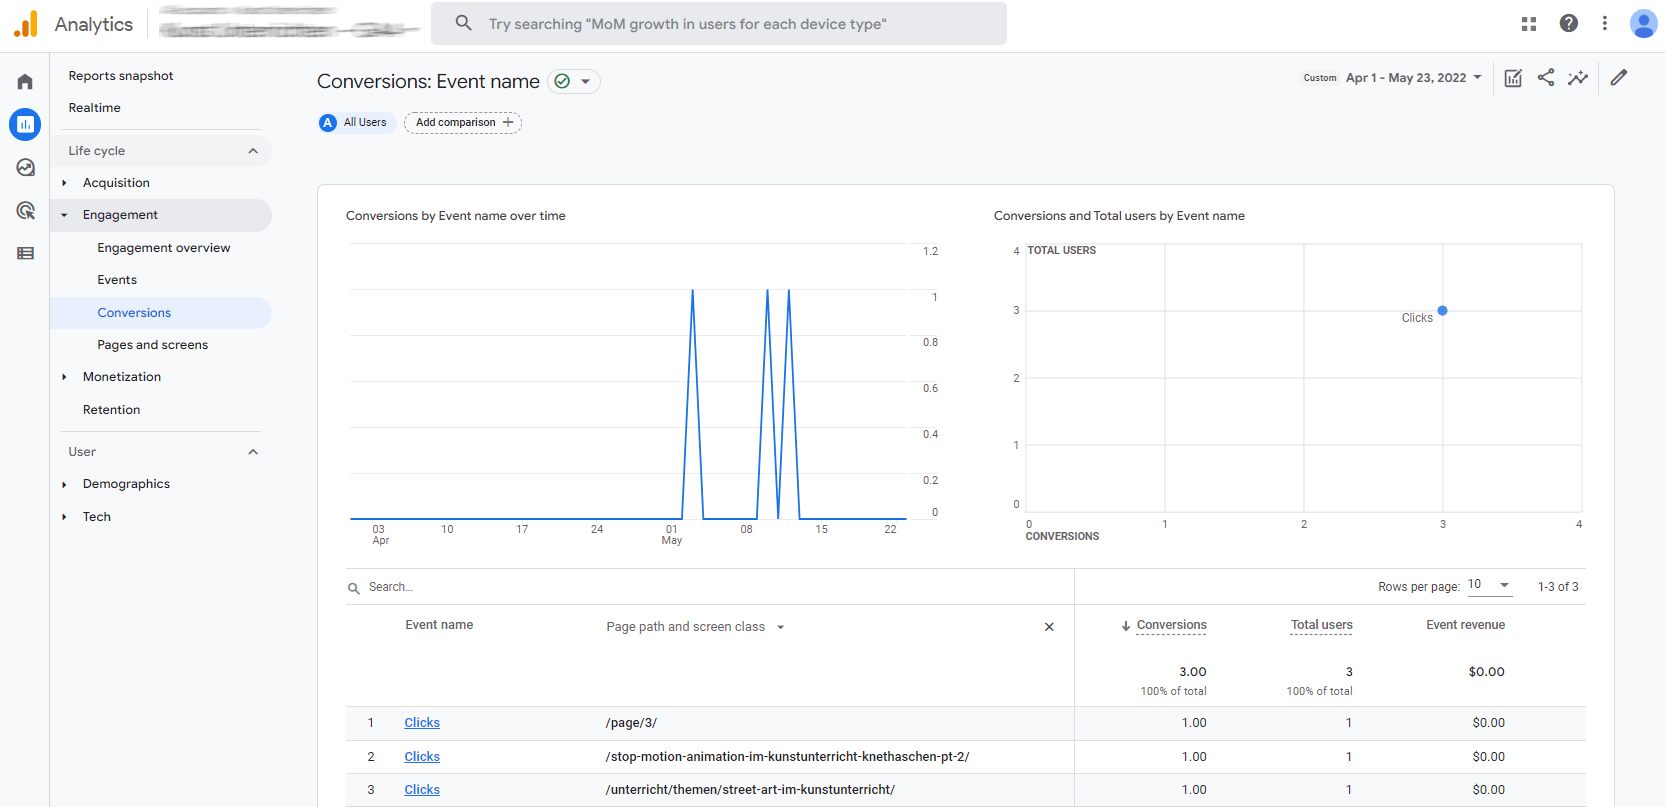
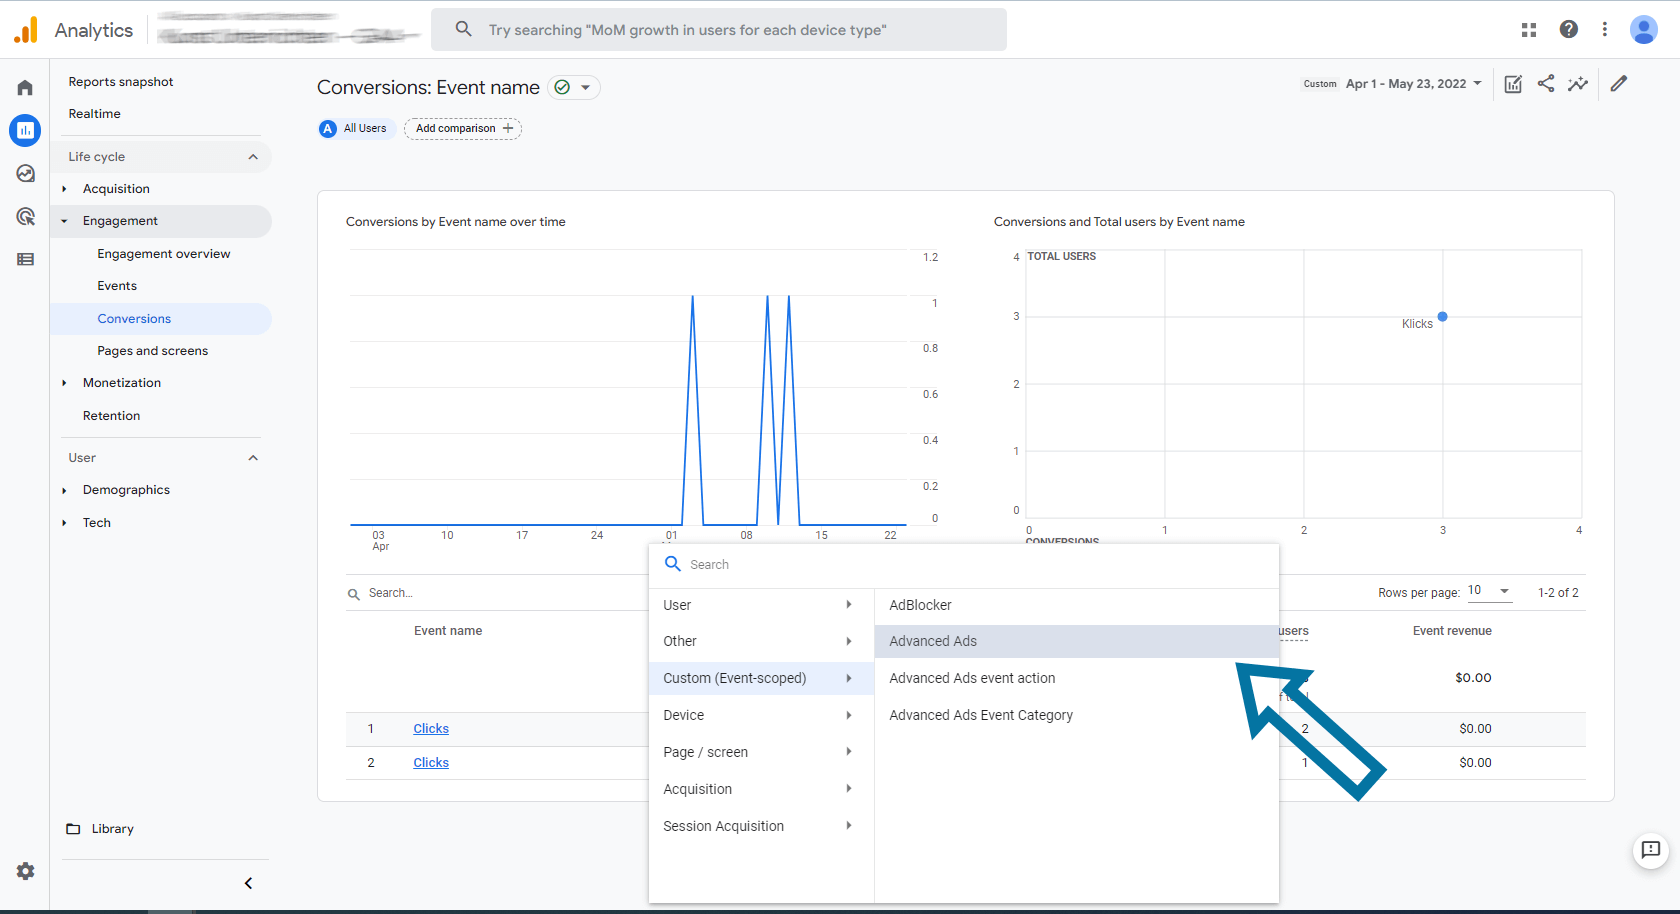
Instead of the Page path and screen report, you can also display the names of your ad units in this view.
Choose Custom (Event-scoped) > Advanced Ads from the popup selection.
Analytics quotas and limits
Google Analytics limits the number of events like ad impressions and clicks you can send to them.
You can find the current limits on this page and listed below:
- The limit for hits per page load is 20. Every second, this limit increases by 2. Hits include page impressions, ad impressions, clicks, and other custom events. Google Analytics does not count hits related to e-commerce here.
- There is an overall limit of 500 hits per session. Hits that exceed this limit will not be processed.
- The monthly hit limit is 10 million per property. Tip: You could create a new property to track ad impressions only or upgrade to Google Analytics 360.
What else do you need to know about Google Analytics ad tracking?
If you choose Google Analytics as the tracking method, the local tracking methods are disabled. That’s why some features of local tracking methods are unavailable in this case.
These limitations include email reports with statistics, click and impressions limits, the feature to spread impressions evenly over a given period, and the opportunity to track clicks and impressions on external pages or newsletters.
The ad tracking only works on pages that contain the Analytics code. E.g., it would not work if you integrated the ad code in a newsletter or on other websites delivered with the ad server placement.
Conclusion
This tutorial taught you how to track your ad performance using Google Analytics. The Advanced Ads Tracking add-on integrates seamlessly with Google Analytics. You can make data-driven decisions and analyze ad performance across multiple metrics by implementing ad tracking in Google Analytics.
Uncover valuable insights about your audience and make informed optimizations to achieve better results with your advertising strategy!
FAQ
Google Analytics tracks various metrics related to website traffic and user behavior. It provides insights into the number of visitors, geographical location, referral sources, page views, bounce rates, conversions, and more. The Advanced Ads Tracking add-on integrates seamlessly with Google Analytics and records ad clicks and impressions. Tracking these metrics lets you understand how users interact with your website and make data-driven decisions to improve your online presence.
After setting up Google Analytics, the data may not be immediately available in your reports. It’s important to note that Google Analytics operates on a processing delay, and it may take up to 24 hours for the data to appear in your account. So, be patient and check back later to analyze your tracking results.
To find ad impressions in Google Analytics, you can utilize event tracking. Set up the Advanced Ads Tracking add-on to record ad impressions and clicks. Once configured, you can find the ad performance data in your Google Analytics reports “Engagement” section. Navigate to “Events” and explore the reports related to ad impressions to get valuable insights.
To find your Google Analytics tracking ID, follow these steps:
1. Sign in to your Google Analytics account.
2. Go to the Admin section.
3. In the “Property” column, click on “Data Streams” and choose a web stream.
4. Your tracking ID will be displayed at the top of the page, starting with “G-” for Google Analytics 4, like G-TDVL1JBF3K.
5. Copy this ID and use it to set up tracking on your website.

