Advanced Ads offers you a way to add a headline above your ads. You can choose to display the ad label for all ads or only on specific Placements.
While not mandatory, AdSense suggests labeling your ads with either “Advertisements” or “Sponsored Links”.
Despite the AdSense program policies, you might want to add such advertisement labels to reduce confusion between your editorial content and ads.
Table of Contents
How to use the ad label feature
Enabling the ad label option
Go to Advanced Ads > Settings > General and enable the ad label option to activate it globally. You can type your phrase into the text field to customize it.
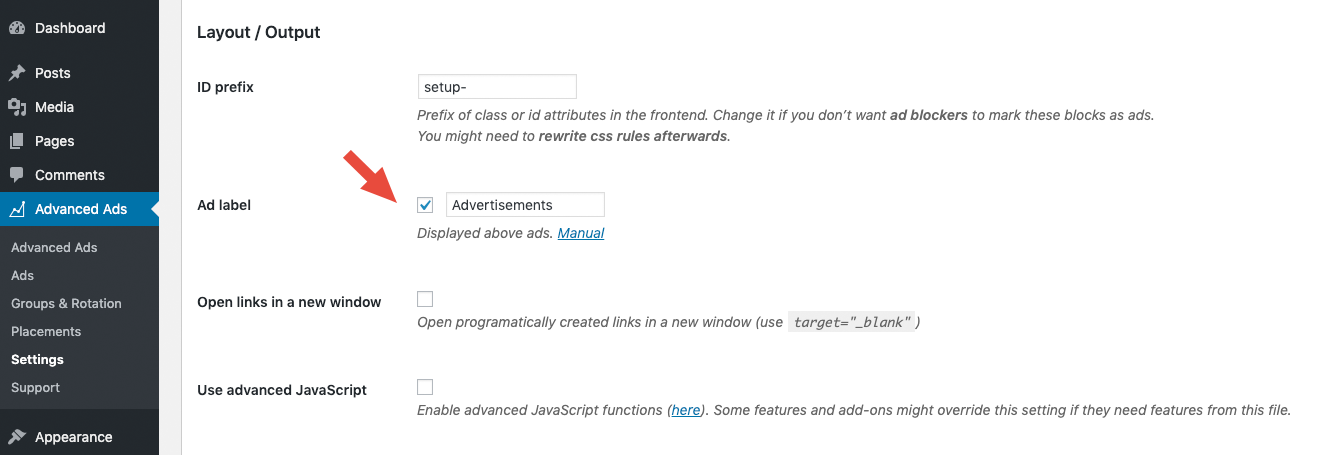
If you use Google AdSense, please keep in mind that only “Advertisements” or “Sponsored Links” are allowed according to the program policies.
Ad label settings in the Placements
Not all Placements offer the option to set an advertisement label (e.g., the invisible Header Code Placement for setting Facebook Pixels or similar source code).
Go to Advanced Ads > Placements and click on show all options. You can enable or disable the ad label individually for every placement.
For example, you can activate the ad label globally and deactivate it for specific placements. On the other hand, you can also deactivate the label globally and activate it only for selected placements.
The default option uses your general settings.
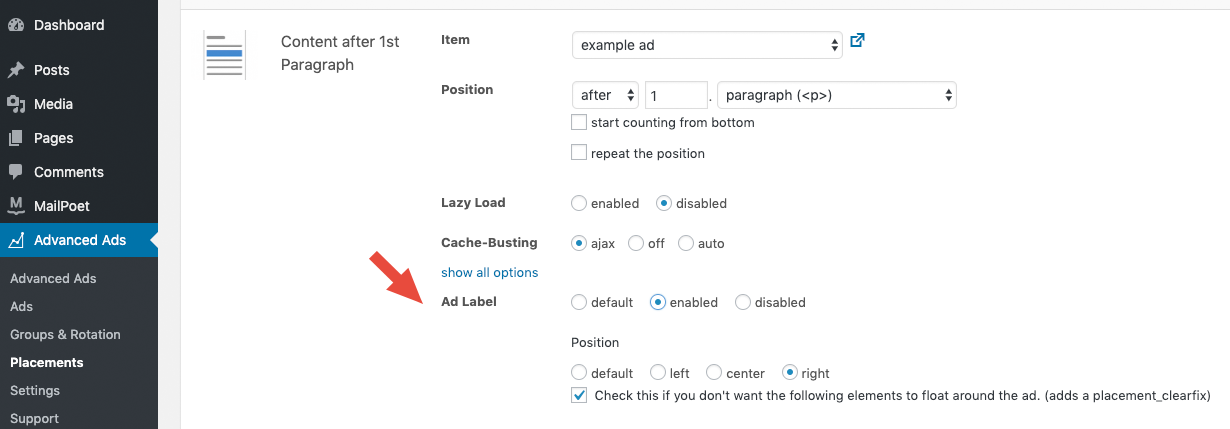
You can adjust the position of the placement and the ad label together for each placement, aligning it to the left, center, or right inside your layout. The default option uses the position you defined in the ad’s alignment settings.
Please note that an placement’s alignment overrides an ad’s position, which you have configured in an ad unit’s Layout/Output settings.
Customizing the ad label (for CSS professionals)
You can customize the style of your ad label with the use of some CSS. The styling of the label depends on your theme. If you are familiar with it, use the code snippets below to format the CSS and edit the PHP of your WordPress theme.
Use Advanced Ads Pro to style each ad and its appearance more easily with the Custom Code feature directly in the ad unit’s Layout/Output options.
Useful CSS classes and rules
The default HTML markup looks like this:
<div class="prefix-adlabel">Advertisements</div>
Please note that the class attribute might be adjusted depending on the prefix option you set up in the general settings of Advanced Ads. prefix- is just the sample prefix and needs to be exchanged with the setting found in the ID prefix option.
You can use this class to apply custom CSS rules to the ad label.
Alignment
To float the label left, even when the ad is centered, adjust, and use the following CSS rule:
.prefix-adlabel { text-align: left; }
Font size
To make the font size smaller, use this rule:
.prefix-adlabel { font-size: 0.8em; }
Position
To move the position of the label below the ad, try something like this:
/* adjust the ad wrapper */
.prefix-top {
position: relative;
margin-bottom: 20px; // depending on size
}
/* label element */
.prefix-adlabel { position: absolute;
    bottom: -20px; // depending on size
    left: 0px;
}
Adjusting the label code or markup
You can adjust the markup of the label using the advanced-ads-custom-label filter.
How to add a specific headline to AdSense ads
AdSense is very clear about headlines:
It’s important that visitors to your site are not misled in any way and are able to easily distinguish content from Google ads. This policy prohibits placing ads under misleading headings such as “resources” or “helpful links”. Publishers may only label ads with either “Advertisements” or “Sponsored Links”. No other variations are permitted.
This violation can be often seen in sidebars because widgets allow you to insert a headline by default. You can use one of the permitted advertisement labels now or just leave it blank. AdSense doesn’t require you to add a label if your ads can be distinguished from other content.
To enable labels for ads in other positions, you can use the following code in your theme’s functions.php. It will display the “Advertisement” heading above any AdSense ad.
// add "ad" headline before ads
add_action( 'advanced-ads-output-final', 'my_advanced_ads_headline', 10, 2 );
function my_advanced_ads_headline( $output, $ad ){
	// check if this is an AdSense ad
	if( $ad->type !== 'adsense' ){
	    return $output;
	}

	$headline = 'Advertisement';
	$output = '<fieldset><legend>' . $headline . '</legend>' . $output . '</fieldset>';
	return $output;
}Code language: PHP (php)
You can remove the check for the AdSense ad to display the headline for other ad types as well. Just remove line 5 to 7.
Use the advanced-ads-output-inside-wrapper filter instead of advanced-ads-output-final if you want to display the label within the ad wrapper.
To change the headline, just modify the string in line 9.
Copy this code to your functions.php, and it should work automatically.
Adding labels to AdSense Auto ads
Many people use the Auto ads feature by AdSense. As described in this tutorial, you can let AdSense automatically choose where to place ads on your website.
Depending on the advertiser, these Auto ads might already contain an advertisement label. Often you can find a small overlay title “Ad” or similar on the bottom right of the ad. You can add your own ad label by adding some CSS definitions to Auto ads’ genuine CSS class google-auto-place.
The following code injects an advertisement label above every AdSense Auto ad. Just add it to the “Additional CSS” section of your WordPress theme’s customization settings. You can also insert this code directly into the style.css of your theme.
.google-auto-placed {
font-size: 12px;
font-family: "Arial",sans-serif;
font-style: italic;
}

.google-auto-placed::before {
content: "Advertisements";
}Code language: CSS (css)
Of course, you can change the font size and other settings by adjusting the CSS.
The following code injects the label after the ad:
.google-auto-placed::after {
content: "Advertisements";
}Code language: CSS (css)