Ad Health is the part of Advanced Ads that informs you about potential problems or important changes in your ad setup. You can find it in the admin toolbar in your frontend or on the Advanced Ads Dashboard page in your WordPress backend.
Table of Contents
Disabling Ad Health
Ad Health is enabled by default. You can remove it by enabling the Disable Ad Health and other notices option in Advanced Ads > Settings > General > Admin.
Please enable Ad Health when you experience any problems or ads are not showing up. It might include the solution.
If you have questions regarding Ad Health or specific warnings then please reach out to us.
Ad Health in the frontend
The Ad Health menu in the frontend toolbar should help admins find potential problems in their ad setup. It will especially highlight problems on the current visited page.
The default no-issue state looks like this:

When an issue occurs, the menu is highlighted, and the error is displayed:
Some of the errors also link to the page where you can either fix the problem or read more about it.
If you don’t see the toolbar
You can go to your Users > Profile and enable the Toolbar option.

Not every theme supports the admin bar, which I find very unfortunate since it not only includes helpful links and shortcuts but plugins like Advanced Ads also have a chance to help you identify issues. If the Toolbar option doesn’t help then please reach out to your theme developer and ask for Toolbar support.
Features
The Ad Health bar comes with some handy features.
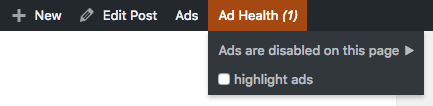
Highlight Ads
Click this to highlight current ad positions. Useful to spot ad spaces that are created with Advanced Ads but not showing up, e.g., when the ad network failed. It does currently only work with ads injected through placements.
Debug Google Ad Manager ads
This option only shows up when you are using ads managed with Google Ad Manager (formerly DoubleClick for publishers, DFP) on your site. When you click on it, the Google Ad Manager debug parameter will be added to the URL and the debug console will open.
Ad Health on the Ads Dashboard
You can see the Ads Dashboard by clicking on Advanced Ads in the menu of your WordPress backend. If there are warnings or notifications available then you might see a block like below.

Here are a few features of that box:
- The hide button (the crossed-out eye) hides critical warnings or removes temporary notifications completely. Only very severe problems don’t have such a button.
- Critical warnings can be made visible again by clicking on the button with the eye on it.
- You can disable Ad Health completely in Advanced Ads > Settings > General > Admin.
Warnings and solutions
The following list gives some information about warnings that might appear in Ad Health and how to fix them.
If you don’t find a warning here then it might be too specific to your site. Please reach out to us for a solution.
Ad blocker enabled
Problem: Your browser or firewall includes an ad blocker, and neither ads nor any ad related scripts load.
Solution: Switch off the ad blocker.
Ads are disabled in the content of this page
Problem: You enabled the option to hide ads in the content of the current page in the Ad Settings meta box.
Solution: Follow the link in the Ad Health menu to go to the correct box and disable the Disable ads on this page option.
Ads are disabled on all pages
Problem: No ads show up at all.
Solution: Go to Advanced Ads > Settings > General and disable the option to hide ads in the frontend.
Ads are disabled on non-singular pages
Problem: No ads show up on archive pages.
Solution: Go to Advanced Ads > Settings > General and disable the option to hide ads from non-singular pages.
Ads are disabled on this page
Problem: You enabled the option to hide ads on the current page in the Ad Settings meta box.
Solution: Follow the link in the Ad Health menu to go to the correct box and disable the Disable ads inside the content option.
Ads are disabled on 404 pages
Problem: You are currently seeing a 404 page, and no ads show up. It is a good thing, but we kept the warning in case you are wondering why no ads show up.
Solution: Go to Advanced Ads > Settings > General and disable the option to hide ads from 404 pages.
Auto ads code found
This message is not warning, because nothing should be wrong when you see it. It only lets you know that an AdSense Auto ads code was found.
This code is used to verify your AdSense account and to add Auto ads to your site.
You can change this in Advanced Ads > Settings > AdSense > Verification code and Auto ads.
It is also possible that you added this code through another plugin or directly in your theme.
For more details about AdSense Auto ads see this page.
Click Fraud Protection enabled
This warning appears if you enabled Click Fraud Protection in Advanced Ads > Settings > Pro and got banned from clicking too often on your own ads. This does not necessarily mean that other visitors also don’t see ads.
You can either delete all cookies in your browser or disable the CFP module in the settings.
Consent not given
The consent method was enabled in Advanced Ads > Settings > Privacy and you didn’t confirm that. You might not see ads due to the missing consent. You’ll find more information on this feature here.
Enable TCF Integration
Advanced Ads detected that your site uses a Consent Management Platform (CMP) that gathers consent based on the TCF 2.2 standard before showing ads. Enable the TCF integration so that Advanced Ads hides ads until users give their consent.
If this is a false positive then add the following code to your theme’s functions.php to disable the warning.
add_filter( 'advanced-ads-ad-health-show-tcf-notice', '__return_false' );Code language: JavaScript (javascript)Random AdSense ads
Problem: Ads from AdSense appear in random positions. These are set up automatically by AdSense.
Solution: Remove the Verification Code & Auto Ads option from Advanced Ads > Settings > AdSense or the Auto Ads feature in your AdSense account. Find more information about this here.
You can also disable AdSense-related warnings with the Disable violation warnings option in Advanced Ads > Settings > AdSense.
Set Disable Level Limitation to show more ads
Problem: You are using a content injection placement (e.g., Content, Below Content), but no ads are injected even though there are enough elements (e.g., paragraphs). It mostly happens when a plugin is wrapping the main content into multiple containers.
Solution: Go to Advanced Ads > Settings > General and activate the option Disable Level Limitation.
The current post ID is 0
Problem: The ID of the current page is 0, which means that no plugin can do anything with it. This can only be caused by a serious coding issue in a plugin or your theme.
We know that BuddyPress has plenty of pages that throw this error and it still seems to work in most cases. We still consider this an issue and reported it.
Solution: Find the causing plugin or theme and contact their developers about it.
Solution2: The BuddyPress behavior seems to collide with the Disable ads on 404 pages option under Advanced Ads > Settings > General. Disable that checkbox in case you are missing ads on the BuddyPress Activity page.
The dom extension(s) is not loaded
Problem: Ads are not injected into the content of your page.
Solution: We rely on the common dom extension to inject ads. You can ask your hosting company to switch it on to fix the issue.
The following responsive AdSense ads are not showing up
You will see this warning if an AdSense ad is placed in a container that has a float CSS rule and therefore won’t show up since AdSense can’t determine the available size. Your theme developer should know how to fix it.
the_content filter does not exist
Problem: Ads cannot be injected automatically into the content of your site.
Solution: Read this section.
the_content filter found multiple times
Problem: the_content is running multiples times, which might cause the ad code to appear more than once.
Advanced Ads uses the outer call to the_contentonly which fixes the problem automatically in most cases. Please reach out here if you don’t see any ads at all because of this feature.
Visible ads should not use the Header placement
This warning appears (with the IDs of the ads behind them) if an ad is using the Header Code placement. This placement type is meant to deliver codes that are in the part of your site’s code where only invisible scripts and meta values belong to and not for visible ads at the top of the site.
Technically, visible ads go into between <body>…</body> tags, while scripts often belong between <head>…</head> tag. The Header Code placement uses the latter and should therefore not deliver images, text, or other visible elements and tags. It could still work as expected but would then create invalid HTML code.
If you believe that this message is wrong then please reach out.
There are a couple of methods to deliver visible ads in the header. Please follow this tutorial.
You look like a bot
This warning appears if the so-called User Agent of your browser is wrong and looking as if you are not a human. It could have been modified by a third party service or a plugin.
You might either want to fix the cause or just ignore the warning. The only real consequence is that you won’t see ads if they are disabled for bots or have impressions or clicks being tracked with the Tracking add-on.
Your website is using HTTPS, but the ad code contains HTTP and might not work
Problem: If your website uses HTTPS (which is good), all external resources should also use it or might not work.
Solution: Ask the ad provider if they have an ad code for HTTPS sites available. Learn more.