The Post Content placement allows you to automatically inject ads into the content of your posts and pages based on paragraphs, headlines, images or any other element on your website.
Since ads within the content are the best performing ones, this placement can have a large impact on the ad revenue, if used correctly.
Table of Contents
Injecting an ad into the content
In order to inject an existing ad or ad group into the content of your posts, you need to create at least one Post Content placement. Go to Advanced Ads > Placements and create a new placement with the type represented by the following icon:

The placement you will now see in the list should look similar to the one on the next image:

In this example, the placement injects the ad with the title “Medium Rectangle” after the 2nd paragraph on each post.
Ad Injection elements
You can inject ads based on practically any element in the content.
- paragraphs
- headlines
- images (includes galleries)
- quotes
- iframes
- tables
- list items (
<li>) - containers (
<div>) - any element with visible text in it
You can also use the “custom” option to build your own injection rules.
Custom injection rules
The “custom” injection rule comes with a tool to help you pick the position of your ad in the frontend just by clicking on it with your mouse. Just click the select position button to start that tool.

A click on “select position” brings you to the last published post on your site. You can navigate to other pages by entering another URL directly or clicking on any link.
The frontend picker allows you to select any element that is technically in the content of your site (tech talk: everything wrapped in the the_content filter). This can be more than just the main blog text if you are using a page builder. The mouse cursor looks different when a position can or can’t be selected.
Here are a few examples on injecting ads using the “custom” option.
- enter
brto inject ads based on<br/>tags or any other specific HTML element. - enter
p/following-sibling::*[1][self::p]+ set the “before” position to only inject ads between paragraphs and not before any other tags, e.g., images. - enter
/p[following-sibling::*]to inject an ad after paragraphs with following paragraphs but not if it is the last paragraph in the content. - enter
/div[contains(@class, 'CLASS')]and replaceCLASSwith the exact classes of any element in the content to inject ads next to it. - enter
/p[contains(text(),"product")]to inject an ad based on paragraphs that contain the string “product”. - Use
/p[contains(.,"product")]to also look for the text in links or other elements with a paragraph. - You can target multiple elements by using this rule
/h2[position() = 3 or position() = 5 or position() = 7]. The “repeat the position” option needs to be checked.
While ads for most pre-defined options like “paragraph” or “headlines” are only injected if these elements include visible text, the “custom” option also counts elements without any text in them.
You can build more sophisticated rules based on XPath. Please find examples in the XPath cheatsheet. If you copy examples from there, start the rules with just one / instead of //.
Xpather is a recommended tool for testing XPath expressions.
Please note, that we cannot provide support for custom injection rules.
Advanced Options
These are options added by Advanced Ads Pro to especially extend the functionalities of the Post Content placement.
Repeat the position
Repeat the ad. E.g., if you set it to display after the second paragraph, checking this option would result in the ad to show up automatically after the fourth, sixth, eighth, etc. paragraph as well.
Note: not every ad network might support this. So far, we have learned that media.net doesn’t. AdSense ads work.
Parallax Ads
Enable a parallax effect for ad units with the “Image” ad type to place your ads with this eye-catching feature. Let them draw more attention and achieve higher click rates and dwell times.
In the effect settings, you can define how much height the placement will reserve to present the effect with either absolute or relative values.
Find more technical explanations, an integration guide—including recommended banner sizes—and examples in our tutorial about parallax ads in WordPress.
Minimum Content Length
Set a minimum length of the content before an ad is injected into it.
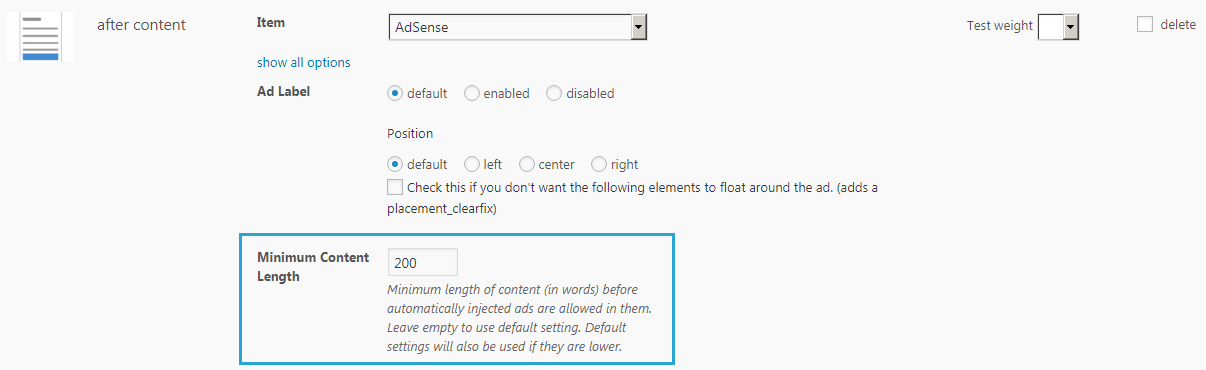
This option is available for the following placements: Before Content, Content, After Content, Random Paragraph, and Content Middle.
Words between ads
This option lets you define a minimum amount of words in a text section that is necessary before an ad will be injected. The option “Words between ads” will not inject an ad when the number of words after the last injected ad is less than the defined value. This includes paragraphs, headlines, and other text elements.
Prevent ad injection into the content
Pro adds a setting to the Ad Options meta box on the post and page edit pages to disable all automatic content injections for that specific page in the frontend.
Influencing the content injection
By default, the content injection works with the following criteria:
- Ads are injected into the main content of every single page for posts, pages, or other post types
- Technically, it uses the
the_contentfilter - The priority is set to
100, which normally means the ads are injected after other elements - Ads are not injected in the content on archive pages like category page or automatically created homepages
- Only elements on the first level of the content code are considered, e.g., no paragraphs in tables, or custom boxes. If Advanced Ads doesn’t find any element on the first level, it also looks for them within other elements two levels down
You can change any of the mentioned behavior using options or custom code on this manual page.
Content Injection Options
You find the general settings that can impact the post injection under Advanced Ads > Settings > General > Content Injection.
Unlimited ad injection
Some plugins and themes trigger ad injections, where it shouldn’t happen. Therefore, Advanced Ads ignores injected placements on non-singular pages and outside the loop. However, this can cause problems with some themes. Set this option to -1 to enable unlimited ad injection at your own risk. Please set it to 0 to keep it disabled or choose a positive number to enable the injection only in the first x posts on your archive pages.

Change the order of injected elements
By default, Advanced Ads tries to inject ads to the post content as late as possible. However, this might not always be your intention. To change the priority of the injection, use the following option in Advanced Ads > Settings > General.

Tip: Many plugins and themes use a priority between 1 and 20 for their injections, so when trying to find the right value, start with 10 or 20.
Disable Level Limitation
Advanced Ads ignores paragraphs and other elements in containers when injecting ads into the post content. Check this option to ignore this limitation and ads might show up again.
Custom solutions
Here are some custom solutions for issues with the content injection placements.
Prevent injection into specific elements
You can prevent automatic ad injection into specific elements by adding the .advads-stop-injection class.
You can add your own elements with the custom code explained here.
Ad injection without the_content()
If your theme can not use the the_content function, but get_the_content() or a similar approach, you can apply the ad injection manually using a line like this in your theme:
echo Advanced_Ads::get_instance()->inject_content( get_the_content() );
Ad injection with a different filter
You can use ad injection on content that uses a different filter, too, when Advanced Ads Pro is enabled. Just set the ADVANCED_ADS_PRO_CUSTOM_CONTENT_FILTER constant in your wp-config.php like in the example below. Replace YOUR_FILTER with your filter string.
define( 'ADVANCED_ADS_PRO_CUSTOM_CONTENT_FILTER', 'YOUR_FILTER' );
Debugging
The content injection can break for various reasons. Mostly, because of a broken ad code or when the paragraphs can not be counted due to a broken tag. Such issues will be captured in the error log or displayed below the ad when you have WP_DEBUG enabled in your wp-config.php.