If you monetize your website by selling Amazon products, you’re engaged in traditional affiliate marketing. One of your core topics as an Amazon affiliate is integrating these products into your content.
The Amazon affiliate program provides you with various advertising tools for this purpose. In our tutorial about Amazon affiliate marketing, I describe their appearance and how to embed them in detail. I also mention using third-party Amazon plugins along with Advanced Ads to inject Amazon products.
In this tutorial, I will look closely at integrating one of them, AAWP (Amazon Affiliate WordPress Plugin), with Advanced Ads. AAWP offers an elegant way of creating appealing Amazon Ads. You’ll learn how to automatically insert them into your website content using Advanced Ads and how to optimize their performance with display and visitor conditions.
Table of Contents
Ad formats that you can create with AAWP
Amazon provides all kinds of information and images about the products via API (Application Programming Interface). But accessing this data manually is almost impossible. That is why most webmasters cannot use it without external help.
This is where AAWP comes into play. With this plugin’s help, you may display Amazon products on your website in attractive product boxes, bestseller lists, comparison tables, and more with just a few clicks. In addition, importing individual data fields, e.g., product images or buttons, is possible. These products and their prices also get regularly and automatically updated.
The simple creation of products and the foolproof integration save enormous amounts of time and offer high flexibility in their optimization.
Note: If you have an active All Access license for Advanced Ads, you can find a 20 % discount code for the awesome plugin AAWP in your account. AAWP is one of the best Amazon affiliate plugins for WordPress, and I highly recommend it for Amazon affiliate websites.
Product boxes
The core function of AAWP is to show products in appealing product boxes. They contain a lot of product information, which you can adapt to the website’s layout. For example, you’ll be able to display the ratings, sales-promoting discounts, and prices in addition to the product image.
Moreover, the AAWP plugin allows you to change the product’s title and description. Of course, the buy button and the Amazon Prime logo also automatically include your affiliate link. As you can see, the possibilities for product box design are huge.
Using a grid view or table template, you can embed several product boxes together. I use this successfully to promote products mentioned and recommended in an article. AAWP automatically adds a product image, the reviews, and the price.

Lists
Another excellent way to promote specific articles from Amazon is embedding product lists. As the name already says, the plugin offers to display multiple products in concise lists. Of course, you can customize the template and the appearance of these lists.
AAWP allows you to create lists of the most popular or the newest products in a particular Amazon category and updates them every hour.
Comparison tables
Especially for product comparisons, tables represent a great added value for every Amazon affiliate partner. Without a dedicated plugin, you’d have to build such tables by hand.
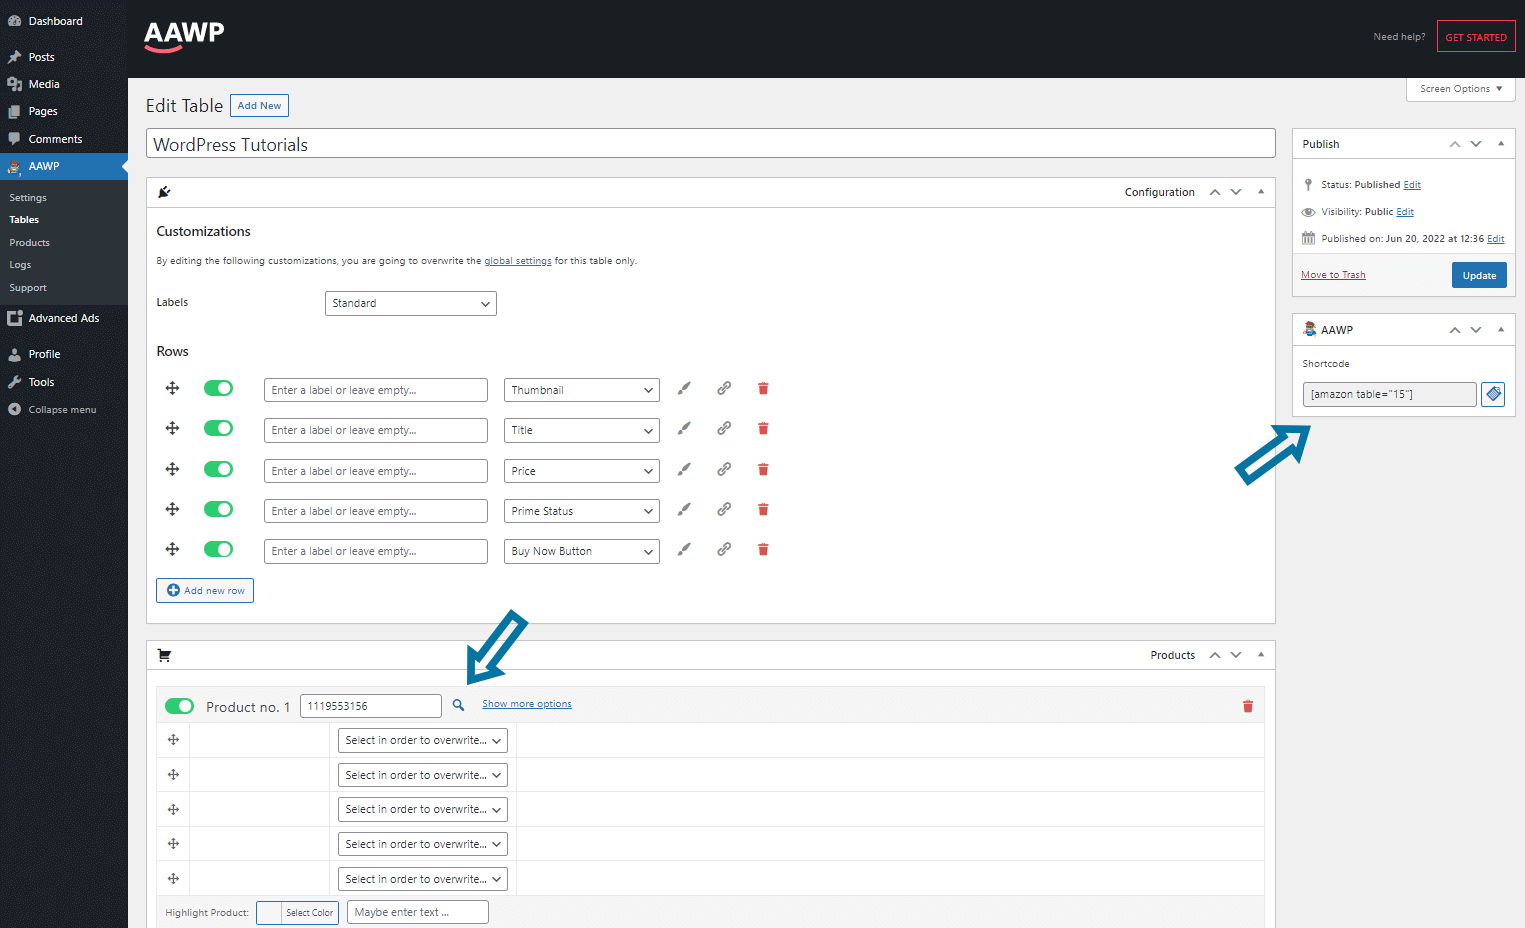
AAWP lets you create these comparison tables quickly and easily. For this purpose, you will find a separate, intuitive table tool in the backend in Dashboard > AAWP > Tables.
When you create a new table, you can add products from the Amazon store via a search field and define which data AAWP should automatically import into the table. For example, you might limit those to only the picture and the price, or you may include the rating and specific properties of the item, too.
Add these comparison tables to your site with their shortcode or the interactive AAWP Gutenberg block, just like you can do with any AAWP ads if you don’t create them with the “Amazon Products” ad type that I will introduce below.

Data fields
Using data fields, you can automatically output specific Amazon product data. This could be the price, the product title, the star rating, or the buy buttons.
Use a shortcode or the interactive Gutenberg block to integrate these data fields at any position on your website. Or you can use them in a custom template or a comparison table.
Embed AAWP ads with Advanced Ads
After you decide on how to display one or more products with AAWP, the next step is to create them and insert them into the posts and pages of your website. However, it is pretty time-consuming to do this manually.
If you use Advanced Ads for this task instead and insert these ads automatically, you will save a lot of time. Besides, the automatic injection allows you to optimize the performance of these ads, e.g., by better targeting users and content or by split testing placement and ads. But let us first create the product.
Create ads using the Amazon Products ad type
If your website has Advanced Ads and AAWP installed, you will find a new ad type to choose from the selection: “Amazon Products”.
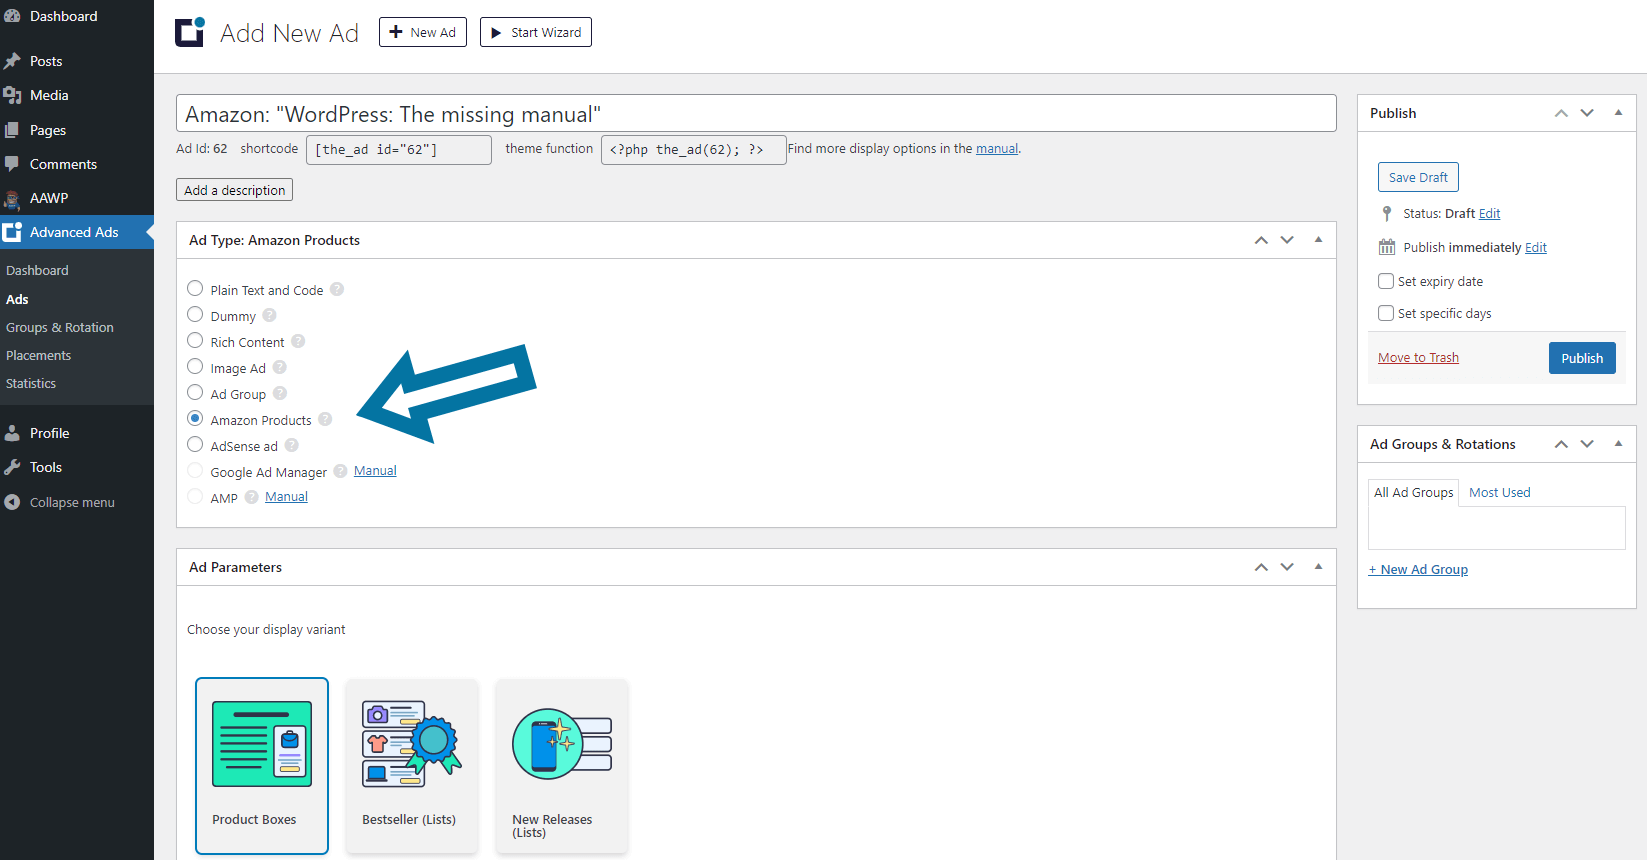
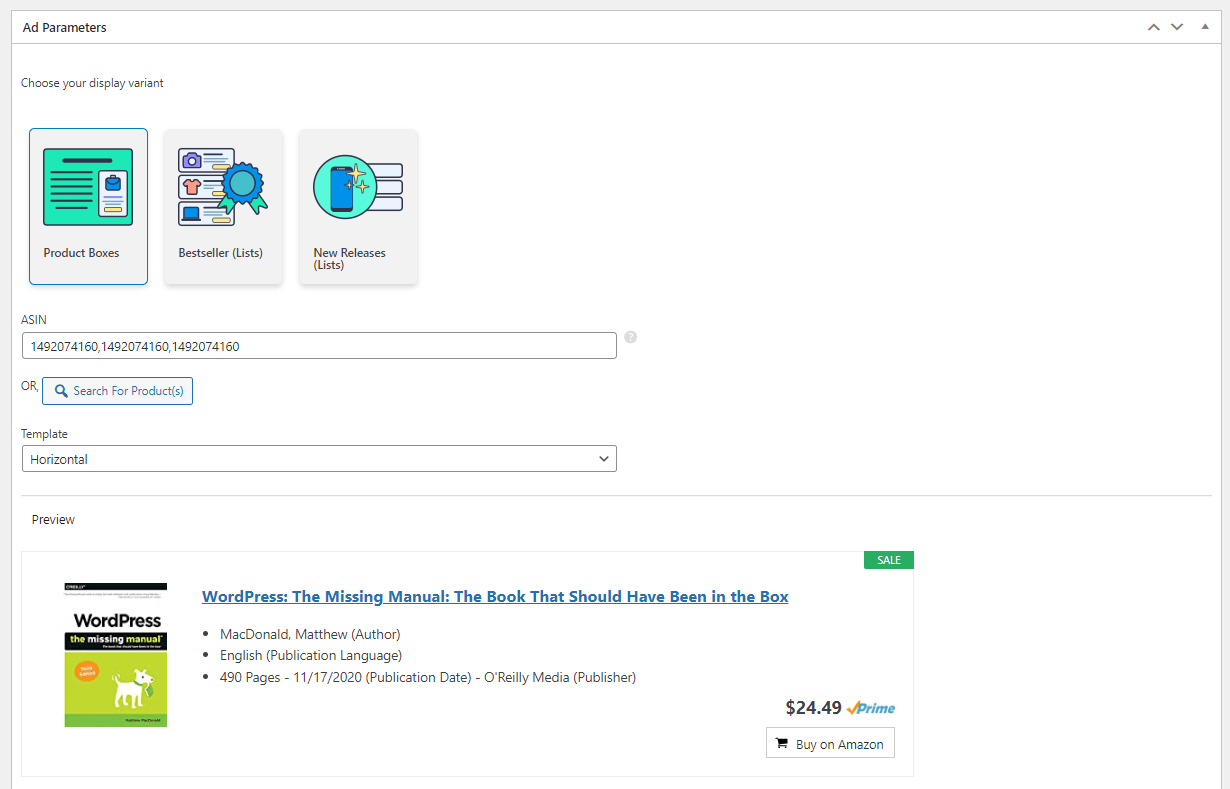
The “Amazon Products” ad type allows you to search for Amazon products directly from the backend when creating a new ad and display them as a product box or as various product lists.
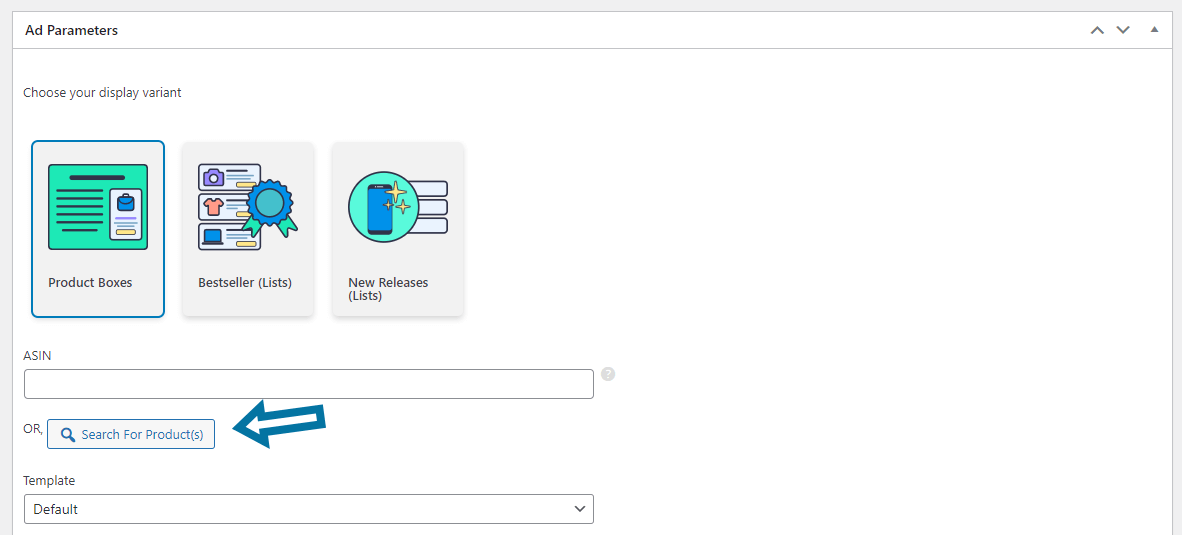
Click the “Search for Products” button and use the input field in the opening window to select the product you want to integrate with AAWP.

If you want to create a product list, enter keywords into the search field and AAWP will offer products to add to your list.
Furthermore, the “Amazon Products” ad type allows you to customize these ads by selecting different templates.
After creating your product box or list, click “Publish” and publish the ad.
You can insert it into your content like any other ad unit from Advanced Ads. I’ll explain a little further down how this works exactly.

Create ads using the AAWP shortcodes
If you don’t use the “Amazon Products” ad type, you can also insert all AAWP ads via shortcode. This is also necessary for some ad types like comparison tables or the data fields, which you cannot create using the “Amazon Products” ad type.
Find the shortcodes for product tables on the overview page in your backend under Dashboard > AAWP > Tables, respectively, in the Edit view of each individual table.
You can also generate shortcodes for product boxes or lists on the Amazon website. For this task, AAWP offers a dedicated browser extension. With its help, you are able to create and customize the shortcodes in a few clicks.
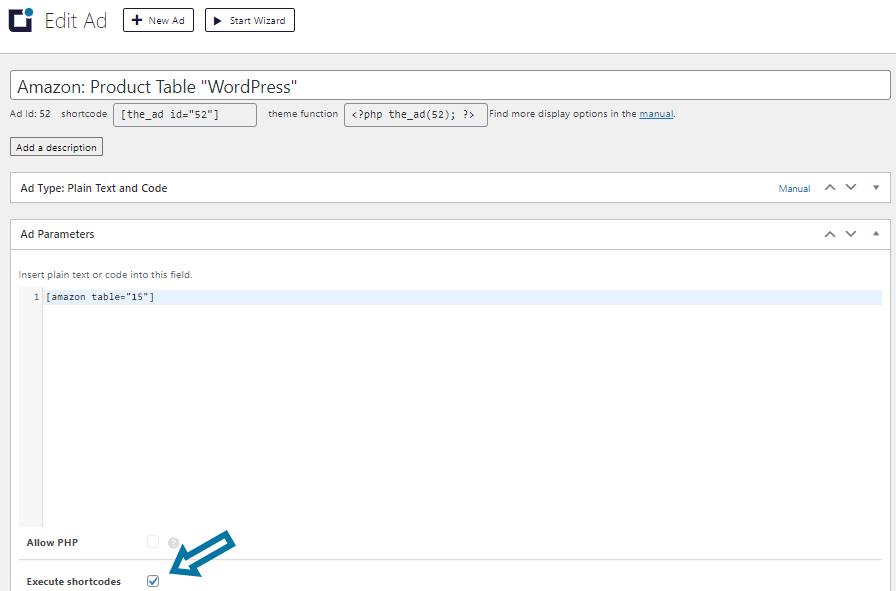
To automatically inject these AAWP shortcodes, you must create a separate ad unit in Advanced Ads for each. To do this, select the “Plain text and code” ad type and set a descriptive title that indicates what product this ad contains.
Then copy the AAWP shortcode into the Ad Parameters field of this new ad unit in Advanced Ads. Make sure to activate the checkbox that allows executing shortcodes.
Afterward, publish the ad and let Advanced Ads embed it into your website.
Choose placement
After you publish the ad, the next step is automatically inserting it into your website’s content. The easiest way to do this is to either create a new placement for this ad or to assign it to an existing placement.

After assigning an ad to a placement, Advanced Ads will now automatically embed it at the selected position on your website. You can specify exactly where these products should appear, e.g., after the second paragraph, at the end of the post, in the sidebar, or at any other position that suits your taste.
Now that you’ve set up a placement for the ads and Advanced Ads integrates them into your website, it’s time for some optimization.
Optimize the performance of the AAWP ads
Track the performance of AAWP ads
The basis for optimizing ad performance is reliable tracking data for individual ads created with AAWP.
If the Tracking add-on is enabled, you can track the impressions and clicks of all AAWP ads on your website using any of the provided tracking methods of Advanced Ads. It doesn’t matter if you included these ads with the “Amazon Products” ad type or with a shortcode using the “Plain text and code” ad type.
After all, we also want to determine these ads’ click-through rate (CTR), so we need the precise number of ad impressions in comparison to the tracked clicks.
Advanced Ads automatically determines the CTR value for each ad unit if you choose one of the local tracking methods and don’t track exclusively with Google Analytics. You can find these values on the statistics page (Dashboard > Advanced Ads > Statistics).
The CTR indicates how many users who see an ad also click on it. It is usually expressed as a percentage.
CTR = Number of clicks/Number of impressions *100%
CTR = 150 (clicks) / 10.000 (impressions) *100% = 1,5%
The CTR from the example above means that out of 10,000 users who saw the ad, 150 clicked on it.
You could now try to improve this value through clever optimization. Imagine you succeed in increasing the CTR to 3% through intensive testing, better targeting, and more powerful placements. This would correspond to a doubling of the users forwarded to Amazon and, ideally, the sales generated as a result.
Track clicks on specific products from lists and tables
If you need to track clicks on specific products, e.g., because you want to analyze which products in a list perform best, enable the AAWP click tracking in AAWP > Settings > General. It supports Google Analytics and Matomo. You can choose if those clicks should appear with their ASIN (Amazon Standard Identification Number) or their product title in the Google Analytics reports.
Find the best-performing products, formats, and layouts
Advanced Ads offers the option to rotate different ads in the same position. This way, you can easily set up split tests to compare the performance of different ad types against each other. For example, you could test whether the CTR changes noticeably when you include the same product in different templates.
Also, test different but related products against each other to see which one has the highest click-through rates. Identify “low-click” products and show the winners of your tests instead.
Improve the content targeting
You can increase your AAWP ads’ performance by ensuring that the advertised products best match the content you’re placing them in. For this targeting, Advanced Ads offers you numerous display conditions.
With the help of these conditions, you can, for example, specify that an ad should only be included in posts of a particular category or a specific tag.
If you want to target the ad even more precisely, use the Post content display condition. This option allows you to display ads only if the content contains one or more specific keywords.
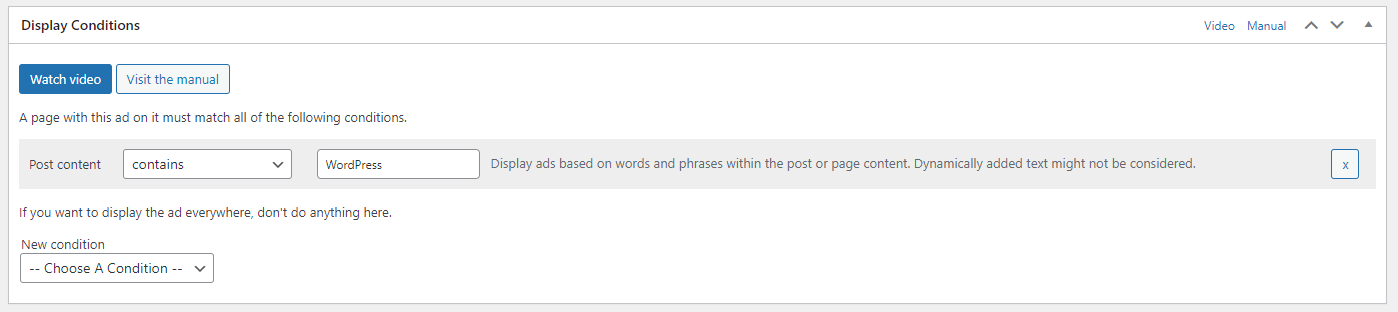
In that manner, for example, you could show a comparison table of WordPress manuals only in posts containing the keyword “WordPress”.
Another way to optimize ads is to target specific user groups. Advanced Ads provides you with many visitor conditions to choose from and use to narrow down precisely which users should see your ads. For example, by device, geo-location, or referrer URL.
This way, you could show alternative ads from other networks to users from a specific region or with mobile devices if those were to convert better.
Test different placements
But it’s not just the content and targeting that influence ad performance. The ad position on your website can also lead to significantly different results. Do you know whether your ad performs better in the middle or at the end of an article? Test it!
You can detect such levers of optimization with the help of placement tests. Here, you’ll define one or more placements that you want to test against each other. Advanced Ads will then perform an A/B test on each page view and display one of the selected placements. The other placements will not be loaded.
In that wise, you can measure if the CTR varies for different placements and later decide on the better-performing variant.
To correctly compare these results for product boxes and product tables, I advise creating a separate ad for each placement to be tested. The quickest way is by using the duplicate ads feature to set up split tests for these ads.

Put your conclusions into action
After you have measured the performance of your ads and tested different variations and positions against each other, you will have gained insights into how clicks and sales are generated on your website and where readjustments are in order.
If you had hoped to learn about achievable CTR ranges by the end of this article, I can only give you a cautious answer. Since this value depends heavily on how closely your content relates to the products advertised and how inclined your visitors are to act on their interest—i.e., to actually buy the product at that time—there is no general answer. But if you do everything right (and with a bit of luck), a CTR of 2 to 8% is within the realm of possibility.
But instead of pondering over such numbers, I advise you to compare the CTR of your ads before and after optimization. After all, this improvement step should be your true goal.